CW:CityWater Scenarios: Difference between revisions
| Line 32: | Line 32: | ||
Changes to a scenario can be made by selecting the scenario in the Project Details page and clicking on the '''Edit''' button. This will take you to the Edit Scenario page. This page has the following options: | Changes to a scenario can be made by selecting the scenario in the Project Details page and clicking on the '''Edit''' button. This will take you to the Edit Scenario page. This page has the following options: | ||
*'''Edit and Re-Run Model''' – This will go to the Map page where elements can be selected and properties changed. Once the changes have been saved, the '''Model Run''' button can be used to re-run the model. | *'''Edit and Re-Run Model''' – This will go to the Map page where elements can be selected and properties changed. Once the changes have been saved, the '''Model Run''' button can be used to re-run the model. | ||
* '''Reset Map Layers''' – Refreshes the layers from the geoserver. | * '''Reset Map Layers''' – Refreshes the layers from the geoserver in instances where there layers need to be rendered again. | ||
* Name – The scenario name can be changed in this field. | * Name – The scenario name can be changed in this field. | ||
* Description – This field allows editing, deleting, or adding to the scenario description. | * Description – This field allows editing, deleting, or adding to the scenario description. | ||
Revision as of 16:56, 14 April 2017
Scenarios are available to accounts with administrative access. Using scenarios allows creating variant simulations of the project. With scenarios, basic properties can be changed in the model then the model can be run again to show how the change affected the model. Each project can have a multiple scenarios attached to it.
Note: If results from a scenario lead to a change in the base model—e.i. the results from the scenario are more accurate than the base model so the scenario inputs are to be used for future scenarios—it is recommended you create a new project with correct inputs.
Creating Scenarios
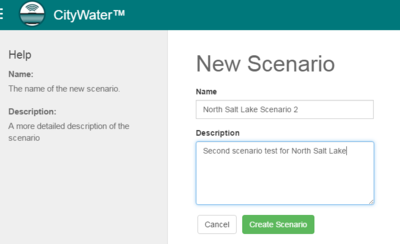
New scenarios are created from the Project Details page. Administrators will see a New Scenario button. Clicking this button will bring up the New Scenario page.
The New Scenario page has the following options:
- Name
- Description – This is the description that will appear in the Project Details page after the scenario has been created.
After clicking the Create Scenario button, CityWater will generate a duplicate of the model. It may take several minutes for the process to finish.
Making Scenario Changes
After creating a new scenario, you will be taken to the Map page. This version of the Map page is different than what can be accessed from the main project page. This version allows element values to be changed. Selecting any element to access the element's properties. Any of the values for an element properties can be changed. Select the Save Changes button after making the desired changes for an element's properties.
Running the Scenario
Once changes have been made in the scenario, the Run Model button becomes active. It may take several minutes for the model run to start and finish.
Scenario Status
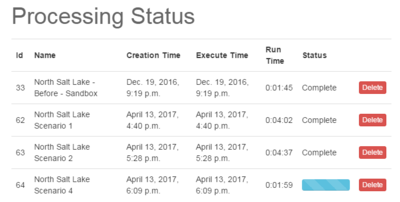
During the model run you will be taken back to the Project Details page. While the project is being processed a Status section will appear. Clicking the Status button will take you to the Processing Status page.
On the Processing Status page you can view all of the scenarios attached to the project. The Run Time for each scenario will vary based on the model size and server capacity. The Delete button on this page will only remove the scenario from teh Processing Status page. A scenario cannot be deleted from this page.
Viewing and Editing the Scenario
Once a scenario has been created, it can be viewed from the Project Details page. A list of available scenarios will be shown in the drop-box on the left of the page. Selecting the desired scenario will update the Project Details to show results for the scenario's model run. All tabs in the Project Details page display the results for the current selected scenario only. If the model run was not completed for the selected scenario, many of the fields will be empty.
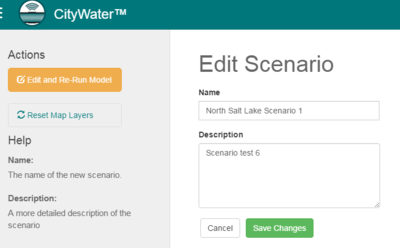
Changes to a scenario can be made by selecting the scenario in the Project Details page and clicking on the Edit button. This will take you to the Edit Scenario page. This page has the following options:
- Edit and Re-Run Model – This will go to the Map page where elements can be selected and properties changed. Once the changes have been saved, the Model Run button can be used to re-run the model.
- Reset Map Layers – Refreshes the layers from the geoserver in instances where there layers need to be rendered again.
- Name – The scenario name can be changed in this field.
- Description – This field allows editing, deleting, or adding to the scenario description.
Related Topics
CityWater | ||
|---|---|---|
| Articles: | Overview • Project Details • Project Map • Project Schematic • Scenarios • User Management |  |
| Support: | Tutorials • Convert NET File • What's New in CityWater • Release Notes • Terms and Conditions | |
| Aquaveo | ||


