CW:CityWater Overview: Difference between revisions
No edit summary |
|||
| (32 intermediate revisions by 4 users not shown) | |||
| Line 1: | Line 1: | ||
{{TOCright}} | {{TOCright}} | ||
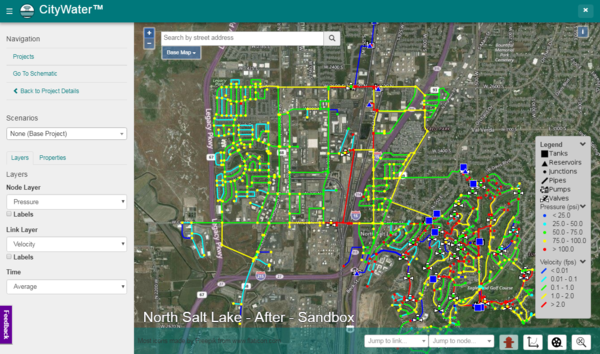
CityWater is the premier EPANET web application for water distribution management. The intuitive, interactive presentation and access-anywhere convenience of CityWater allows you to unlock the data in your EPANET models and add value to the everyday operations of your distribution system. Plus, the subscription-based pricing means you don't need to pay for expensive software you don't use. | CityWater is the premier EPANET web application for water distribution management. The intuitive, interactive presentation and access-anywhere convenience of CityWater allows you to unlock the data in your EPANET models and add value to the everyday operations of your distribution system. Plus, the subscription-based pricing means you don't need to pay for expensive software you don't use. | ||
*Visualize the distribution of pressure, head, velocity, flow and other important variables on an interactive web map. | |||
*Present model results anywhere and at a moment's notice using your phone, tablet, or laptop. Look up any network property or model result on the go by accessing CityWater on your phone. | |||
*Plot how model results like pressure or velocity change over time and export the plot to an image to share with contractors or place in a report. | |||
*Enhance your understanding of your network and quickly identify inefficiencies with the conceptual schematic view and analysis tools. | |||
*[http://www.aquaveo.com/software/citywater-pricing Purchase CityWater here.] | |||
*[http://www.aquaveo.com/software/citywater-pricing Purchase CityWater] | |||
[[File:Citywater1.png|thumb|none|600 px|CityWater map example]] | [[File:Citywater1.png|thumb|none|600 px|CityWater map example]] | ||
| Line 10: | Line 12: | ||
==CityWater Advantages== | ==CityWater Advantages== | ||
*Convenient subscription-based access | *Convenient subscription-based access | ||
*Works on most operating systems and devices: | *Works on most operating systems and devices: Windows<sup>®</sup>, macOS<sup>®</sup>, Android™, iOS<sup>®</sup>, etc. | ||
*No installation required—only a modern web browser is needed | *No installation required—only a modern web browser is needed | ||
*Upload any EPANET input file and access it on all devices | *Upload any EPANET input file and access it on all devices | ||
| Line 23: | Line 25: | ||
# Go to the Aquaveo portal at: [https://portal.aquaveo.com/ portal.aquaveo.com]. | # Go to the Aquaveo portal at: [https://portal.aquaveo.com/ portal.aquaveo.com]. | ||
# Enter your login and password to sign to your CityWater account. | # Enter your login and password to sign to your CityWater account. | ||
# Complete the CAPTCHA section, entering the characters shown in the image. | |||
# Press Enter or click the '''Login''' button. | # Press Enter or click the '''Login''' button. | ||
===Password Reset=== | ===Password Reset=== | ||
| Line 36: | Line 39: | ||
==Applications Library== | ==Applications Library== | ||
When first signing into the Aquaveo portal, you will see the Apps Library page. This page shows all application connected to the account. CityWater should be listed as an available application. Any other applications you have purchased will be | When first signing into the Aquaveo portal, you will see the Apps Library page. This page shows all application connected to the account. CityWater should be listed as an available application. Any other applications you have purchased will also be listed on this page. | ||
[[File:AppLibraryPage.png|thumb|none| | [[File:AppLibraryPage.png|thumb|none|420 px|Example of the App Library page]] | ||
==Account Profile== | ==Account Profile== | ||
[[File:AccountSettings.png|thumb| | [[File:AccountSettings.png|thumb|420 px|Example of the account settings page]] | ||
In the upper right corner of the Aquaveo Portal, you should see your name or the name of your company. Clicking on this name will take you to the Account Settings page. On this page, the following information is listed: | In the upper right corner of the Aquaveo Portal, you should see your name or the name of your company. Clicking on this name will take you to the Account Settings page. On this page, the following information is listed: | ||
* The account owner's name | * The account owner's first name | ||
* The account | * The account owner's last name | ||
* The account | * The account username | ||
* The account password (with characters hidden) | * The account password (with characters hidden) | ||
* Application programming interface (API) key token | |||
* The account owner's email | * The account owner's email | ||
* Date the account was created | * Date the account was created | ||
| Line 61: | Line 65: | ||
Your projects will all be displayed on the project page. This page appears first after clicking the CityWater application button. | Your projects will all be displayed on the project page. This page appears first after clicking the CityWater application button. | ||
The project page will list all of your projects by name and show a brief description along with the date the project was created. Clicking on the project name will open the project details for the project. Clicking the '''Map''' button will take you to the map page for the project. Clicking the '''New Project''' button starts the process of creating a new project in CityWater. | The project page will list all of your projects by name and show a brief description along with the date the project was created and who created it. Clicking on the project name will open the project details for the project. Clicking the '''Map''' [[File:CityWater - Map button.png|35 px]] button will take you to the map page for the project. Clicking the '''New Project''' button starts the process of creating a new project in CityWater. | ||
[[File:CityWater ProjectPage Admin.png|thumb|none| | [[File:CityWater ProjectPage Admin.png|thumb|none|420 px|Example of the project page]] | ||
===Create a New Project=== | ===Create a New Project=== | ||
[[File:NewCityWaterProject.png|thumb| | [[File:NewCityWaterProject.png|thumb|400 px|Example of the new project page]] | ||
A new project can only be created using an administrator account. Viewer accounts will not show the '''New Project''' button. After clicking the '''New Project''' button, you will come to the New Project page. Enter the basic information for the project on this page. | A new project can only be created using an administrator account. Viewer accounts will not show the '''New Project''' [[File:CityWater_new_project_button.PNG |20 px]] button at the top right of the page. After clicking the '''New Project''' [[File:CityWater_new_project_button.PNG|20 px]] button, you will come to the New Project page. Enter the basic information for the project on this page. | ||
*'''''Name''''' | *'''''Name''''' | ||
::The name of the new project. | |||
The name of the new project. | |||
*'''''Description''''' | *'''''Description''''' | ||
::Allows for a more detailed explanation of the project. | |||
Allows for a more detailed explanation of the project. | |||
*'''''Organizations''''' | *'''''Organizations''''' | ||
::Projects will be accessible to the members of the organizations to which the project is assigned. | |||
Projects will be accessible to the members of the organizations to which the project is assigned. | |||
*'''''Spatial Reference System''''' | *'''''Spatial Reference System''''' | ||
::The spatial reference system that was used to define the spatial features of your EPANET project. If you don't know the spatial reference system or no spatial reference system was used to create your EPANET project, then leave it blank. You may want to use [http://spatialreference.org/ spatialref.org] to help you identify the appropriate spatial reference system. | |||
The spatial reference system that was used to define the spatial features of your EPANET project. If you don't know the spatial reference system or no spatial reference system was used to create your EPANET project, then leave it blank. You may want to use [http://spatialreference.org/ spatialref.org] to help you identify the appropriate spatial reference system. | |||
The Spatial Reference System field allows partial entries. Once part of a spatial reference system has been entered into the field, CityWater will search for possible spatial reference systems that match the partial entry and present a list of options. Select the spatial reference system you want to use from the list. It may take CityWater a few moments to generate the spatial reference system list based on the partial entry. | ::The Spatial Reference System field allows partial entries. Once part of a spatial reference system has been entered into the field, CityWater will search for possible spatial reference systems that match the partial entry and present a list of options. Select the spatial reference system you want to use from the list. It may take CityWater a few moments to generate the spatial reference system list based on the partial entry. | ||
*'''''EPANET Input File''''' | *'''''EPANET Input File''''' | ||
::Upload the EPANET input file (*.inp) for your project. Click the '''Browse''' button to bring up an Open dialog to located and upload the input file. If you have a NET file, it can be [[Citywater Convert NET File to INP File|converted to an INP file]] using EPANET. | |||
Upload the EPANET input file (*.inp) for your project. Click the '''Browse''' button to bring up an Open dialog to located and upload the input file. If you have a NET file, it can be [[Citywater Convert NET File to INP File|converted to an INP file]] using EPANET. | |||
*'''''Peakday Fire Flow (Optional)''''' | |||
::Run available peakday fireflow for whole model. This option, when turned on, will calculate the fireflow at each junction for the entire model. When turned on, the Peakday Time and Residual Pressure must be entered. While Fireflow Options can be specified for the entire model when you are creating the project, they can also be specified for parts of a model afterwords. | |||
::Note that this option requires an account with the Fire Flow Analysis add-on. Also note that when creating a project with fire flow analysis, the processing time for creating the project can be significantly increased. | |||
===Edit Project=== | ===Edit Project=== | ||
| Line 96: | Line 95: | ||
#Select the project name to go to the Project Details page. | #Select the project name to go to the Project Details page. | ||
#Under Actions, select the '''Edit''' button to open the Edit Project page. | #Under Actions, select the '''Edit''' button to open the Edit Project page. | ||
The | The Project Name, Description, Organization, and Spatial Reference System can be edited. The EPANET Input File cannot be edited. | ||
===Delete Project=== | ===Delete Project=== | ||
| Line 112: | Line 111: | ||
==Project Schematic== | ==Project Schematic== | ||
The Schematic page provides a simplified visualization of the conceptual zones and provides a high level overview of the most important elements in the model. See [[CityWater Project Schematic|CityWater Project Schematic]]. | The Schematic page provides a simplified visualization of the conceptual zones and provides a high-level overview of the most important elements in the model. See [[CityWater Project Schematic|CityWater Project Schematic]]. | ||
==Project Scenarios== | ==Project Scenarios== | ||
| Line 119: | Line 118: | ||
==User Management== | ==User Management== | ||
For accounts with administrative access, the User Accounts page can be used to create and edit accounts as well as control which accounts can access each project. See [[CityWater User Management|CityWater User Management]] | For accounts with administrative access, the User Accounts page can be used to create and edit accounts as well as control which accounts can access each project. See [[CityWater User Management|CityWater User Management]] | ||
==My Account== | |||
The My Account page will show information about your CityWater user account. The page contains three sections. | |||
*General – Shows whether your account is active, your username, and what or organizations your account belongs to. | |||
*Permissions – Lists all permissions, such as add-ons and role, for the account. | |||
*Organizations – Lists all organizations to which the account belongs. | |||
==Related Topics== | ==Related Topics== | ||
Latest revision as of 14:49, 17 October 2024
CityWater is the premier EPANET web application for water distribution management. The intuitive, interactive presentation and access-anywhere convenience of CityWater allows you to unlock the data in your EPANET models and add value to the everyday operations of your distribution system. Plus, the subscription-based pricing means you don't need to pay for expensive software you don't use.
- Visualize the distribution of pressure, head, velocity, flow and other important variables on an interactive web map.
- Present model results anywhere and at a moment's notice using your phone, tablet, or laptop. Look up any network property or model result on the go by accessing CityWater on your phone.
- Plot how model results like pressure or velocity change over time and export the plot to an image to share with contractors or place in a report.
- Enhance your understanding of your network and quickly identify inefficiencies with the conceptual schematic view and analysis tools.
CityWater Advantages
- Convenient subscription-based access
- Works on most operating systems and devices: Windows®, macOS®, Android™, iOS®, etc.
- No installation required—only a modern web browser is needed
- Upload any EPANET input file and access it on all devices
- Improve the presentation of EPANET simulation results to non-technical audiences
- Provide instant feedback on the model results using the annotation features
Logging in to CityWater
Any modern web browser can be used to access CityWater. For best experience, use either Google Chrome, Mozilla Firefox, or Safari. An account must be created before logging into CityWater. An account is created after purchasing CityWater.
To access your CityWater account:
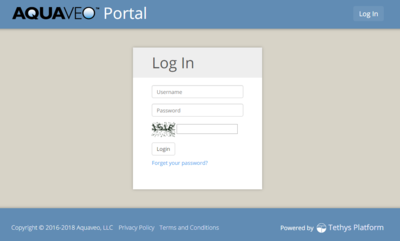
- Go to the Aquaveo portal at: portal.aquaveo.com.
- Enter your login and password to sign to your CityWater account.
- Complete the CAPTCHA section, entering the characters shown in the image.
- Press Enter or click the Login button.
Password Reset
In case you have forgotten your password or need to change your password, do the following:
- If you have forgotten your password, click the phrase Forgot your password?
- In the Reset Password page, enter the email belonging to the account.
- Check your email for a message containing a link and follow the directions in the email to reset your password.
Logging Out
When done with a session, it is recommended that you sign out.
- Select the down arrow
 next to your account name in the upper right corner.
 - Select the Log Out command to sign out of your account.
Applications Library
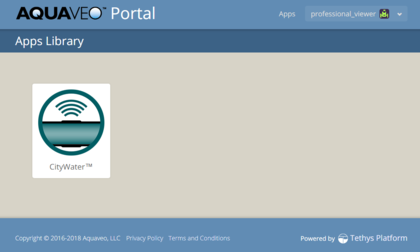
When first signing into the Aquaveo portal, you will see the Apps Library page. This page shows all application connected to the account. CityWater should be listed as an available application. Any other applications you have purchased will also be listed on this page.
Account Profile
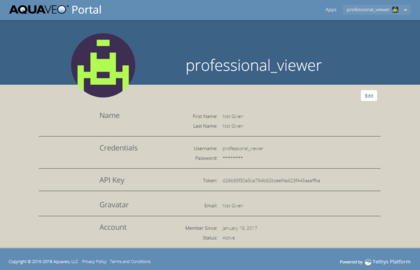
In the upper right corner of the Aquaveo Portal, you should see your name or the name of your company. Clicking on this name will take you to the Account Settings page. On this page, the following information is listed:
- The account owner's first name
- The account owner's last name
- The account username
- The account password (with characters hidden)
- Application programming interface (API) key token
- The account owner's email
- Date the account was created
- State of the account
Clicking the Edit button on this page will allow changing any of the above items. This include resetting the account password or deleting the account entirely.
Account Profile Image
The image shown with your user account is provided by the Gravatar service. To change the image,
- Visit https://en.gravatar.com/.
- Create an account using the same email associated with your Aquaveo Portal profile.
- Upload an image.
Project Page
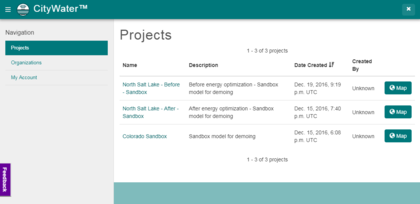
Your projects will all be displayed on the project page. This page appears first after clicking the CityWater application button.
The project page will list all of your projects by name and show a brief description along with the date the project was created and who created it. Clicking on the project name will open the project details for the project. Clicking the Map ![]() button will take you to the map page for the project. Clicking the New Project button starts the process of creating a new project in CityWater.
button will take you to the map page for the project. Clicking the New Project button starts the process of creating a new project in CityWater.
Create a New Project
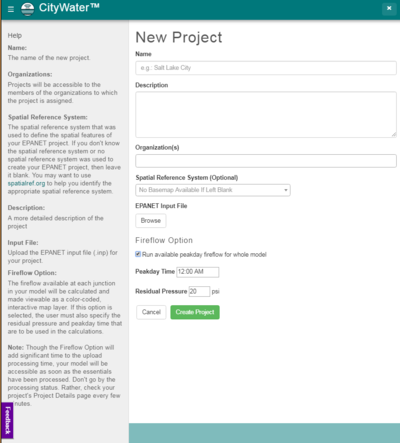
A new project can only be created using an administrator account. Viewer accounts will not show the New Project button at the top right of the page. After clicking the New Project
button, you will come to the New Project page. Enter the basic information for the project on this page.
- Name
- The name of the new project.
- Description
- Allows for a more detailed explanation of the project.
- Organizations
- Projects will be accessible to the members of the organizations to which the project is assigned.
- Spatial Reference System
- The spatial reference system that was used to define the spatial features of your EPANET project. If you don't know the spatial reference system or no spatial reference system was used to create your EPANET project, then leave it blank. You may want to use spatialref.org to help you identify the appropriate spatial reference system.
- The Spatial Reference System field allows partial entries. Once part of a spatial reference system has been entered into the field, CityWater will search for possible spatial reference systems that match the partial entry and present a list of options. Select the spatial reference system you want to use from the list. It may take CityWater a few moments to generate the spatial reference system list based on the partial entry.
- EPANET Input File
- Upload the EPANET input file (*.inp) for your project. Click the Browse button to bring up an Open dialog to located and upload the input file. If you have a NET file, it can be converted to an INP file using EPANET.
- Peakday Fire Flow (Optional)
- Run available peakday fireflow for whole model. This option, when turned on, will calculate the fireflow at each junction for the entire model. When turned on, the Peakday Time and Residual Pressure must be entered. While Fireflow Options can be specified for the entire model when you are creating the project, they can also be specified for parts of a model afterwords.
- Note that this option requires an account with the Fire Flow Analysis add-on. Also note that when creating a project with fire flow analysis, the processing time for creating the project can be significantly increased.
Edit Project
Editing a CityWater project requires administrative access. After a project has been created, you can change the details of the project by doing the following:
- Click on the Projects link in the menu on the left.
- Select the project name to go to the Project Details page.
- Under Actions, select the Edit button to open the Edit Project page.
The Project Name, Description, Organization, and Spatial Reference System can be edited. The EPANET Input File cannot be edited.
Delete Project
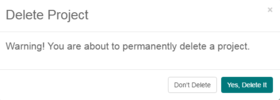
When a project is no longer needed, an administrator can delete a project from the list of projects. Deleting a project is permanent. Deleted projects cannot be recovered. Delete a project by:
- Go to the Project Details page for the project being removed.
- Click on the Delete button under the Actions list.
- Confirm the deletion to remove the project.
Project Details
The Project Details page displays several tabs with information about the project. See CityWater Project Details.
Project Map
The Map page displays an aerial map of the project area with the pipe network overlaying the area. See CityWater Project Map.
Project Schematic
The Schematic page provides a simplified visualization of the conceptual zones and provides a high-level overview of the most important elements in the model. See CityWater Project Schematic.
Project Scenarios
Scenarios allow making changes to a project, then running the model to see the results of the changes. Projects can have multiple changes attached to them. See CityWater Scenarios.
User Management
For accounts with administrative access, the User Accounts page can be used to create and edit accounts as well as control which accounts can access each project. See CityWater User Management
My Account
The My Account page will show information about your CityWater user account. The page contains three sections.
- General – Shows whether your account is active, your username, and what or organizations your account belongs to.
- Permissions – Lists all permissions, such as add-ons and role, for the account.
- Organizations – Lists all organizations to which the account belongs.
Related Topics
CityWater | ||
|---|---|---|
| Articles: | Overview • Project Details • Project Map • Project Schematic • Scenarios • User Management |  |
| Support: | Tutorials • Convert NET File • What's New in CityWater • Release Notes • Terms and Conditions | |
| Aquaveo | ||
