User:Jcreer/SMS 13.4 Changes: Difference between revisions
From XMS Wiki
Jump to navigationJump to search
(→SRH-2D) |
No edit summary |
||
| (One intermediate revision by the same user not shown) | |||
| Line 10: | Line 10: | ||
** Select by | Mesh Type – Only usuable in the Map Module. Brings up the ''Select by Mesh Type'' dialog where polygons can be selected by the assigned meshing type (paving, patch, etc.). | ** Select by | Mesh Type – Only usuable in the Map Module. Brings up the ''Select by Mesh Type'' dialog where polygons can be selected by the assigned meshing type (paving, patch, etc.). | ||
* Display Theme changes | * Display Theme changes | ||
* Flow Trace option additions: [[User:Jcreer/SMS:Flow Trace]] | |||
===GSSHA=== | ===GSSHA=== | ||
*[[User:Jcreer/SMS:GSSHA]] | *[[User:Jcreer/SMS:GSSHA]] | ||
| Line 19: | Line 20: | ||
*[[User:Jcreer/SMS:SRH-2D Changes]] | *[[User:Jcreer/SMS:SRH-2D Changes]] | ||
*Update [[SMS:SRH-2D Structures]] so that ''Checked uses 2d terrain for overtopping. Unchecked disables 2d domain in culvert region and uses hy8 for overtopping'' is changed so the user doesn't need to do anything. | *Update [[SMS:SRH-2D Structures]] so that ''Checked uses 2d terrain for overtopping. Unchecked disables 2d domain in culvert region and uses hy8 for overtopping'' is changed so the user doesn't need to do anything. | ||
===STWAVE=== | |||
*no longer model specific coverages. | |||
*Model control needs updates. | |||
===Toolbox=== | ===Toolbox=== | ||
Revision as of 22:00, 4 November 2024
| This contains information about functionality available starting at SMS version 13.4. The content may not apply to other versions. |
Note changes for SMS 13.4
- Display Options
- 2D Mesh Node numbers, element numbers, nodal elevation numbers will only show up to 10,000 numbers. When zooming in or panning, the display will show those numbers in the display view.
- Contour and vector import and export
- Copy to Clipboard
- Edit Menu
- Select by | Mesh Type – Only usuable in the Map Module. Brings up the Select by Mesh Type dialog where polygons can be selected by the assigned meshing type (paving, patch, etc.).
- Display Theme changes
- Flow Trace option additions: User:Jcreer/SMS:Flow Trace
GSSHA
- User:Jcreer/SMS:GSSHA
- User:Jcreer/SMS:GSSHA Model Control
- User:Jcreer/SMS:GSSHA Mapping Tables
- User:Jcreer/SMS:GSSHA Coverages
SRH-2D
- User:Jcreer/SMS:SRH-2D Changes
- Update SMS:SRH-2D Structures so that Checked uses 2d terrain for overtopping. Unchecked disables 2d domain in culvert region and uses hy8 for overtopping is changed so the user doesn't need to do anything.
STWAVE
- no longer model specific coverages.
- Model control needs updates.
Toolbox
- OceanMesh UGrid Cleaner Tool
- OceanMesh UGrid from Coverage Tool
- dataset toolbox
- make link visible on data calculator articles
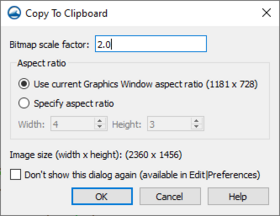
Copy to Clipboard
- Update Image
The Copy To Clipboard dialog contains options for how the Copy to Clipboard command works. It can be accessed through the Edit | Copy to Clipboard command or through the Display Options dialog. The dialog has the following options:
- Bitmap scale factor – Set the scaling factor (resolution) for the copied bit map image.
- Size – This sections has options for defining the size of the copied image.
- Use current Graphics Window aspect ration – The default option. This will use the aspect ratio of the Graphics Window for the screen capture box.
- Specify aspect ratio – This option allows setting a user-define aspect ratio for the screen capture box.
- Specify size – This option allows setting a user-define size for the screen capture box.
- Width – Defines the horizontal ratio or size for the screen capture box.
- Height – Defines the vertical ratio or size for the screen capture box.
- Image size – This will show the current image size for the copied image.
- Set to Specified Size – Will populate the Specified size width and height with the current image size.
- Don't show this dialog again – This option will cause the Copy to Clipboard dialog to not appear when the Copy to Clipboard command is used.
