SMS:Observation Profile Plot: Difference between revisions
| Line 22: | Line 22: | ||
* '''Specified time step''' – Profile plot points are based on the specified time step. | * '''Specified time step''' – Profile plot points are based on the specified time step. | ||
*'''Use active | *'''Use active dataset and time step''' – This option causes the plot to display the values of the active dataset and time step for each arc being plotted. When the active dataset changes, the plot is recomputed and updated. | ||
*'''Use selected | *'''Use selected dataset and time step''' – This option causes the plot to display the values of one or more specified datasets or time steps for each arc being plotted. Changing the active dataset does not affect the plot. Check the check-box of the data set that will be viewed from the list box. | ||
== Plotting With Multiple Arcs Selected == | == Plotting With Multiple Arcs Selected == | ||
Revision as of 21:29, 16 November 2012
A Profile plot is used to display the variation of one or more scalar datasets associated with a mesh or grid along observation arcs in the Observation Coverage. Profile plots are created in the Plot Wizard dialog by selecting Observation Profile from the plot type list. When an arc is selected two small arrows appear at either end of the arc. These arrows indicate the viewing direction for the plots. To change the viewing direction select the arc and execute the "Feature Objects | Reverse Arc Direction" command. A sample plot is shown in the figure.
Profile Plot Options
After the plot type is set in Step 1 of the Plot Wizard, the profile plot options need to be defined. The following options must be set for a profile plot:
Coverage
A profile plot operates on a single observation type coverage. The following coverage related options are available:
- Coverage – If multiple observation type coverages exist, the coverage to use for the profile plot must be selected.
- Extraction method
- Model Intersections – Profile plot points are based on intersections of the specified feature arcs and element, cell, or triangle edges.
- Points and Vertices – Profile plot points are interpolated at the location of points and vertices on the specified feature arcs.
Dataset
- Active dataset – Profile plot points are based on the active dataset. The profile plot will update when the active dataset is changed.
- Module - Since each module contains an active dataset, when using the active dataset option, the module must be specified.
- Specified data set(s) – Profile plot points are based on the specified dataset(s). Datasets from different modules can be specified.
Time step
- Active time step – Profile plot points are based on the active time step. The profile plot will update when the active time step is changed.
- Specified time step – Profile plot points are based on the specified time step.
- Use active dataset and time step – This option causes the plot to display the values of the active dataset and time step for each arc being plotted. When the active dataset changes, the plot is recomputed and updated.
- Use selected dataset and time step – This option causes the plot to display the values of one or more specified datasets or time steps for each arc being plotted. Changing the active dataset does not affect the plot. Check the check-box of the data set that will be viewed from the list box.
Plotting With Multiple Arcs Selected
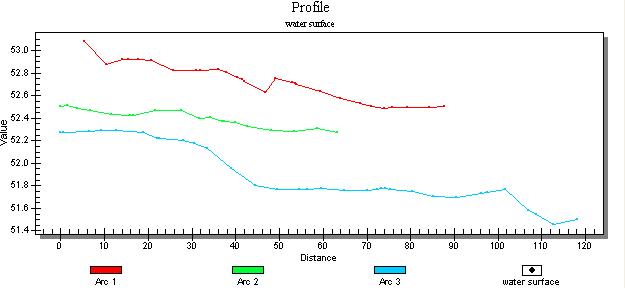
There are two ways in which an observation profile can be created when multiple arcs will be graphed. Multiple arcs can be graphed on a single plot was so they appear in separate segments as shown below.
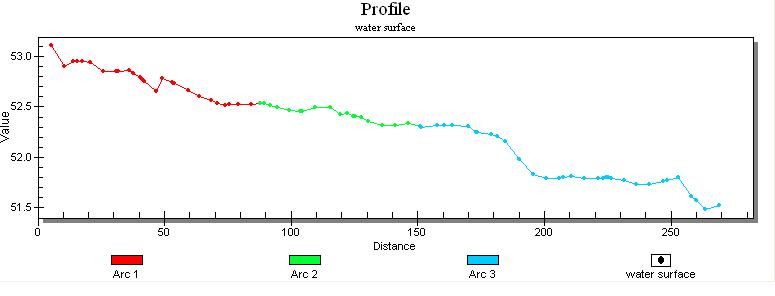
Multiple observation arcs can also be plotted to look continuous if they are part of an arc group by following these steps:
- Create a profile arc that composed of more than one arc (this means the arcs must be connected at the end points and start points)
- Choose the menu command Feature Objects | Create Arc Group
- Create the observation profile plot like before by using the Plot Wizard
When the plot is generated, it will look as shown below where the line is continuous. The different arcs are drawn in their respective colors, but are linked together end to end.
Related Topics
Modules: Mesh Module · Cartesian Grid Module · Scatter Module · Map Module · GIS Module · Particle Module
Models: ADCIRC · BOUSS-2D · CGWAVE · CMS-Flow · CMS-Wave · FESWMS · FVCOM · Generic Mesh Model · GENESIS · HYDRO AS-2D · PTM · SRH-2D · Steering · STWAVE · TABS · TUFLOW

