Registering an Image
This is the approved revision of this page, as well as being the most recent.
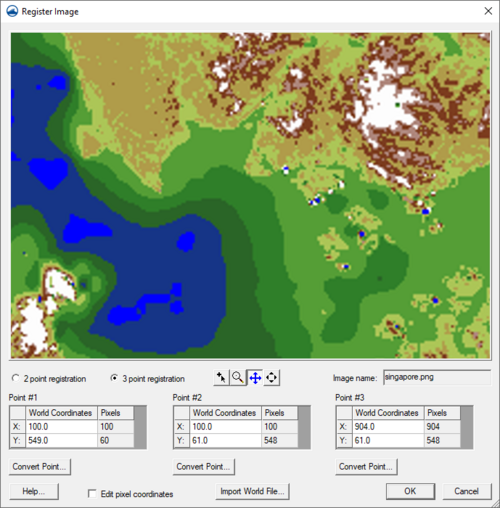
If an image file is not geo-referenced then it's necessary to define the coordinate system of the image. The Register Image dialog allows specifying the coordinate system for the image. When an image is opened, if the image is not self-referenced, XMS attempts to find world file with the same name as the image (*.wld or *.jpgw extension). If neither of these is found, the Register Image dialog opens.
What is Image Registration?
Before an image can be displayed, the image must be "registered" or geo-referenced. Registering an image involves identifying points on the image corresponding to locations with known real world (XY) coordinates. Once these points are identified, they are used to scale and translate the image to the proper location when it is drawn with the other objects in the Graphics Window. If an image is not registered properly, any objects which are created using the background image as a guide will have the wrong coordinates.
Register Image Dialog
An image is registered using the Register Image dialog. The main feature of the Register Image dialog is a large window in which the image is displayed. Two or three points (shown by "+" symbols) are also displayed in the window. These points are used to identify locations with known real world coordinates. The real world coordinates (X,Y) and image coordinates (U,V) of the registration points are listed in edit fields below the image. The points are moved to the desired locations on the image by dragging the points using the tools described below. Once the points are located, the real world coordinates can be entered in the corresponding edit fields. The dialog contains the following options:
- 2 point or 3 point registration – Two point registration rotates and uniformly scales an image. Three point registration allows for non-uniform scaling to account for some parallax.
- Import World File – Used to import a TIFF world file (*.tfw). A TIFF world file has the information needed to set the (X,Y) and (U,V) coordinates in order to place the image in the correct world coordinates.
- Image name – Used to associate a name with the file. This name will appear in the project explorer.
Register Image Dialog Tools
The following tools can be used to help position the registration points:
Import World File
The Import World File button can be used to automatically define the registration data. A world file is a special file associated with a previously registered image that is exported from ArcView® or Arc/Info®. The file contains registration data that can be used to register the image.
Saving/Reading Image Registration Data
When a project file is saved, a link to the image is saved in the project file, along with the current image registration information so that the image is re-registered to the same coordinates every time the project is opened. The original image file and world file (if one exists) are not altered.
Convert Point Coordinate System
The x, y coordinates of each register point must be specified. If there are (x,y) coordinates in a different coordinate system than the project, the coordinates will need to be converted.
GMS Point Conversion
The Convert Point button in the image registration dialog will allow converting the coordinates.
SMS Point Conversion
The Single Point Conversion command in the Edit menu can be helpful if it becomes necessary to convert between any two coordinate systems. Perform this conversion and record the locations in the correct coordinate system prior to entering the registration dialog.
An alternative approach is to convert the coordinate system after importing by right-clicking on the image in the Project Explorer and choosing Coordinate Conversion from the right-click menu.
WMS Point Conversion
The Single Point Conversion command in the Edit menu can be helpful if it becomes necessary to convert between any two coordinate systems. Perform this conversion and record the locations in the correct coordinate system prior to entering the registration dialog.
