|
|
| Line 28: |
Line 28: |
| [[WMS:Quick Tour - Getting Started| '''< Previous''']] | [[WMS:Quick Tour - Modules | ''' Next >''']] | | [[WMS:Quick Tour - Getting Started| '''< Previous''']] | [[WMS:Quick Tour - Modules | ''' Next >''']] |
|
| |
|
| [[Category:WMS Quick Tour|L]] | | [[Category:WMS Quick Tour|Layout]] |
Revision as of 16:16, 6 January 2017

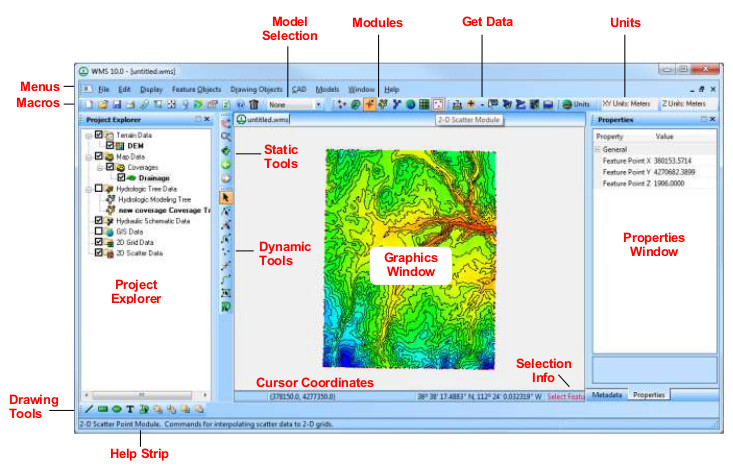
The WMS window is organized into the following sections:

- Graphics Window – where WMS displays two and three-dimensional data. It is also where the user interacts with that data in WMS.
- Project Explorer – contains a hierarchical representation of the data associated with a modeling project.
- Menus & ndash; a list of pull down menus with many of the commands used in WMS.
- Macros – many of the more frequently used menu commands can be accessed through the macro buttons.
- Model Selection – a drop down combo box that sets the active model.
- Modules Toolbar – used to switch between modules.
- Get Data Toolbar – used to get data from agencies that manage data fro a community of users.
|
- Units Toolbar – displays planimetric and elevation units.
- Properties Window – provides both information and opportunities to edit properties of WMS entities.
- Static Tools – tools available in every module.
- Dynamic Tools – tools that correspond to the active module.
- Drawing Tools – allow manually manipulating and create certain objects depending on the active module.
- Help Strip – used for prompts and to display context sensitive help messages.
- Cursor Coordinates – gives the current coordinates of the selected object.
- Selection Info – displays the current active tool.
|
< Previous | Next >

