SMS:Import Spectra: Difference between revisions
| (52 intermediate revisions by 2 users not shown) | |||
| Line 1: | Line 1: | ||
[[File: | [[File:ImportSpectraDialog.png|thumb|300 px|''Import Spectra'' dialog]] | ||
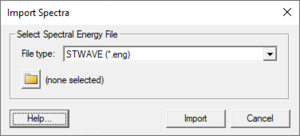
The ''Import Spectra'' dialog is accessed through the ''Spectral Energy'' dialog by clicking on the '''Import Spectra''' button. This dialog is used to import existing spectra into the project. | The ''Import Spectra'' dialog is accessed through the [[SMS:Spectral_Energy|''Spectral Energy'']] dialog by clicking on the '''Import Spectra''' button. This dialog is used to import existing spectra into the project. The dialog consists of a ''File type'' drop down menu and a browser button [[File:File Selector button.png]] to select an existing file. | ||
== File types == | == File types == | ||
The following types of files can be imported through this dialog. | The following types of files can be imported through this dialog. | ||
* | * ''*.eng'' – Spectral energy file. A prompt will appear to specify if the file is in the CMS-Wave or STWAVE format. | ||
* '''*.dws''' –- The BOUSS-2D | * ''*.h5'' – [[XMDF]] grid and spectrum. | ||
* ''*.dws'' – The BOUSS-2D spectra file format. | |||
* ''*.cdip'' – Data from the [https://cdip.ucsd.edu/ Coastal Data Information Program]. | |||
==Import Spectra Processing== | |||
After clicking the '''Import''' button in the ''Import Spectra'' dialog, indicate to SMS how to process the selected file. | |||
===Open Files=== | |||
[[File:Open Spectral Files.png|thumb|400 px|The ''Open Files'' dialog for importing spectra files.]] | |||
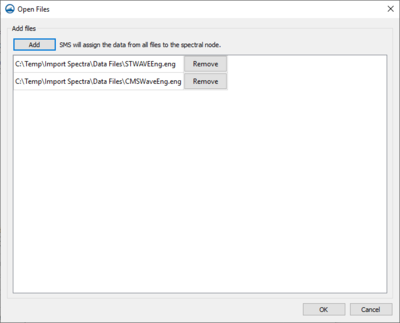
If spectral data is in multiple files, the option to place these files in one coverage. This is done by adding these files to the ''Open File'' dialog that appears after clicking the '''Import''' button. Click the '''Add''' button to open a file browser to add additional files. Each file selected will appear in the field below. The '''Remove''' button can be used to eliminate unwanted files. | |||
===Time Settings=== | |||
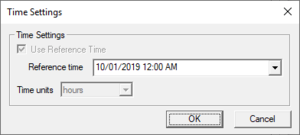
When importing ENG files for STWAVE or DWS files for BOUSS-2D, the ''Time Settings'' dialog will appear after a warning dialog appears. ENG files may contain time stamps for each time step. If the file has an 8 or 12 digit time stamp, SMS will read it in and assign the times accordingly. If the ENG file is not using time stamps, it will just have an integer ID for each set of data. In this case, it’s necessary to give SMS a reference time, and SMS will treat each ID as the number of hours past the specified reference time. | |||
[[File:Spectral Time Setting.png|thumb|none|left|300 px|The ''Time Settings'' dialog for importing STWAVE ENG and BOUSS-2D DWS files.]] | |||
===Time Increment=== | |||
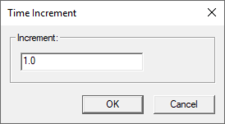
DWS files for BOUSS-2D require an additional step. Each dataset in the DWS file will be offset by a specified number of hours from the reference time. This is done in the ''Time Increment'' dialog. | |||
[[File:TimeIncrement.png|thumb|none|left|225 px|The ''Time Increment'' dialog for importing DWS files.]] | |||
===Grid Angle and Specify Location=== | |||
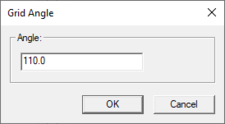
When importing ENG files for CMS-Wave, the ''Grid Angle'' dialog will appear. CMS-Wave ENG files do not specify the grid angle, so it’s necessary to enter one here. | |||
[[File:SpectralGridAngle.png|thumb|none|left|225 px|The ''Grid Angle'' dialog for importing CMS-Wave ENG files.]] | |||
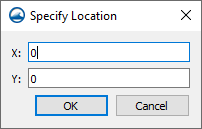
After indicating the grid angle, the ''Specify Location'' dialog will appear. CMS-Wave ENG files also do not specify the location of the spectral data. It’s necessary to enter in the location manually. | |||
[[File:SpecifyLocation.png|thumb|none|left|The ''Specify Location'' dialog for importing CMS-Wave ENG files.]] | |||
===Times to Import=== | |||
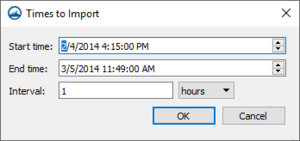
When importing CDIP files, the ''Times to Import'' dialog will appear to select the times to import. The ''Start time'' and ''End time'' shown represent the times available in the file. Select which start/end times to be imported, and select a time interval. The datasets will be read in or interpolated so that there is a dataset for the starting time and then one at each time interval until the end time. | |||
[[File:TimetoImport.png|thumb|none|left|300 px|The ''Times to Import'' dialog for importing CDIP files.]] | |||
===Update Reference Time=== | |||
In some cases, the reference time will need to be updated in the [[SMS:Spectral Energy|''Spectral Energy'']] dialog. | |||
== Obsolete Options == | == Obsolete Options == | ||
| Line 21: | Line 50: | ||
[[Category:Spectral Energy|I]] | [[Category:Spectral Energy|I]] | ||
[[Category:SMS Dialogs| | [[Category:SMS Spectral Dialogs]] | ||
[[Category:Importing Data| | [[Category:SMS Import Dialogs|Spect]] | ||
[[Category:Importing Data|Spect]] | |||
[[Category:External Links]] | |||
[[Category:STWAVE]] | |||
[[Category:BOUSS-2D]] | |||
[[Category:CMS-Wave]] | |||
Latest revision as of 15:32, 6 September 2017
The Import Spectra dialog is accessed through the Spectral Energy dialog by clicking on the Import Spectra button. This dialog is used to import existing spectra into the project. The dialog consists of a File type drop down menu and a browser button ![]() to select an existing file.
to select an existing file.
File types
The following types of files can be imported through this dialog.
- *.eng – Spectral energy file. A prompt will appear to specify if the file is in the CMS-Wave or STWAVE format.
- *.h5 – XMDF grid and spectrum.
- *.dws – The BOUSS-2D spectra file format.
- *.cdip – Data from the Coastal Data Information Program.
Import Spectra Processing
After clicking the Import button in the Import Spectra dialog, indicate to SMS how to process the selected file.
Open Files
If spectral data is in multiple files, the option to place these files in one coverage. This is done by adding these files to the Open File dialog that appears after clicking the Import button. Click the Add button to open a file browser to add additional files. Each file selected will appear in the field below. The Remove button can be used to eliminate unwanted files.
Time Settings
When importing ENG files for STWAVE or DWS files for BOUSS-2D, the Time Settings dialog will appear after a warning dialog appears. ENG files may contain time stamps for each time step. If the file has an 8 or 12 digit time stamp, SMS will read it in and assign the times accordingly. If the ENG file is not using time stamps, it will just have an integer ID for each set of data. In this case, it’s necessary to give SMS a reference time, and SMS will treat each ID as the number of hours past the specified reference time.
Time Increment
DWS files for BOUSS-2D require an additional step. Each dataset in the DWS file will be offset by a specified number of hours from the reference time. This is done in the Time Increment dialog.
Grid Angle and Specify Location
When importing ENG files for CMS-Wave, the Grid Angle dialog will appear. CMS-Wave ENG files do not specify the grid angle, so it’s necessary to enter one here.
After indicating the grid angle, the Specify Location dialog will appear. CMS-Wave ENG files also do not specify the location of the spectral data. It’s necessary to enter in the location manually.
Times to Import
When importing CDIP files, the Times to Import dialog will appear to select the times to import. The Start time and End time shown represent the times available in the file. Select which start/end times to be imported, and select a time interval. The datasets will be read in or interpolated so that there is a dataset for the starting time and then one at each time interval until the end time.
Update Reference Time
In some cases, the reference time will need to be updated in the Spectral Energy dialog.
Obsolete Options
The following options are no longer available as of SMS version 11.2.
- Select Spectral Energy File – Click on the folder icon to browse to the spectral energy file to be imported.
- Create New Spectral Grid – If this option is selected, SMS will import the spectra with the grid definition contained in the spectral energy file.
- Select Existing Spectral Grid – If this option is selected the datasets are imported as datasets of the selected grid (the grid selected in the combo box below).
- Import as Time Steps – Imports the datasets using the identifier as a time value.
Related Topics
SMS – Surface-water Modeling System | ||
|---|---|---|
| Modules: | 1D Grid • Cartesian Grid • Curvilinear Grid • GIS • Map • Mesh • Particle • Quadtree • Raster • Scatter • UGrid |  |
| General Models: | 3D Structure • FVCOM • Generic • PTM | |
| Coastal Models: | ADCIRC • BOUSS-2D • CGWAVE • CMS-Flow • CMS-Wave • GenCade • STWAVE • WAM | |
| Riverine/Estuarine Models: | AdH • HEC-RAS • HYDRO AS-2D • RMA2 • RMA4 • SRH-2D • TUFLOW • TUFLOW FV | |
| Aquaveo • SMS Tutorials • SMS Workflows | ||
