SMS:Materials Data: Difference between revisions
(→Legend) |
No edit summary |
||
| (4 intermediate revisions by 2 users not shown) | |||
| Line 1: | Line 1: | ||
[[File:SMS Materials Data.jpg|thumb|400 px|Example of the ''Materials Data'' dialog]] | [[File:SMS Materials Data.jpg|thumb|400 px|Example of the ''Materials Data'' dialog]] | ||
Many of the data entities constructed and edited in SMS (i.e., elements, cells) have a material ID associated with them. This material ID is an index into a list of material types. Materials contain model specific parameters such as | Many of the data entities constructed and edited in SMS (i.e., elements, cells) have a material ID associated with them. This material ID is an index into a list of material types. Materials contain model specific parameters such as Manning's roughness, or bed material grain size. A global list of material attributes is maintained and can be edited using the menu command [[SMS:Edit_Menu#Materials Data|''Edit'' | '''Materials Data''']]. This command brings up the ''Materials Data'' dialog where each material is assigned an ID number. This dialog can be used to delete unused materials, create new materials, and assign a descriptive name, color, and pattern to a material. This general information is saved in the material file. The materials defined within the ''Materials Data'' dialog are available for all modules. | ||
== Dialog Description == | == Dialog Description == | ||
| Line 7: | Line 7: | ||
When a new mesh element or grid cell is created, the material is assigned to the new object based on the materials options in the [[SMS:Mesh_Element_Options|''Element Options'' dialog]]. | When a new mesh element or grid cell is created, the material is assigned to the new object based on the materials options in the [[SMS:Mesh_Element_Options|''Element Options'' dialog]]. | ||
Model specific material properties such as Manning's ''n'' and | Model specific material properties such as Manning's ''n'' and eddy viscosity are edited using commands available in the model specific menu. | ||
[[File: | [[File:PatternPicker.jpg|thumb|200 px|Example of the ''Pattern Attributes'' dialog.]] | ||
=== Materials Spreadsheet === | === Materials Spreadsheet === | ||
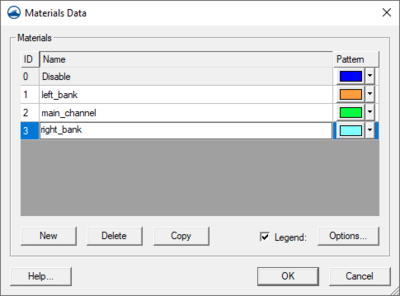
The materials spreadsheet contains three columns (''ID, Name,'' and ''Pattern'') for the defined materials. All IDs must be unique and the spreadsheet can be sorted by clicking on the column headings. The default "Disable" material cannot be edited (except the display pattern) and will always be at the top of the spreadsheet regardless of sorting. Each material is accompanied by a pattern button in the ''Pattern'' column. To select a pattern, click on the preview section (left side) of the button to open the ''Pattern Attributes'' window. To quickly edit only the color, click on the down arrow (right side) of the button, and make a selection in the pop up color palette. | The materials spreadsheet contains three columns (''ID, Name,'' and ''Pattern'') for the defined materials. All IDs must be unique and the spreadsheet can be sorted by clicking on the column headings. The default "Disable" material cannot be edited (except the display pattern) and will always be at the top of the spreadsheet regardless of sorting. Each material is accompanied by a pattern button in the ''Pattern'' column. To select a pattern, click on the preview section (left side) of the button to open the ''Pattern Attributes'' window. To quickly edit only the color, click on the down arrow (right side) of the button, and make a selection in the pop up color palette. | ||
=== Buttons === | === Buttons === | ||
; New : Inserts a material into the spreadsheet with the lowest unique ID available and a default name and pattern. | |||
; Delete : Removes the currently selected material from the spreadsheet. | |||
; Copy : Creates and inserts a copy of the currently selected material with the lowest unique ID available and a default "copy of" name. | |||
=== Legend === | === Legend === | ||
| Line 37: | Line 37: | ||
{{Template:Navbox SMS}} | {{Template:Navbox SMS}} | ||
[[Category:SMS Dialogs| | [[Category:SMS Dialogs|Materials]] | ||
[[Category:SMS Materials| | [[Category:SMS Materials|Materials]] | ||
Latest revision as of 21:40, 9 November 2017
Many of the data entities constructed and edited in SMS (i.e., elements, cells) have a material ID associated with them. This material ID is an index into a list of material types. Materials contain model specific parameters such as Manning's roughness, or bed material grain size. A global list of material attributes is maintained and can be edited using the menu command Edit | Materials Data. This command brings up the Materials Data dialog where each material is assigned an ID number. This dialog can be used to delete unused materials, create new materials, and assign a descriptive name, color, and pattern to a material. This general information is saved in the material file. The materials defined within the Materials Data dialog are available for all modules.
Dialog Description
The Materials Data dialog is accessible from the menu command Edit | Materials Data or from model specific material properties windows (ex. ADH), available in the model specific menu. The dialog is resizable by dragging on the window edges.
When a new mesh element or grid cell is created, the material is assigned to the new object based on the materials options in the Element Options dialog.
Model specific material properties such as Manning's n and eddy viscosity are edited using commands available in the model specific menu.
Materials Spreadsheet
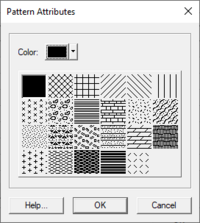
The materials spreadsheet contains three columns (ID, Name, and Pattern) for the defined materials. All IDs must be unique and the spreadsheet can be sorted by clicking on the column headings. The default "Disable" material cannot be edited (except the display pattern) and will always be at the top of the spreadsheet regardless of sorting. Each material is accompanied by a pattern button in the Pattern column. To select a pattern, click on the preview section (left side) of the button to open the Pattern Attributes window. To quickly edit only the color, click on the down arrow (right side) of the button, and make a selection in the pop up color palette.
Buttons
- New
- Inserts a material into the spreadsheet with the lowest unique ID available and a default name and pattern.
- Delete
- Removes the currently selected material from the spreadsheet.
- Copy
- Creates and inserts a copy of the currently selected material with the lowest unique ID available and a default "copy of" name.
Legend
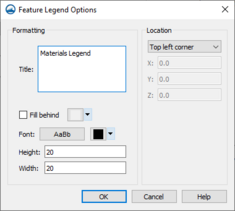
- Legend – Check box with the associated Options... button controls the display of a legend of the materials in the Graphics Window.
- Options... – Opens the Legend Options dialog. The options for the legend are edited in the Legend Options dialog. These options include:
- Legend Title – The name to be displayed on the legend.
- Legend Location – The specification of where on the screen the legend will appear. Options include "Top Left Corner", "Bottom Left Corner", "Top Right Corner", "Bottom Right Corner", "Screen Location", and "World Location". The "Screen Location" and "World Location" will require the X location and Y location to be indicated. "World Location" also require the Z location to be specified.
- Font – The font to be used in the legend. Clicking on the button will open the Font dialog. The down arrow can be used to specify a font color without opening the Font dialog.
- Size – The size of each entry in the legend as indicated by Width and Height
Note that only active materials are included in the legend.
Related Topics
SMS – Surface-water Modeling System | ||
|---|---|---|
| Modules: | 1D Grid • Cartesian Grid • Curvilinear Grid • GIS • Map • Mesh • Particle • Quadtree • Raster • Scatter • UGrid |  |
| General Models: | 3D Structure • FVCOM • Generic • PTM | |
| Coastal Models: | ADCIRC • BOUSS-2D • CGWAVE • CMS-Flow • CMS-Wave • GenCade • STWAVE • WAM | |
| Riverine/Estuarine Models: | AdH • HEC-RAS • HYDRO AS-2D • RMA2 • RMA4 • SRH-2D • TUFLOW • TUFLOW FV | |
| Aquaveo • SMS Tutorials • SMS Workflows | ||


