SMS:GenCade Structures: Difference between revisions
(→Groins) |
|||
| (48 intermediate revisions by the same user not shown) | |||
| Line 2: | Line 2: | ||
==Breakwaters== | ==Breakwaters== | ||
[[Image:GenCade Detached Breakwaters. | [[Image:GenCade Detached Breakwaters.png|thumb|450 px|GenCade ''Detached Breakwaters'' table]] | ||
Parameters for characterizing breakwaters include start and end location, depth, and transmission coefficient. To define a breakwater, proceed with the following steps: | Parameters for characterizing breakwaters include start and end location, depth, and transmission coefficient. To define a breakwater, proceed with the following steps: | ||
# Select the '''Create Breakwater''' | # Select the '''Create Breakwater''' [[File:Create Breakwater Tool.svg|16 px]] tool and click with the left mouse button to specify the start and end location. | ||
# Select the menu option ''GenCade'' | '''Edit Breakwaters'''. The GenCade ''Detached Breakwaters'' dialog will appear allowing the entry of breakwater parameters. At this point, | # Select the menu option ''GenCade'' | '''Edit Breakwaters'''. The GenCade ''Detached Breakwaters'' dialog will appear allowing the entry of breakwater parameters. At this point, verify that the parameters are correct. Further information concerning the selection of breakwater parameters is provided in the GenCade model documentation. | ||
==Seawalls== | ==Seawalls== | ||
Parameters for characterizing seawalls include start and end location. To define a seawall, proceed with the following steps: | Parameters for characterizing seawalls include start and end location. To define a seawall, proceed with the following steps: | ||
# Select the '''Create Seawall''' | # Select the '''Create Seawall''' [[File:Create Seawall Tool.svg|16 px]] tool and click with the left mouse button to specify the start and end location. | ||
# Select the menu option ''GenCade'' | '''Edit Seawalls'''. The GenCade ''Seawalls'' dialog will appear allowing the entry of seawall parameters. At this point, | # Select the menu option ''GenCade'' | '''Edit Seawalls'''. The GenCade ''Seawalls'' dialog will appear allowing the entry of seawall parameters. At this point, verify that the parameters are correct. | ||
[[Image:GenCade Seawalls. | [[Image:GenCade Seawalls.png|thumb|none|left|350 px|GenCade ''Seawalls'' table]] | ||
==Groins== | ==Groins== | ||
[[Image:GenCade Groins. | [[Image:GenCade Groins.png|thumb|350 px|GenCade ''Groins'' table]] | ||
Parameters for characterizing groins include length, permeability, diffraction, and depth. To define a groin or jetty, proceed with the following steps: | Parameters for characterizing groins include length, permeability, diffraction, and depth. To define a groin or jetty, proceed with the following steps: | ||
# Select the '''Create Jetty/Groin''' | # Select the '''Create Jetty/Groin''' [[File:Create Groin Tool.svg|16 px]] tool and click to specify the jetty or groin location. The groin or jetty will be created perpendicular to the grid. | ||
# Select the menu option ''GenCade'' | '''Edit Groins'''. The GenCade ''Groins'' dialog will appear allowing the entry of groin and jetty parameters. At this point, | # Select the menu option ''GenCade'' | '''Edit Groins'''. The GenCade ''Groins'' dialog will appear allowing the entry of groin and jetty parameters. At this point, verify that the parameters are correct. Further information concerning the selection of groin and jetty parameters is provided in the GenCade model documentation. | ||
Parameters that can be edited for groins include: | |||
* Cell Index | |||
* Length | |||
* Permeability | |||
* Diffracting | |||
* Seaward Depth | |||
==Inlets== | ==Inlets== | ||
To create an inlet, create a feature arc, right-click on it, select '''Attributes''' and change the attribute to ''Inlet''. Inlets have a name, a left and right bypass coefficient, cell positions, shoal volumes, jetties, and dredging options. | To create an inlet, create a feature arc, right-click on it, select '''Attributes''' and change the attribute to ''Inlet''. Inlets have a name, a left and right bypass coefficient, cell positions, shoal volumes, jetties, and dredging options. | ||
[[Image:GenCade Inlets.png|thumb|none|475 px|GenCade ''Inlets (Reservoir Model and Jetties)'' table]] | |||
====Cell Positions==== | ====Cell Positions==== | ||
Cell beginning and ending positions can specified for the inlet and its left and right bypass. These can be set by creating attachment arcs by the inlet before mapping to a 1D grid. If there are two inlets with one attachment arc in between, the attachment arc will be associated to the inlet closest to the arc. | Cell beginning and ending positions can specified for the inlet and its left and right bypass. These can be set by creating attachment arcs by the inlet before mapping to a 1D grid. If there are two inlets with one attachment arc in between, the attachment arc will be associated to the inlet closest to the arc. | ||
[[File:GenCade InletPosition.png|thumb|none|200 px|GenCade ''Inlet Position'' dialog]] | |||
====Shoal Volumes==== | ====Shoal Volumes==== | ||
The initial and equilibrium shoal volumes can be specified for the ebb, flood, bypass (left and right) and attachment (left and right) shoals. | The initial and equilibrium shoal volumes can be specified for the ebb, flood, bypass (left and right) and attachment (left and right) shoals. | ||
[[File:GenCade InletShoalVolume.png|thumb|none|250 px|GenCade ''Inlet Shoal Volume'' dialog]] | |||
====Jetties==== | ====Jetties==== | ||
The jetties to the left and right of the inlet can be given a length, permeability, and a seaward depth. Also, whether the jetty exists and is diffracting can also be specified. | The jetties to the left and right of the inlet can be given a length, permeability, and a seaward depth. Also, whether the jetty exists and is diffracting can also be specified. | ||
[[File:GenCade InletJetties.png|thumb|none|400 px|GenCade ''Inlet Jetties'' dialog]] | |||
====Dredging Events==== | ====Dredging Events==== | ||
Dredging events can have a beginning and ending date, which shoal is to be mined, and the amount to be removed from the specified shoal between the beginning and ending date. | Dredging events can have a beginning and ending date, which shoal is to be mined, and the amount to be removed from the specified shoal between the beginning and ending date. | ||
[[File:GenCade DredgingEvents.png|thumb|none|350 px|Gencade ''Dredging Events'' dialog]] | |||
==Related Topics== | ==Related Topics== | ||
| Line 40: | Line 52: | ||
{{Template:Navbox SMS}} | {{Template:Navbox SMS}} | ||
[[Category:GenCade|S]] | |||
[[Category:GenCade Dialogs|S]] | |||
Latest revision as of 16:29, 12 July 2019
GenCade has the capability to model the structures listed below. The GenCade menu includes commands to view a table of the structures of a specific type included in a simulation. Some structures can also be selected interactively if they have a geographic attribute such as length.
Breakwaters
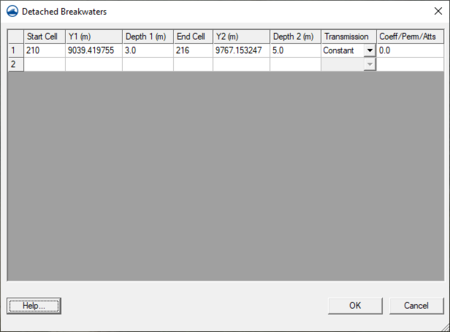
Parameters for characterizing breakwaters include start and end location, depth, and transmission coefficient. To define a breakwater, proceed with the following steps:
- Select the Create Breakwater
 tool and click with the left mouse button to specify the start and end location.
 - Select the menu option GenCade | Edit Breakwaters. The GenCade Detached Breakwaters dialog will appear allowing the entry of breakwater parameters. At this point, verify that the parameters are correct. Further information concerning the selection of breakwater parameters is provided in the GenCade model documentation.
Seawalls
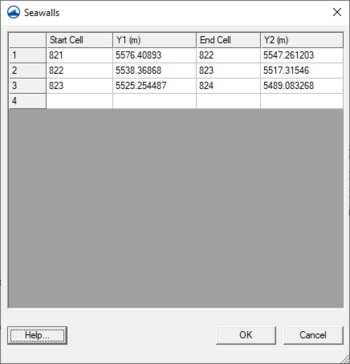
Parameters for characterizing seawalls include start and end location. To define a seawall, proceed with the following steps:
- Select the Create Seawall
 tool and click with the left mouse button to specify the start and end location.
 - Select the menu option GenCade | Edit Seawalls. The GenCade Seawalls dialog will appear allowing the entry of seawall parameters. At this point, verify that the parameters are correct.
Groins
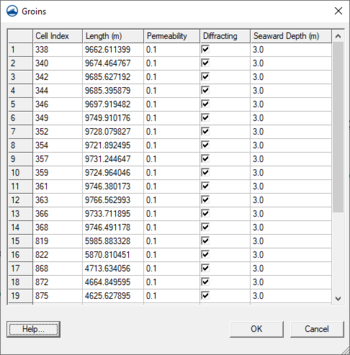
Parameters for characterizing groins include length, permeability, diffraction, and depth. To define a groin or jetty, proceed with the following steps:
- Select the Create Jetty/Groin
 tool and click to specify the jetty or groin location. The groin or jetty will be created perpendicular to the grid.
 - Select the menu option GenCade | Edit Groins. The GenCade Groins dialog will appear allowing the entry of groin and jetty parameters. At this point, verify that the parameters are correct. Further information concerning the selection of groin and jetty parameters is provided in the GenCade model documentation.
Parameters that can be edited for groins include:
- Cell Index
- Length
- Permeability
- Diffracting
- Seaward Depth
Inlets
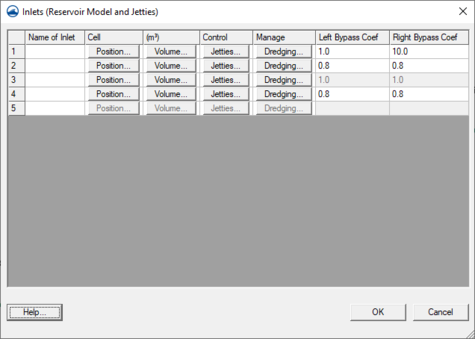
To create an inlet, create a feature arc, right-click on it, select Attributes and change the attribute to Inlet. Inlets have a name, a left and right bypass coefficient, cell positions, shoal volumes, jetties, and dredging options.
Cell Positions
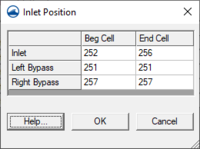
Cell beginning and ending positions can specified for the inlet and its left and right bypass. These can be set by creating attachment arcs by the inlet before mapping to a 1D grid. If there are two inlets with one attachment arc in between, the attachment arc will be associated to the inlet closest to the arc.
Shoal Volumes
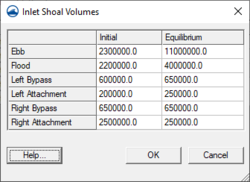
The initial and equilibrium shoal volumes can be specified for the ebb, flood, bypass (left and right) and attachment (left and right) shoals.
Jetties
The jetties to the left and right of the inlet can be given a length, permeability, and a seaward depth. Also, whether the jetty exists and is diffracting can also be specified.
Dredging Events
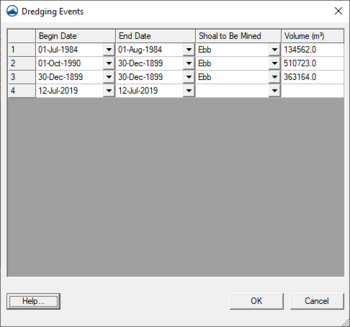
Dredging events can have a beginning and ending date, which shoal is to be mined, and the amount to be removed from the specified shoal between the beginning and ending date.
Related Topics
SMS – Surface-water Modeling System | ||
|---|---|---|
| Modules: | 1D Grid • Cartesian Grid • Curvilinear Grid • GIS • Map • Mesh • Particle • Quadtree • Raster • Scatter • UGrid |  |
| General Models: | 3D Structure • FVCOM • Generic • PTM | |
| Coastal Models: | ADCIRC • BOUSS-2D • CGWAVE • CMS-Flow • CMS-Wave • GenCade • STWAVE • WAM | |
| Riverine/Estuarine Models: | AdH • HEC-RAS • HYDRO AS-2D • RMA2 • RMA4 • SRH-2D • TUFLOW • TUFLOW FV | |
| Aquaveo • SMS Tutorials • SMS Workflows | ||
