GMS:Notes: Difference between revisions
| (20 intermediate revisions by 2 users not shown) | |||
| Line 1: | Line 1: | ||
Notes can be added to most objects or to the project itself to aid in model development. For example, a model developer might add a note to a dataset used to interpolate elevations to describe the real world source of the data. Typical notes might describe what an object is, where it came from, or why the developer did something a particular way. | |||
==Automatic Notes== | |||
GMS will create some notes automatically if the ''Create GMS notes automatically'' option is turned on in the ''General'' tab of the [[GMS:Preferences#General|''Preferences'']] dialog. | |||
GMS creates automatic notes for the following items when ''Create GMS notes automatically'' is turned on: | |||
GMS | {| class="wikitable" | ||
! Automatic note gets attached to | |||
! Automatic note gets created when | |||
|- | |||
|[[GMS:UGrid_Module|UGrids]] | |||
|The UGrid is created | |||
|- | |||
|Some [[GMS:Datasets|datasets]] created in GMS | |||
|Datasets are created using the Data Calculator or through interpolation | |||
|- | |||
|Some [[GMS:Coverages|coverages]] created in GMS | |||
|Coverages get created from certain other objects (e.g. CAD objects). Does not apply to merging coverages or creating coverages from shapefiles and cross sections. | |||
|} | |||
==Object Notes== | ==Object Notes== | ||
Notes for objects are accessed via a tab on the ''Properties'' dialog. | Notes for objects, including for the entire project are accessed via a tab on the ''Properties'' dialog. Access the ''Properties'' dialog by right-clicking on an item in the Project Explorer and selecting '''Properties'''. To find the ''Properties'' dialog for the entire project, right-click on ''Project'' in the Project Explorer and select '''Properties'''. | ||
[[Image:NotesDialog.png|thumb|none| | :[[Image:NotesDialog.png|thumb|none|500 px|''Notes'' tab in a ''Properties'' dialog.]] | ||
Notes are given a time stamp when they are created and the notes can be sorted by time in ascending or descending order. | Notes are given a time stamp when they are created and the notes can be sorted by time in ascending or descending order. Add notes by clicking the '''Add row''' [[File:Add Note Icon.svg|14 px]] button. Remove notes by selecting the note and clicking the '''Delete''' [[File:GMS Delete Icon.svg|14 px]] button. | ||
The dialog has options for showing all notes, only GMS created notes, or only user created notes. | The dialog has options for showing all notes, only GMS created notes, or only user created notes. | ||
==All Notes== | ==All Notes== | ||
All notes for all objects can be viewed via the ''Edit'' | '''Notes''' command. In this dialog, notes cannot be created, but they can be deleted. | All notes for all objects can be viewed via the [[GMS:Edit Menu|''Edit'' | '''Notes''']] command. In this dialog, notes cannot be created, but they can be deleted. Remove notes by selecting the checkbox to the left of the note and clicking the '''Delete''' [[File:GMS Delete Icon.svg|14 px]] button. | ||
[[Image:AllNotesDialog.png|thumb|none|581 px|All notes dialog]] | :[[Image:AllNotesDialog.png|thumb|none|581 px|All notes dialog]] | ||
Latest revision as of 21:23, 7 June 2022
Notes can be added to most objects or to the project itself to aid in model development. For example, a model developer might add a note to a dataset used to interpolate elevations to describe the real world source of the data. Typical notes might describe what an object is, where it came from, or why the developer did something a particular way.
Automatic Notes
GMS will create some notes automatically if the Create GMS notes automatically option is turned on in the General tab of the Preferences dialog.
GMS creates automatic notes for the following items when Create GMS notes automatically is turned on:
| Automatic note gets attached to | Automatic note gets created when |
|---|---|
| UGrids | The UGrid is created |
| Some datasets created in GMS | Datasets are created using the Data Calculator or through interpolation |
| Some coverages created in GMS | Coverages get created from certain other objects (e.g. CAD objects). Does not apply to merging coverages or creating coverages from shapefiles and cross sections. |
Object Notes
Notes for objects, including for the entire project are accessed via a tab on the Properties dialog. Access the Properties dialog by right-clicking on an item in the Project Explorer and selecting Properties. To find the Properties dialog for the entire project, right-click on Project in the Project Explorer and select Properties.
Notes are given a time stamp when they are created and the notes can be sorted by time in ascending or descending order. Add notes by clicking the Add row ![]() button. Remove notes by selecting the note and clicking the Delete
button. Remove notes by selecting the note and clicking the Delete ![]() button.
button.
The dialog has options for showing all notes, only GMS created notes, or only user created notes.
All Notes
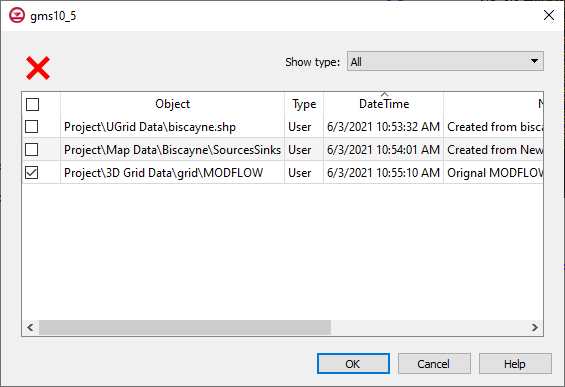
All notes for all objects can be viewed via the Edit | Notes command. In this dialog, notes cannot be created, but they can be deleted. Remove notes by selecting the checkbox to the left of the note and clicking the Delete ![]() button.
button.
GMS – Groundwater Modeling System | ||
|---|---|---|
| Modules: | 2D Grid • 2D Mesh • 2D Scatter Point • 3D Grid • 3D Mesh • 3D Scatter Point • Boreholes • GIS • Map • Solid • TINs • UGrids | |
| Models: | FEFLOW • FEMWATER • HydroGeoSphere • MODAEM • MODFLOW • MODPATH • mod-PATH3DU • MT3DMS • MT3D-USGS • PEST • PHT3D • RT3D • SEAM3D • SEAWAT • SEEP2D • T-PROGS • ZONEBUDGET | |
| Aquaveo | ||

