SMS:SRH-2D Simulation: Difference between revisions
No edit summary |
|||
| Line 4: | Line 4: | ||
Simulations for SRH-2D are created by right-clicking in the [[SMS:Project Explorer|Project Explorer]] and selecting ''New Simulation'' | '''SRH-2D'''. The simulation will appear in the Project Explorer under the "Simulation Data" item. | Simulations for SRH-2D are created by right-clicking in the [[SMS:Project Explorer|Project Explorer]] and selecting ''New Simulation'' | '''SRH-2D'''. The simulation will appear in the Project Explorer under the "Simulation Data" item. | ||
Right-clicking on the simulation gives access to the SRH-2D [[SMS:SRH Menu|menus]], including access to the [[SMS:SRH Model Control|SRH ''Model Control'']] dialog. Each SRH simulation can have its own parameters based on what is entered into the model control. | Right-clicking on the simulation gives access to the SRH-2D [[SMS:SRH Menu|menus]], including access to the [[SMS:SRH Model Control|SRH ''Model Control'']] dialog. Each SRH-2D simulation can have its own parameters based on what is entered into the model control. | ||
==SRH-2D Components== | ==SRH-2D Components== | ||
Revision as of 16:28, 6 November 2015
SRH-2D makes use of simulations starting in SMS 12.0 and later. Simulations are useful as multiple simulations can be used in the same project.
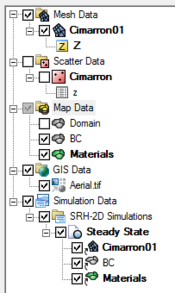
Simulations for SRH-2D are created by right-clicking in the Project Explorer and selecting New Simulation | SRH-2D. The simulation will appear in the Project Explorer under the "Simulation Data" item.
Right-clicking on the simulation gives access to the SRH-2D menus, including access to the SRH Model Control dialog. Each SRH-2D simulation can have its own parameters based on what is entered into the model control.
SRH-2D Components
Components for SRH-2D usually include:
- A 2D mesh
- A boundary condition coverage
- A material coverage
- A monitor point coverage (optional)
- An obstructions coverage (optional)
A simulation cannot include multiple coverages of the same type. So if building multiple boundary condition coverages, only one of the boundary condition coverages can be included in the simulation. Coverages can be merged if needed.
Linking Components
After a simulation has been created, components may be added to the simulation. Components are usually added by clicking on the component item in the Project Explorer and dragging the item under the SRH simulation. A link is then created between the component and the simulation. If the component is updated, it is updated automatically in all simulations that are linked to it.
Components can also be added to a simulation by right-clicking on the component in the project explorer and selecting the simulation name in the Link To submenu. Simularly, components can be unlinked from a simualtion by right-clicking on the component and selecting the simulation name in the Unlink From submenu. The Link To and Unlink From submenus become available once a simulation has been created.
Running an SRH-2D Simulation
After all components have been added to the simulation and the model parameters have been established, the simulation can be run. This is done by right-clicking on the simulation and choosing the Launch SRH-2D command or the Save, Export, and Launch SRH-2D command.
The SRH-2D Model Wrapper should appear. If there are any errors in the model run, the model wrapper will exit early. The model run can also be exited early by clicking the Abort button. When the model run is completed, select Exit to close the model wrapper.
The Load solution option in the model wrapper is selected by default. This option will load the solution from the SRH-2D model run in to SMS as soon as the model run is complete.
Running SRH-2D requires both the pre-SRH-2D executable and the SRH-2D executable. If SMS cannot find these executables, the model run will encounter an error. The File Locations tab in the Preferences dialog can be used to specify the path to these executables if SMS cannot find them.
Related Topics
SMS – Surface-water Modeling System | ||
|---|---|---|
| Modules: | 1D Grid • Cartesian Grid • Curvilinear Grid • GIS • Map • Mesh • Particle • Quadtree • Raster • Scatter • UGrid |  |
| General Models: | 3D Structure • FVCOM • Generic • PTM | |
| Coastal Models: | ADCIRC • BOUSS-2D • CGWAVE • CMS-Flow • CMS-Wave • GenCade • STWAVE • WAM | |
| Riverine/Estuarine Models: | AdH • HEC-RAS • HYDRO AS-2D • RMA2 • RMA4 • SRH-2D • TUFLOW • TUFLOW FV | |
| Aquaveo • SMS Tutorials • SMS Workflows | ||
