GMS:Plot Axes
Version 10.0
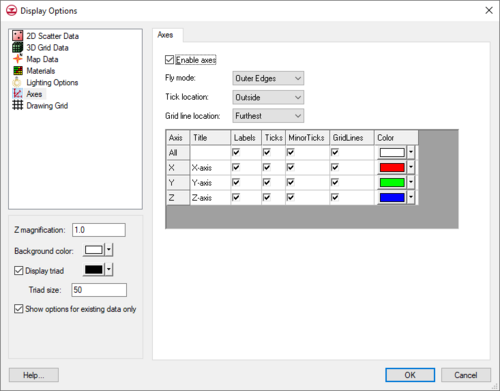
The Plot Axes are a set of ruled lines oriented in the world coordinate system. The plot axes options can be controlled through the Axes tab of the Display Options dialog. The following describes the plot axes options.
- Enable axes – If on, the axes will be displayed.
- Fly mode – These options control where the axes are placed.
- Tick location – Controls whether tick lines placed along the axes are drawn inside or outside.
- Grid line location – These options control which surfaces grid lines are placed on.
- XYZ Options – For each axis, several options are available.
Version 9.2 and earlier
| This contains information about functionality available in GMS version 9.2 and earlier. The content may not apply to other versions. |
The Plot Axes are a set of ruled lines oriented in either the world coordinate system or the grid coordinate system. The axes can be either 2D or 3D. The properties of the plot axes can be controlled through the Plot Axes tab of the Display Options dialog. The Plot Axes options are accessed by selecting the Axes ![]() item in the Display Options dialog. The Plot Axes tab is then displayed on the dialog, and is used to specify the attributes of the axes, axes ticks, axes labels, and axes numbers. The following describes the display options available for the plot axes.
item in the Display Options dialog. The Plot Axes tab is then displayed on the dialog, and is used to specify the attributes of the axes, axes ticks, axes labels, and axes numbers. The following describes the display options available for the plot axes.
- Display plot axes – If selected, the plot axes will be displayed as specified and a sample of the plot axes will appear in the window in the upper left of the dialog. If the Display plot axes toggle is not selected, all plot axes will be hidden and the rest of the dialog will be dimmed.
- Origin options – If selected, the numbers displayed on the plot axes are defined by the origin of the world coordinate system. If there is either a 2D or 3D grid currently defined in GMS, the origin of the grid can be used to define the numbering by selecting either the Use 3D grid origin option or the Use 2D grid origin option. If there is not a 3D grid defined in GMS, the Use 3D grid origin option is dimmed. Likewise, if there is not a 2D grid defined in GMS, the Use 2D grid origin option is dimmed.
- If the world coordinate origin is used, the world coordinate system will also be used to align the axes. However, if the origin of either the currently defined 2D or 3D grid is used, the plot axes can be aligned with either the world coordinate system or the local grid coordinate system. If the angle of rotation of the currently defined grid is 0.00 degrees, there is no difference between the world coordinate system and the local grid coordinate system. If there is an angle of rotation other than 0.00 degrees, the local grid coordinate system can be used by selecting the Local grid coordinates option. The world coordinate system can be used by selecting the World coordinates option.
- Use exponential notation – This option controls whether or not the axes numbers are displayed using exponential notation.
- Axis extents – The extents of the plot axes are specified with the controls in the spreadsheet. The Auto scale X, Auto scale Y, and Auto scale Z options are used to specify that the extents and spacing of the axes will be automatically calculated by GMS. If extents or spacing other than the calculated defaults are desired, any or all of the Manual scale X, Manual scale Y, and Manual scale Z options can be selected. If one of the Manual scale options is chosen, the min, max, tick interval, and how many ticks are to be labeled are specified for the corresponding direction.
- All of the directions that use the Auto scale option are further controlled by the Fit to bounding volume and the Offset from bounding volume options. If the Fit to bounding volume option is selected, the axes will be placed such that they fit tightly to the bounding volume of the currently defined objects in GMS. If the Offset from bounding volume option is chosen, the axes will be placed such that they are 15-20% larger than the bounding volume of the currently defined object in GMS.
- Axis properties – The axis properties can be changed for each axis by right-clicking on the axis in the canvas window. The right-click menu options include Hide axis and Edit Axis. The Edit Axis options brings up a separate dialog with attributes including color and size that can be specified.
See also
GMS – Groundwater Modeling System | ||
|---|---|---|
| Modules: | 2D Grid • 2D Mesh • 2D Scatter Point • 3D Grid • 3D Mesh • 3D Scatter Point • Boreholes • GIS • Map • Solid • TINs • UGrids | |
| Models: | FEFLOW • FEMWATER • HydroGeoSphere • MODAEM • MODFLOW • MODPATH • mod-PATH3DU • MT3DMS • MT3D-USGS • PEST • PHT3D • RT3D • SEAM3D • SEAWAT • SEEP2D • T-PROGS • ZONEBUDGET | |
| Aquaveo | ||
