SMS:Extract Features Tool
| This contains information about functionality available starting at SMS version 13.1. The content may not apply to other versions. |
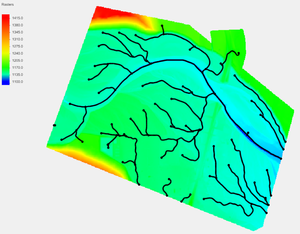
The Extract Features tool allows using a raster to generate features arcs on a map coverage. Currently, the extract feature feature arcs can be centerlines of channels, centerlines of ridges, cross sections of channels, and banklines of channels.
Preprocessor
The extract features tool requires the use of either of the two pre-processors TOPAZ or TauDEM. These pre-processors analyze a raster to determine flow directions and flow accumulation. After the data is collected, it can be used to determine the location of channels and ridges in a geographical area. The pre-processor writes data to files that are used for the run and then later kept for the purpose of extracting features.
If there is a change to the extraction setup, the pre-processor may need to be run again. These changes include: changing the pre-processor, changing the feature type between embankment or channel centerline, or changing depression points.
These pre-processors can be run using the right-click menu on the rasters located in the "![]() GIS Data" folder of the Project Explorer or from the Extract Features dialog. If the pre-processors are launched from a raster in the Project Explorer, it will create the files necessary for embankment and channel centerlines. If it is launched in the Extract Features dialog, it will only generate the files needed for the current configuration.
GIS Data" folder of the Project Explorer or from the Extract Features dialog. If the pre-processors are launched from a raster in the Project Explorer, it will create the files necessary for embankment and channel centerlines. If it is launched in the Extract Features dialog, it will only generate the files needed for the current configuration.
Extracting All Centerlines
The extraction of all of the centerlines from a raster is possible depending on the threshold area. This means that if extracting all stream centerlines with a threshold area of 900 square feet, the Extract Features tool will determine when the flow from 900 square feet of raster would combine and start drawing an arc from that point downstream until it flows off the raster. If longer and more centerlines are needed, the threshold number entered should be smaller. For shorter and fewer, the threshold number should be larger.
Depression points, or locations where centerlines may terminate, can be specified. This could be useful if the feature being extracted is an embankment ridge. Specifying the end of the embankment as a depression point will have the arc flow to the end of the embankment ridge.
There are two options for making the extraction of all features available:
- The extraction commands found in the right-click menu for rasters found in the "
 GIS Data" folder of the Project Explorer.
 - Creating points in a coverage then right-click on the points to use the extraction commands in the right-click menu. These created points will be used as depression points.
Extracting Specific Centerlines
The Extract Features tool can extract centerlines from specific starting points. This is done by doing the following:
- Create a coverage with points where the centerlines should begin.
- Select these created points.
- Use the Extract Feature… right-click menu command.
When extracting a single centerline, the Extract Features tool finds the closest high accumulation value to the starting point.
Extracting Channel Bank Features and Cross Sections
Bank features and cross sections can also be extracted using the Extract Features tool. Before doing this, a centerline arc and a point along the bank are needed. To extract the bank or cross section feature:
- Use the Select Object tool to select both the centerline arc and bank point.
- Tip: The user can easily select the arc by holding the CTRL key while dragging across the arc.
- Right-click and select the Extract Banks… command.
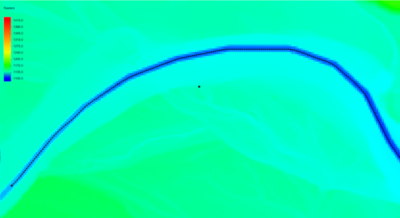
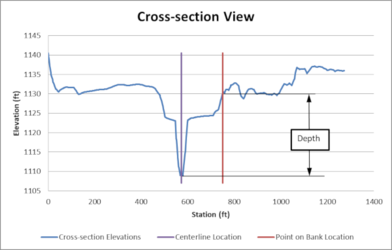
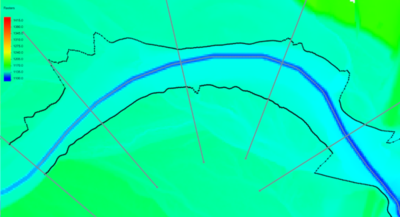
The Extract Features tool will generate cross sections that follow the centerline and trace the banks by matching the depth between the selected point and centerline along the cross sections. See the images below showing how the bank location is defined, how the depth at the bank location is used, and the extracted banks at this depth. If the centerline arc does not have vertices normally distributed close to the raster’s resolution, it will redistribute vertices along the selected arc.
Extract Features Dialog
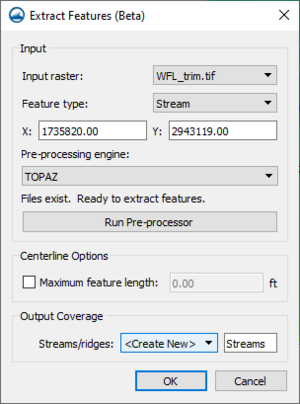
The options in the Extract Features dialog vary depending on how the tool was opened. Regardless of how the tool was opened, the following options are available in all instances:
- Input raster: – The raster used to extract features. in the drop-down box to the right, select the chosen raster type to be input.
- Pre-processing engine: – Use to select TOPAZ or TauDEM for computing flow directions and flow accumulations.
- Run Pre-Processor: Select this button to launch TOPAZ or TauDEM and compute flow directions and flow accumulations. The pre-processor will run in the background and a message will appear when the flow directions and flow accumulations are finished being computed.
The options that do vary depending on the selected feature tools are detailed below.
For extracting all centerlines, the following options are available in the Extract Feature dialog.
- Input section – Area where information can be entered regarding the type of raster and Pre-Processor being applied. Options include:
- Feature type: – Contains two options in the drop-down menu:
- "Channel" – Used to extract all channel centerlines from the selected raster
- "Embankment" – Used to extract all embankments and ridges from the selected raster.
- Threshold area: – The minimum flow accumulation value used for extracting a feature.
- "TOPAZ" – Analyzes a raster to determine flow directions and flow accumulation.
- "TauDEM" – Analyzes a raster to determine flow directions and flow accumulation.
- Results Section – Section of the Extract Feature dialog where result options are available.
- Centerline – When turned on this option allows to the creation of a new coverage from the extracted features or the addition of the results to an existing coverage.
- "Area Property" – This option allows the use of the already created Erea Property to be affected.
- "<Create New>" – This option allows for the creation of a new coverage to affected.
- Centerline – When turned on this option allows to the creation of a new coverage from the extracted features or the addition of the results to an existing coverage.
For extracting all centerlines with one or more selected depression points, the following options are available:
- Feature type: – Use channel to extract all channel centerlines from the selected raster or Embankment to extract all embankments and ridges from the selected raster.
- Threshold area: – The minimum flow accumulation value used for extracting a feature.
For extracting a single centerline, the following options are available:
- Feature type: – Use “Channel” to extract a single channel centerline from the selected point on the raster or “Embankment” to extract a single embankment centerline or ridge from the selected point on the raster.
- X/Y: – The selected starting point location (not editable).
- Run Pre-Processor: – Select this to launch TOPAZ or TauDEM and compute flow directions and flow accumulations. (The pre-processor will run in the background and a message will appear when the flow directions and flow accumulations are finished being computed.)
- Maximum feature length: – The maximum length for the centerline feature. If the edge of the raster is reached before the feature length is reached, the feature stops at the edge of the raster.
- Centerline: – Turn on to create a new coverage from the extracted feature or add the results to an existing coverage.
For extracting banks, the following options are available:
- Use the depth that is – This option is used when the matching depth is found at multiple points along one side of the cross section.
- "Closest to centerline" finds the matching depth on each generated cross section that is closest to the centerline.
- "Closest to previous" finds the matching depth on each generated cross section that is closest to the previous distance from the centerline, starting at the user-specified bank point location.
- "Furthest from centerline" finds the matching depth on each generated cross section that is furthest from the centerline.
- Maximum distance from centerline: – The generated cross section lines that are used for extracting the banks are equal to twice this distance. If the edge of a cross section is encountered before the matching depth is found on a cross section, a bank line is drawn at this distance from the centerline.
- Banks: – Select this option to create a new coverage from the extracted bank or add the results to an existing coverage.
- Smooth bank lines: – Select this option to smooth the bank lines after they are generated.
- Cross sections: – Select this option to create a new coverage from the generated cross sections or add the results to an existing coverage. NOTE: If the name of the cross section coverage matches the name of the bank coverage, the cross sections and banks will be placed in the same coverage.
Best Practices
The following sections discuss some best practices to keep in mind when extracting features.
Digital Dams
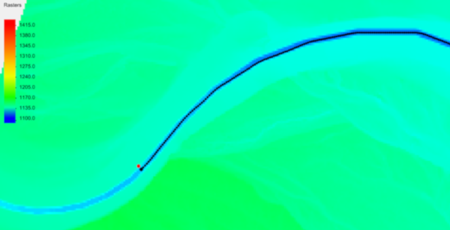
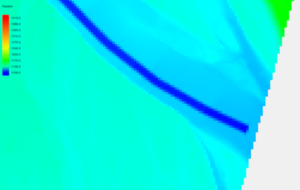
Digital dams, usually artifacts from stamping channels or from unprocessed LIDAR data, cause problems determining flow directions on the raster. Note in the image below how the deep channel comes to an end before reaching the edge of the raster.
The pre-processing engines (TOPAZ and TauDEM) fill these digital dams prior to computing flow directions. This can be a problem because the centerline may stray from the thalweg and the computed matching depth will be based on the filled raster instead of the original raster. This results higher elevations along the channel above the digital dam.
Fix digital dams by doing one of the following:
- Trim the raster above the digital dam. Right-click on a raster to trim it using a polygon in the map module.
- Modify the elevations downstream of the digital dam to match the correct stream thalweg elevations and remove the digital dam. Right-click a raster to edit a raster’s elevations using the elevations on a selected arc.
Placing Points for Extracting Bank Features
Place the point for extracting a bank feature closest to the area that is most important. For example, if a section is being used for bridge analysis, place the bank point close to the bridge. The bank lines stay closest to original feature at the original point location.
If the extract bank tool misses a section of the bank, try moving the starting point to the missed section of the bank and run the tool again.
Extracting Centerlines for Braided Streams
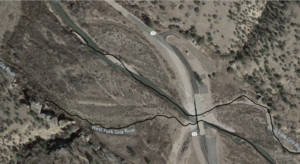
Sometimes when extracting centerlines for braided streams, the extracted centerline may not follow the actual stream location because of digital elevation model inaccuracies. See the image below where two points were used to extract stream centerlines:
In this case, extract both centerlines and manually merge the arcs into a single arc after both centerlines have been extracted.
Use the Depth That Is Option
When using the Use the depth that is option, the following guidelines should be reviewed:
- If there is a single well defined channel with a strong bank feature, use the "Closest to centerline" option.
- If there are multiple floodplain bank features, the Extract Features tool may catch a different floodplain feature, therefore use the "Closest to previous" option for the best result.
- If there are multiple channels or a braided stream and the user wishes to catch the widest extents of the channel, use the "Furthest from centerline" option.
Related Topics
SMS – Surface-water Modeling System | ||
|---|---|---|
| Modules: | 1D Grid • Cartesian Grid • Curvilinear Grid • GIS • Map • Mesh • Particle • Quadtree • Raster • Scatter • UGrid |  |
| General Models: | 3D Structure • FVCOM • Generic • PTM | |
| Coastal Models: | ADCIRC • BOUSS-2D • CGWAVE • CMS-Flow • CMS-Wave • GenCade • STWAVE • WAM | |
| Riverine/Estuarine Models: | AdH • HEC-RAS • HYDRO AS-2D • RMA2 • RMA4 • SRH-2D • TUFLOW • TUFLOW FV | |
| Aquaveo • SMS Tutorials • SMS Workflows | ||
