SMS:SRH-2D Advanced Simulation
In additional to standard simulation runs, SRH-2D allows for running multiple simulations runs at once using a set of parameters to vary each model run. Running multiple simulations in this way can be used to either create alternate scenarios or it can be used to help calibrate the model.
Before using the advanced simulation options, it is recommended that a successful model run of the SRH-2D model be completed.
The Advanced Simulation dialog is accessed by right-clicking on the simulation item in the Project Explorer and selecting the Tools | Advanced Simulation option.
The Advanced Simulation dialog has the following options:
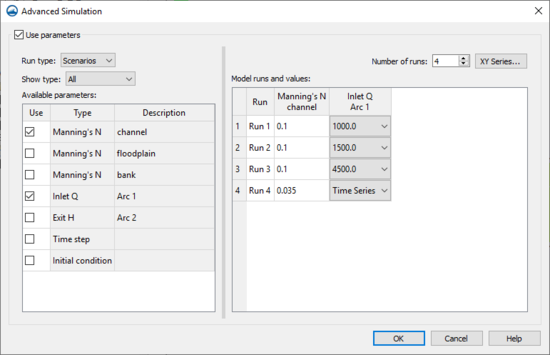
- Use parameters – Turning on this option activates the advanced simulation options. The advanced simulation runs will execute when using the Save and Run Simulation command.
- Run type – Can be set to "Scenarios" or "Calibration". The selected run type will determine the options in the rest of the dialog. See the following sections for details on each of the options.
Scenarios
- Show type – This drop-down menu allows sorting the different available parameters. The available parameters are based on the each individual SRH-2D project. All parameters are shown when "All" is select. The other options will only show the selected parameter type.
- Available parameters – This table allows setting which parameters will be available for the different model run scenarios. The parameters listed in the table are determined by the individual SRH-2D model. The table as the following columns:
- Use – Turning on this box allows the parameter value to be changed in the Model runs and values section.
- Type – Lists the type of parameter available. Typical parameters that may be available include inlet and outlet boundary conditions, material roughness, time step controls, and initial conditions controls.
- Description – This states where the parameters is coming from in the project. For example, if the type were "Intlet Q" and there were two arcs assigned to an "Inlet Q" boundary condition, then this section would list the arc ID for each arc next to the "Inlet Q" type.
- Number of runs – Determines the number of model runs that will happen when running the simulation. Each model run will be listed in the Model runs and values section.
- XY Series – Opens the XY Series Editor dialog. Here multiple time series, rating curves, and other variables can be entered. The data is stored and can be used as a value in the Model runs and values section for certain parameters such as a boundary condition.
- Model runs and values – This section will list all of the model runs and the parameters that were selected. The selected parameters can have their values changed for each of the model runs.
Calibration
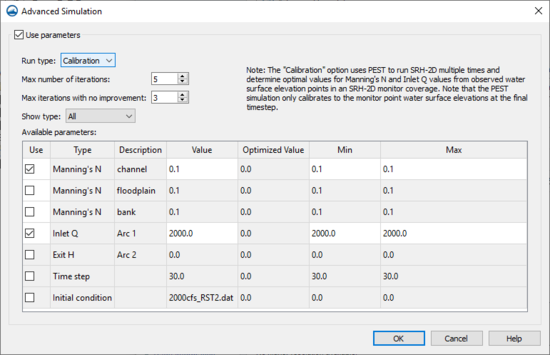
Note: The "Calibration" option uses PEST to run SRH-2D multiple times and determine optimal values for Manning's N, and Inlet Q values from observed water surface elevation points in an SRH-2D monitor coverage. Note that the PEST simulation only calibrates to the monitor point water surface elevations at the final time step.
- Number of iterations – Determines how many iterations PEST will run.
- Max iterations with no improvements – Determines how many iterations PEST will run without any improvement to the calibration. After this, PEST will stop running.
- Show type – This drop-down menu allows sorting the different available parameters. The available parameters are based on the each individual SRH-2D project. All parameters are shown when "All" is select. The other options will only show the selected parameter type.
- Available parameters – This lists all of the available parameters based on the individual SRH-2D model. Certain values may be altered for some parameters. The table as the following columns:
- Use – Turning on this box allows the parameter value to be changed.
- Type – Lists the type of parameter available. Typical parameters that may be available include inlet and outlet boundary conditions, material roughness, time step controls, and initial conditions controls.
- Description – This states where the parameters is coming from in the project. For example, if the type were "Intlet Q" and there were two arcs assigned to an "Inlet Q" boundary condition, then this section would list the arc ID for each arc next to the "Inlet Q" type.
- Value – A value can be entered or changed for a selected parameter.
- Optimized Value If an optimized value for calibration is available, it will be displayed here.
- Min &dnash; The minimum value allowed during the calibration run.
- Max &dnash; the maximum value allowed during the calibration run.
Calibration Error Plot
In the Simulation Run Queuedialog, during a calibraiton run, the Calibration Error plot can be viewed when the Monitoring data option is turned on. This plot shows a plot of the simulation error vs iteration. The error is the sum squared weighted residuals. The units are length squared and multiplied by weight. There is a weight at each point and it is computed by using the interval at the point. Points with a smaller interval will have larger weights compared to points with a larger interval. This mean PEST will work to match points with smaller intervals.
Related Topics
| [hide] SMS – Surface-water Modeling System | ||
|---|---|---|
| Modules: | 1D Grid • Cartesian Grid • Curvilinear Grid • GIS • Map • Mesh • Particle • Quadtree • Raster • Scatter • UGrid |  |
| General Models: | 3D Structure • FVCOM • Generic • PTM | |
| Coastal Models: | ADCIRC • BOUSS-2D • CGWAVE • CMS-Flow • CMS-Wave • GenCade • STWAVE • WAM | |
| Riverine/Estuarine Models: | AdH • HEC-RAS • HYDRO AS-2D • RMA2 • RMA4 • SRH-2D • TUFLOW • TUFLOW FV | |
| Aquaveo • SMS Tutorials • SMS Workflows | ||

