Projection Dialogs
There are two main projection dialogs used in XMS (GMS, SMS, and WMS): The Display Projection dialog, and the Object Projection dialog. From each of these, the Horizontal Projection dialog can be accessed. More detailed information about each projection and the information in these dialogs can be found in the Projections article.
Display Projection Dialog
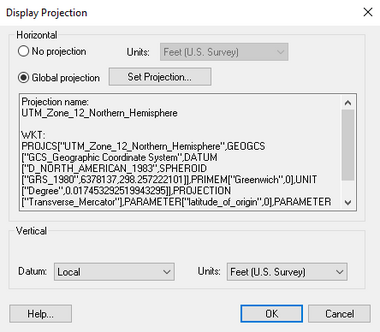
The Display Projection dialog contains settings which are applied to the project as a whole.
Horizontal section
The Horizontal section of the dialog has two options available via radio buttons:
- No projection – This option doesn't set a projection, and only allows adjusting the horizontal Units used in the project. The available units include:
- "U. S. Survey Feet". Equal to 1200⁄3937 meters, approximately 0.3048006096 meters.
- "International Feet". Equal to 0.3048 meters.
- "Meters". Equal to the distance traveled by light in vacuum within 1⁄299792458 of a second.
- "Inches". Equal to 1⁄39.37 of a meter.
- "Centimeters". Equal to 1⁄100 of a meter.
- Global projection – Clicking on the Set Projection button allows more specific projections to be set. These are listed below in the Horizontal Projection Dialog section.
Vertical section
The Vertical section has two drop-down boxes:
- Datum, giving the following options:
- "Local"
- "NGVD 29 (US)"
- "NAVD 88 (US)"
- Units, giving the following options:
- "U. S. Survey Feet"
- "International Feet"
- "Meters"
- "Inches"
- "Centimeters"
Object Projection Dialog
The Object Projection dialog is the same as the Display Projection dialog, but only applies to one specific object (e.g., a coverage or a mesh). It can be accessed by selecting the object in the Project Explorer, then right-clicking on it and selecting Projection... from the menu. In GMS and WMS, the command in the right-click menu is Projection | Projection….
Horizontal Projection Dialog
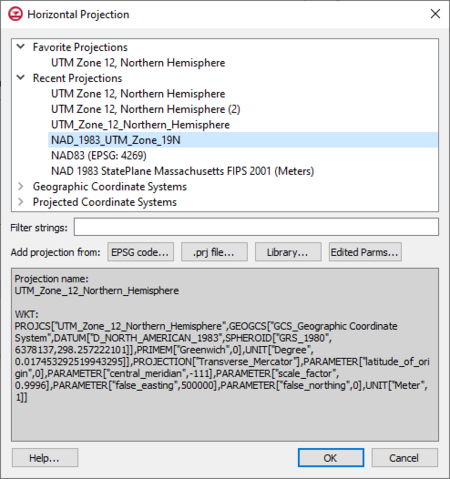
The Horizonal Projection dialog allows setting a global projection. The dialog contains three main sections: the projection list, the projection filter and import options, and the current selected projection display.
The project list shows all currently available projections. The list has four main sections:
- Favorite Projections – Contains a list of most used and favorite projections. To add a projection to this list, right-click on the projection and select Add to Favorites. Right-clicking on a projection in the favorites list has the options to remove it from the list or the rename the projection.
- Recent Projections – This is a list of all projections recently used by XMS. The list contains the current projection for the project if one has already been set.
- Geographic Coordinate Systems – A list of geographic coordinate systems. See below for more information.
- Projected Coordinate Systems – A list of projected coordinate systems. See below for more information.
The filter and import options sections contains the following options:
- Filter strings – This field can be used to filter projections. Values entered here will alter the projection list to only show projections that include the value in the name.
- Add projection from – These buttons allow importing projection data from another source instead of using the projection list.
- EPSG Code – This button brings up the Projection from EPSG code dialog where an EPSG code can be entered.
- *.prj file – Brings up the Projection from .prj File dialog were a projection file can be selected.
- Library – This brings up the Select Projection dialog. A default projection will be used when entering the Select Projection dialog. The dialog allows defining a new Projection, Zone, Datum, and Units. Parameters for the new projection are set to default values.
- Edited Parms – Brings up the Edit Projection PARAMETERS dialog. This dialog allows for inputting new values for latitude_of_origin, central_meridian, scale_factor, false_easting, and false_northing. This creates a new projection with the updated values. The adjusted projection appears under Recent Projections. It uses the name of the current projection and adds a number to the end. Adjusted attributes can be viewed in the current selected projection display.
The projection display area will show the projection name and characteristics for the currently selected projection. This is the projection that will be applied to the project once OK is selected.
| Horizontal Projections | ||||
|---|---|---|---|---|
|
Related Topics
Projections | |
|---|---|
| UTM: | Africa • Asia • Australia • Europe • North America • South America |
| State Plane: | Alaska • Hawaii • Mideast • Midwest • New England • Northwest • South Central • Southeast • Southwest • Virginia Area |
| Other | CPP • Geographic |

