SMS:SRH-2D Datasets to Rasters
From XMS Wiki
Jump to navigationJump to search
Template:SMS Depricated Feature
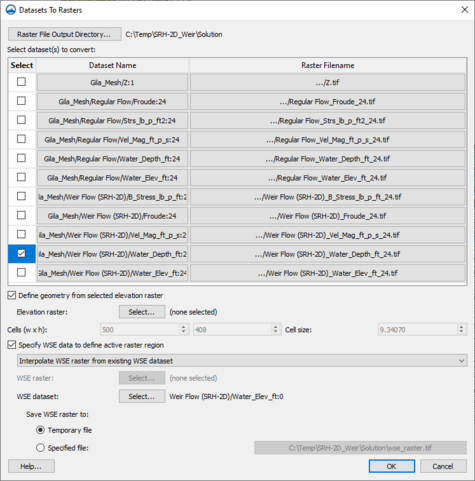
The Datasets to Rasters tool converts a spatial dataset on an unstructured grid to a raster object (TIF file) that can be used in general GIS applications. The tool is accessed by right-clicking on an SRH-2D simulation in the Project Explorer then selecting Tools | Datasets to rasters.... The Datasets to Rasters dialog will then appear.
Datasets to Rasters Dialog
The Datasets to Rasters dialog contains the following options:
- Select dataset(s) to convert – A table with three columns.
- Select – This column contains a toggle box to select which datasets should be converted to rasters.
- Datset Name – This column lists the dataset name as nameed in the Project Explorer.
- Raster File Name – This column gives the name of raster that will be created. Click on the name allows the name to be changed.
The bottom of the dialog defines the resolution/pixel size of the rasters to be created. There are two options for specifying this resolution.
- Define geometry from selected raster – Allows choosing an existing raster/DEM. Each raster has its own pixel size, origin and extents. If no raster is selected, or the toggle box is not checked this option will not be used. If used, the pixel size will come from the selected raster.
- Raster – Lists the raster being used if a raster has been selected.
- Select...– Opens a selection browser to select an existing raster.
- Raster – Lists the raster being used if a raster has been selected.
- Cells (w x h) – Allows specifying the number of pixels for a bounding box of the geometry in the x- and y-direction for the origin of the raster. Will change when the Cells size values are changed to be compatible.
- Cell size – Allows specifying the pixel size for the new raster. Will change when the Cells (w x y) values are changed to be compatible.
- Specify WSE data to define active raster region – This option allows selecting water surface elevation data as either a dataset or a raster to define the active raster region.
- "Use existing WSE raster" – This option allows using a raster to define the active raster region.
- "Interpolate WSE raster from existing dataset" – Allows using an existing dataset loaded in the project to define the active raster region.
- WSE raster – Shows which raster is being used to define the active raster region.
- Select – This button will open the Select WSE Raster dialog where a raster loaded into the project can be selected to use for the active raster region.
- WSE dataset &ndash Shows which dataset is being used to define the active raster region.
- Select – This button brings up the Select WSE Dataset dialog where a dataset loaded into the project can be selected to use for the active raster region. If the dataset is transient, a time step can also be selected.
- Save WSE raster to – With a dataset selected, a temporary WSE raster file will need to be generated. Where this file is a saved can be specified by the user.
- Temporary file – The WSE raster will be saved as a temporary file.
- Specified file &ndash' The WSE raster will be saved to a directory specified by the user. Use this option if wanting to keep the raster generated from the WSE dataset.
- WSE raster – Shows which raster is being used to define the active raster region.
Input/Operation
- Right-click on an SRH-2D simulation in the Project Explorer then select Tools | Datasets to rasters....
- Select/check the toggle box(es) on the left side o the table to define which datasets should be converted to rasters for the current time step.
- Click on any cell in the third column of the table to specify the name for the raster that will be created from the dataset associated with that row of the table.
- Click Ok to execute the tool, create the rasters, and have them loaded into the current session of SMS.
Related Topics
| [hide] SMS – Surface-water Modeling System | ||
|---|---|---|
| Modules: | 1D Grid • Cartesian Grid • Curvilinear Grid • GIS • Map • Mesh • Particle • Quadtree • Raster • Scatter • UGrid |  |
| General Models: | 3D Structure • FVCOM • Generic • PTM | |
| Coastal Models: | ADCIRC • BOUSS-2D • CGWAVE • CMS-Flow • CMS-Wave • GenCade • STWAVE • WAM | |
| Riverine/Estuarine Models: | AdH • HEC-RAS • HYDRO AS-2D • RMA2 • RMA4 • SRH-2D • TUFLOW • TUFLOW FV | |
| Aquaveo • SMS Tutorials • SMS Workflows | ||
