SMS:BOUSS-2D Probes
BOUSS-2D can output the histories of the computed water-surface elevation, velocities, force, and pressure at every grid point and at every time-step. However, due to the number of data points in the domain, this is usually done at intervals of 15-30 min.
In order to provide a more complete temporal representation of the results of the calculation, the model allows the user to specify probes. At a probe location (x,y,z) the user can specify what data should be saved and at what temporal resolutions. The options include water surface, velocity, force, and pressure.
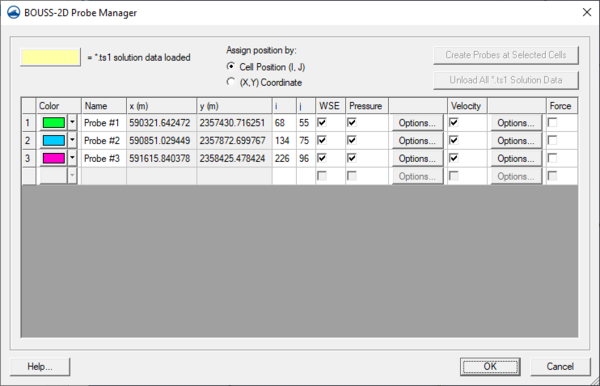
BOUSS-2D Probe Manager
The probe manager allows creating, editing, and deleting probes. This dialog is only accessible when a BOUSS-2D grid exists. The properties associated with probes as follows:
- Create Probes at Selected Cells – this button will add probes to the probe list using any cells that were selected when the Probe Manager was opened.
- Unload All *.ts1 Solution Data
- Asign position by: –
- Cell Position (I,J) – activates the i and j fields.
- (X,Y) Coordinate – activates the x and y fields.
- Color – clicking on this button will bring up Color dialog. Altenatively, a simple color picker can be accessed by clicking on the arrow to the right.
- Name – a default name will be entered in this field, but by selecting the field any name can be typed in.
- x and y coordinates – these fields are only available when the (X,Y) Coordinate option is toggled on under the Assign position by: section. When active, specific coordinates may be entered which will move the probe on the grid.
- i and j coordinates – these fields are only available when the Cell Position (I,J) option is toggled on under the Assign position by: section. When active, specific coordinates may be entered which will move the probe on the grid.
- WSE –
- Pressure –
- Velocity –
- Force –
A probe can be deleted from the Probe Manager list by selecting the probe row number and hitting the Delete key.
Related Topics
SMS – Surface-water Modeling System | ||
|---|---|---|
| Modules: | 1D Grid • Cartesian Grid • Curvilinear Grid • GIS • Map • Mesh • Particle • Quadtree • Raster • Scatter • UGrid |  |
| General Models: | 3D Structure • FVCOM • Generic • PTM | |
| Coastal Models: | ADCIRC • BOUSS-2D • CGWAVE • CMS-Flow • CMS-Wave • GenCade • STWAVE • WAM | |
| Riverine/Estuarine Models: | AdH • HEC-RAS • HYDRO AS-2D • RMA2 • RMA4 • SRH-2D • TUFLOW • TUFLOW FV | |
| Aquaveo • SMS Tutorials • SMS Workflows | ||
