SMS:BOUSS Runup / Overtopping: Difference between revisions
No edit summary |
|||
| (81 intermediate revisions by the same user not shown) | |||
| Line 1: | Line 1: | ||
[[Image:New Runup. | {{TOCright}}[[Image:New Runup.png|thumb|320 px|BOUSS Runup/Overtopping ''New Runup/Overtopping Simulation'' dialog]] | ||
BOUSS Runup / Overtopping model can used to in the design of coastal structures. The model runs a simulation based on user-specified parameters. | |||
Simulations are available in BOUSS Runup / Overtopping starting in SMS 11.1. | |||
To create a new simulation: | |||
*Right-click on empty space in the Project Explorer and select ''New Simulation'' | '''Bouss Runup/Overtopping'''. | |||
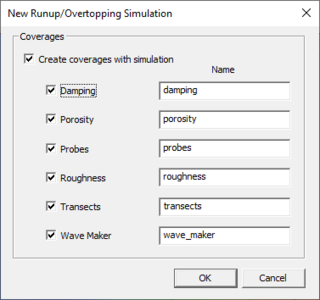
*The ''New Runup/Overtopping Simulation'' dialog will appear. Select the coverages that will be created for the project and give each coverage the desired name. Click '''OK'''. | |||
A new tree item [[File:Runup Folder Icon.svg|16 px]] for the simulation will appear in the Project Explorer. Also, all coverages that were selected in the ''New Runup/Overtopping Simulation'' dialog will appear under the "Map Data" item. Coverages can be added to the simulation by selecting the coverage and dragging it under the simulation item in the Project Explorer. | |||
== | ==Simulation Menu== | ||
Right-clicking on the simulation item [[File:Runup Simulation Icon.svg|16 px]] in the Project Explorer will bring up the simulation menu. | |||
* '''Delete''' – Standard menu command to remove the simulation. | |||
* '''Duplicate''' – Standard menu command create a copy of the simulation. | |||
* '''Rename''' – Standard menu command to give the simulation a different name. | |||
* '''Model Control''' – Launches the Runup/Overtopping [[SMS:BOUSS Runup / Overtopping Model Control|''Model Control'']] dialog. | |||
* '''View Transect Profile''' – Brings up the [[SMS:BOUSS Runup / Overtopping Viewing Data#Transect Profile|''Transect Profile'']]. | |||
* '''Export Runup/overtopping files''' – Initiates creating and saving all BOUSS Run / Overtopping files necessary to run the model. Files will be saved in the project folder. | |||
* '''Launch Runup/overtopping''' – Starts the BOUSS-2D model. A model wrapper should appear that shows the model run as it happens. Clicking the '''Abort''' button will end the model run early. Once the model run is complete, the '''Exit''' button can be selected. | |||
* '''Save project, export, and launch Runup/overtopping''' – Completes the process of saving the project, exporting the model files, and running the model in one command rather than completing each step separately. | |||
* '''Statistics''' – The [[SMS:BOUSS Runup / Overtopping Viewing Data#Statistics|''Statistics'']] dialog will open showing the values being used. | |||
=== | ==Coverage Menus== | ||
The ''Properties'' dialog | The right-click menus for Runup/Overtopping coverages are fairly standard. For each coverage (damping, probes, roughness, transects, and wave maker) there are the following options in the right-click menu: | ||
* '''Delete''' – Standard menu command to remove the coverage. | |||
* '''Duplicate''' – Standard menu command create a copy of the coverage. | |||
* '''Rename''' – Standard menu command to give the coverage a different name. | |||
* '''Projection''' – Opens an [[Projections|''Object Projection'']] dialog. | |||
* '''Metadata''' – Opens the [[SMS:Metadata|''Metadata'']] dialog. | |||
*'''Zoom to Coverage''' – Fits any feature objects associated with the coverage into the graphics window. This command will proportionally resize and center the objects associated with the coverage so they all fit in the graphics window viewing space. | |||
*''Type'' – A sub-menu that allows seeing the current coverage type and changing the coverage type if necessary. The Runup/Overtopping model only uses the damping, probes, roughness, transects, and wave maker coverages and will not make use of other coverage types. | |||
===Probes=== | |||
The probes coverage has an addition command option in the right-click menu. | |||
* '''Properties''' – Brings up the [[SMS:BOUSS Runup / Overtopping#Probes Coverage|''Probe Rules'']] dialog. | |||
===Runup Probes=== | ===Transects=== | ||
The transects coverage has an addition command option in the right-click menu. | |||
* '''Extract Elevations''' – Launches the [[SMS:Scatter_Interpolation|''Interpolation'']] dialog. | |||
==Runup / Overtopping Coverages== | |||
[[Category:SMS Coverages|BOUSS Runup]] | |||
The data from various coverages in SMS is combined to create a BOUSS Run-up / Overtopping simulation. By clicking on the coverage in the Project Explorer and dragging the item under the Runup/Overtopping simulation item in the Project Explorer, the coverages become linked to the simulation. The different coverages are as follows: | |||
===Transects Coverage=== | |||
Transects are made by creating arcs in the transects coverage. Each transect represents the 1-d grid used for a run-up simulation. It is recommended that these transects be linear. To assign elevations to the transects, use the right-click option: '''Extract elevations'''. This will prompt selecting a dataset to use for extracting. This must be done before launching a runup simulation. | |||
===Wave Maker Coverage=== | |||
Wave makers are made by creating arcs in this coverage. The wave maker properties can be edited by double-clicking on the arc or by right-clicking and selecting '''Attributes'''. Each wave maker can have multiple sets of wave parameters. Each set of wave parameters will be run in a separate simulation. It is necessary that each wave maker arc in a simulation has the same number of wave parameters. The location of the wave makers on the transect is determined by the intersection of the transect arc and the wave maker arc. Each transect arc may have only one wave maker. | |||
===Probes Coverage=== | |||
[[File:RunupProbeRules.png|thumb|400 px|BOUSS Runup/Overtopping ''Probe Rules'' dialog.]] | |||
Probes are also made by creating arcs. The location of each probe on the transect is determined by the intersection of the transect arc and the probe arc. In the arc attributes, set the type of probe which can be any of the following: Velocity, Pressure, Water Surface Elevation, and Force. To create a run-up probe, simply create a polygon in the desired location. The runup probe will be the portion of the transect arc that is inside of the polygon. | |||
====Auto-Create Probes==== | |||
The ''Probe Rules'' dialog for the probes coverage can be used to automatically create probes. | |||
====Runup Probes==== | |||
To automatically create a runup probe, define the following variables: | To automatically create a runup probe, define the following variables: | ||
* | * ''Minumum z'' – Probes will not be created below this elevation | ||
* | * ''Maximum z'' – Probes will not be created above this elevation | ||
* | * ''Delta z'' – The difference in elevation that must occur for a probe to be created | ||
When auto-creating these probes, SMS will traverse the transect arc, starting from the land and going seaward. Once a local maximum that is below "maximum z" is found, this point will be the starting point of the probe. SMS continues to traverse the arc until it reaches a point that is a distance of "delta z" below the starting point. This point will be the end point. However, if SMS reaches another local maximum with a higher elevation than the starting point, this point with the higher elevation will replace the original starting point. | When auto-creating these probes, SMS will traverse the transect arc, starting from the land and going seaward. Once a local maximum that is below "maximum z" is found, this point will be the starting point of the probe. SMS continues to traverse the arc until it reaches a point that is a distance of "delta z" below the starting point. This point will be the end point. However, if SMS reaches another local maximum with a higher elevation than the starting point, this point with the higher elevation will replace the original starting point. | ||
===Other Probes=== | ====Other Probes==== | ||
To automatically create other types of probes, it's necessary to set the following parameters: | To automatically create other types of probes, it's necessary to set the following parameters: | ||
* | * ''Elevation (m)'' – The elevation (along the transect) at which the probe should be placed | ||
* | * ''Location'' – Set to "First" or "Last". This is used only when the defined elevation occurs more than once on the transect arc. If "First" is selected, the probe will be placed at the first qualifying location on the transect arc. If "Last" is selected, the probe will be placed at the last location. | ||
* | * ''Probe Types'' – The available probe types are: flowrate, WSE, force, pressure, and velocity. Set which type(s) should be created for this rule. For pressure and velocity, define elevation(s) above the seabed where they should be placed. These can be entered by clicking the '''Define...''' button next to their checkboxes. | ||
==Damping / Porosity Coverage== | [[File:RunupProbesArcAttributes.png|thumb|400 px|The ''Arc Attributes'' dialog for the probes coverage]] | ||
====Manual Probes==== | |||
Feature arcs created in the probes coverage can be manually assigned probe properties. Right-clicking on the feature arc and selecting the '''Attributes''' command will being up an ''Arc Attributes'' dialog where the probe can be defined. This dialog has the following options: | |||
*Probe – Defines the selected arc as a probe. | |||
*Name – Allows specifying a name for the probe. | |||
*WSE | |||
*Force | |||
*Flow Rate | |||
*Pressure | |||
*Velocity | |||
===Damping / Porosity Coverage=== | |||
Damping and porosity attributes are created by making arcs. The type of attribute (damping or porosity) and its coefficient and width are set in the arc properties. | Damping and porosity attributes are created by making arcs. The type of attribute (damping or porosity) and its coefficient and width are set in the arc properties. | ||
{| | |||
|- | |||
| | |||
[[File:DampingProperties.png|thumb|none|190 px|The ''Damping Properties'' dialog]] | |||
| | |||
[[File:PorosityProperties.png|thumb|none|190 px|The ''Porosity Properties'' dialog]] | |||
|} | |||
==Roughness Coverage== | ===Roughness Coverage=== | ||
If there is varying roughness throughout a transect arc, roughness polygons can be used to define the varying roughness. Each polygon that is created will be assigned a Chezy roughness value | If there is varying roughness throughout a transect arc, roughness polygons can be used to define the varying roughness. Each polygon that is created will be assigned a Chezy roughness value. To manually set this value, double-click on the polygon and assign use the ''Roughness'' dialog. The portion of the transect arc that is inside of the polygon will be assigned that value. Otherwise, the default Chezy coefficient (defined in the model control), will be used. | ||
Note: It is helpful to turn on the display of inactive coverages while creating the wavemakers, probes, damping arcs, porosity arcs, and roughness polygons. This enables | [[File:RoughnessDialog.png|thumb|none|240 px|The ''Roughness'' dialog]] | ||
:'''''Note:''''' It is helpful to turn on the display of inactive coverages while creating the wavemakers, probes, damping arcs, porosity arcs, and roughness polygons. This enables seeing the location of the transect arcs to ensure that they are intersecting the wavemakers, probes, etc., in the desired locations. | |||
==Related Topics== | ==Related Topics== | ||
* [[SMS: | * [[SMS:BOUSS Runup / Overtopping Model Control|BOUSS Runup / Overtopping Model Control]] | ||
* [[SMS: | * [[SMS:BOUSS Runup / Overtopping Input Files|BOUSS Runup / Overtopping Input Files]] | ||
* [[SMS:BOUSS Runup / Overtopping Viewing Data|BOUSS Runup / Overtopping Viewing Data]] | |||
{{Template:Navbox SMS}} | {{Template:Navbox SMS}} | ||
[[Category:Runup/Overtopping|Run]] | |||
[[Category:Runup/Overtopping Dialogs|Run]] | |||
[[Category:Wave Modeling|R]] | |||
[[Category:SMS Simulations|Runup]] | |||
[[Category:SMS Menus]] | |||
Latest revision as of 15:41, 16 July 2019
BOUSS Runup / Overtopping model can used to in the design of coastal structures. The model runs a simulation based on user-specified parameters.
Simulations are available in BOUSS Runup / Overtopping starting in SMS 11.1.
To create a new simulation:
- Right-click on empty space in the Project Explorer and select New Simulation | Bouss Runup/Overtopping.
- The New Runup/Overtopping Simulation dialog will appear. Select the coverages that will be created for the project and give each coverage the desired name. Click OK.
A new tree item ![]() for the simulation will appear in the Project Explorer. Also, all coverages that were selected in the New Runup/Overtopping Simulation dialog will appear under the "Map Data" item. Coverages can be added to the simulation by selecting the coverage and dragging it under the simulation item in the Project Explorer.
for the simulation will appear in the Project Explorer. Also, all coverages that were selected in the New Runup/Overtopping Simulation dialog will appear under the "Map Data" item. Coverages can be added to the simulation by selecting the coverage and dragging it under the simulation item in the Project Explorer.
Simulation Menu
Right-clicking on the simulation item ![]() in the Project Explorer will bring up the simulation menu.
in the Project Explorer will bring up the simulation menu.
- Delete – Standard menu command to remove the simulation.
- Duplicate – Standard menu command create a copy of the simulation.
- Rename – Standard menu command to give the simulation a different name.
- Model Control – Launches the Runup/Overtopping Model Control dialog.
- View Transect Profile – Brings up the Transect Profile.
- Export Runup/overtopping files – Initiates creating and saving all BOUSS Run / Overtopping files necessary to run the model. Files will be saved in the project folder.
- Launch Runup/overtopping – Starts the BOUSS-2D model. A model wrapper should appear that shows the model run as it happens. Clicking the Abort button will end the model run early. Once the model run is complete, the Exit button can be selected.
- Save project, export, and launch Runup/overtopping – Completes the process of saving the project, exporting the model files, and running the model in one command rather than completing each step separately.
- Statistics – The Statistics dialog will open showing the values being used.
Coverage Menus
The right-click menus for Runup/Overtopping coverages are fairly standard. For each coverage (damping, probes, roughness, transects, and wave maker) there are the following options in the right-click menu:
- Delete – Standard menu command to remove the coverage.
- Duplicate – Standard menu command create a copy of the coverage.
- Rename – Standard menu command to give the coverage a different name.
- Projection – Opens an Object Projection dialog.
- Metadata – Opens the Metadata dialog.
- Zoom to Coverage – Fits any feature objects associated with the coverage into the graphics window. This command will proportionally resize and center the objects associated with the coverage so they all fit in the graphics window viewing space.
- Type – A sub-menu that allows seeing the current coverage type and changing the coverage type if necessary. The Runup/Overtopping model only uses the damping, probes, roughness, transects, and wave maker coverages and will not make use of other coverage types.
Probes
The probes coverage has an addition command option in the right-click menu.
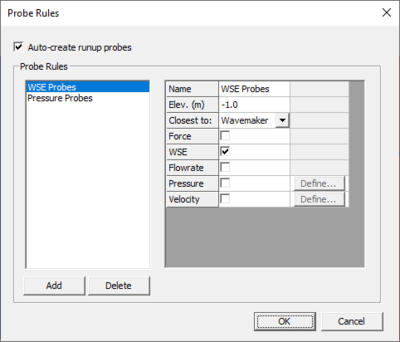
- Properties – Brings up the Probe Rules dialog.
Transects
The transects coverage has an addition command option in the right-click menu.
- Extract Elevations – Launches the Interpolation dialog.
Runup / Overtopping Coverages
The data from various coverages in SMS is combined to create a BOUSS Run-up / Overtopping simulation. By clicking on the coverage in the Project Explorer and dragging the item under the Runup/Overtopping simulation item in the Project Explorer, the coverages become linked to the simulation. The different coverages are as follows:
Transects Coverage
Transects are made by creating arcs in the transects coverage. Each transect represents the 1-d grid used for a run-up simulation. It is recommended that these transects be linear. To assign elevations to the transects, use the right-click option: Extract elevations. This will prompt selecting a dataset to use for extracting. This must be done before launching a runup simulation.
Wave Maker Coverage
Wave makers are made by creating arcs in this coverage. The wave maker properties can be edited by double-clicking on the arc or by right-clicking and selecting Attributes. Each wave maker can have multiple sets of wave parameters. Each set of wave parameters will be run in a separate simulation. It is necessary that each wave maker arc in a simulation has the same number of wave parameters. The location of the wave makers on the transect is determined by the intersection of the transect arc and the wave maker arc. Each transect arc may have only one wave maker.
Probes Coverage
Probes are also made by creating arcs. The location of each probe on the transect is determined by the intersection of the transect arc and the probe arc. In the arc attributes, set the type of probe which can be any of the following: Velocity, Pressure, Water Surface Elevation, and Force. To create a run-up probe, simply create a polygon in the desired location. The runup probe will be the portion of the transect arc that is inside of the polygon.
Auto-Create Probes
The Probe Rules dialog for the probes coverage can be used to automatically create probes.
Runup Probes
To automatically create a runup probe, define the following variables:
- Minumum z – Probes will not be created below this elevation
- Maximum z – Probes will not be created above this elevation
- Delta z – The difference in elevation that must occur for a probe to be created
When auto-creating these probes, SMS will traverse the transect arc, starting from the land and going seaward. Once a local maximum that is below "maximum z" is found, this point will be the starting point of the probe. SMS continues to traverse the arc until it reaches a point that is a distance of "delta z" below the starting point. This point will be the end point. However, if SMS reaches another local maximum with a higher elevation than the starting point, this point with the higher elevation will replace the original starting point.
Other Probes
To automatically create other types of probes, it's necessary to set the following parameters:
- Elevation (m) – The elevation (along the transect) at which the probe should be placed
- Location – Set to "First" or "Last". This is used only when the defined elevation occurs more than once on the transect arc. If "First" is selected, the probe will be placed at the first qualifying location on the transect arc. If "Last" is selected, the probe will be placed at the last location.
- Probe Types – The available probe types are: flowrate, WSE, force, pressure, and velocity. Set which type(s) should be created for this rule. For pressure and velocity, define elevation(s) above the seabed where they should be placed. These can be entered by clicking the Define... button next to their checkboxes.
Manual Probes
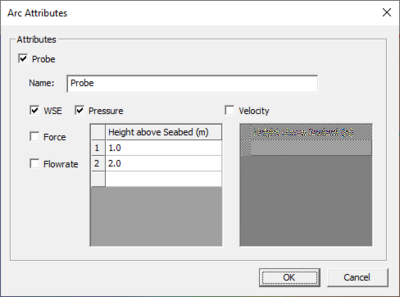
Feature arcs created in the probes coverage can be manually assigned probe properties. Right-clicking on the feature arc and selecting the Attributes command will being up an Arc Attributes dialog where the probe can be defined. This dialog has the following options:
- Probe – Defines the selected arc as a probe.
- Name – Allows specifying a name for the probe.
- WSE
- Force
- Flow Rate
- Pressure
- Velocity
Damping / Porosity Coverage
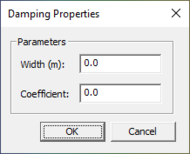
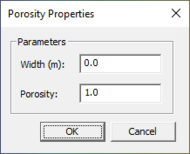
Damping and porosity attributes are created by making arcs. The type of attribute (damping or porosity) and its coefficient and width are set in the arc properties.
Roughness Coverage
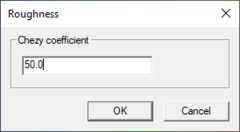
If there is varying roughness throughout a transect arc, roughness polygons can be used to define the varying roughness. Each polygon that is created will be assigned a Chezy roughness value. To manually set this value, double-click on the polygon and assign use the Roughness dialog. The portion of the transect arc that is inside of the polygon will be assigned that value. Otherwise, the default Chezy coefficient (defined in the model control), will be used.
- Note: It is helpful to turn on the display of inactive coverages while creating the wavemakers, probes, damping arcs, porosity arcs, and roughness polygons. This enables seeing the location of the transect arcs to ensure that they are intersecting the wavemakers, probes, etc., in the desired locations.
Related Topics
- BOUSS Runup / Overtopping Model Control
- BOUSS Runup / Overtopping Input Files
- BOUSS Runup / Overtopping Viewing Data
SMS – Surface-water Modeling System | ||
|---|---|---|
| Modules: | 1D Grid • Cartesian Grid • Curvilinear Grid • GIS • Map • Mesh • Particle • Quadtree • Raster • Scatter • UGrid |  |
| General Models: | 3D Structure • FVCOM • Generic • PTM | |
| Coastal Models: | ADCIRC • BOUSS-2D • CGWAVE • CMS-Flow • CMS-Wave • GenCade • STWAVE • WAM | |
| Riverine/Estuarine Models: | AdH • HEC-RAS • HYDRO AS-2D • RMA2 • RMA4 • SRH-2D • TUFLOW • TUFLOW FV | |
| Aquaveo • SMS Tutorials • SMS Workflows | ||
