AHGW:Assign Related Identifier: Difference between revisions
No edit summary |
No edit summary |
||
| Line 13: | Line 13: | ||
*'''OK''' – Click close the ''Assign Related Identifiers'' dialog and assign the source layer and field to the target layer and field as selected in the drop-downs. | *'''OK''' – Click close the ''Assign Related Identifiers'' dialog and assign the source layer and field to the target layer and field as selected in the drop-downs. | ||
*'''Cancel''' – Discard any changes and close the ''Assign Related Identifiers'' dialog. | *'''Cancel''' – Discard any changes and close the ''Assign Related Identifiers'' dialog. | ||
==Example== | ==Example== | ||
Revision as of 00:38, 8 November 2019
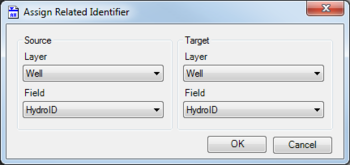
The Assign Related Identifier dialog is accessed by clicking ![]() Assign Related Identifier on the Arc Hydro Groundwater Toolbar. This tool assists in assigning a source layer and field to a target layer and field in ArcGIS.
Assign Related Identifier on the Arc Hydro Groundwater Toolbar. This tool assists in assigning a source layer and field to a target layer and field in ArcGIS.
The Arc Hydro Groundwater Data Model includes relationships between features, which are based on key fields. For example, well and aquifer features are related through the HydroID and AquiferID key attributes, and to nodes and cells of simulation model grids and meshes supported in the simulation component. The Assign Related Identifier dialog simplifies the matching up of these IDs by allowing the user to interactively assign the value of one field in one layer to another field in another layer. The tool is similar to an existing tool in the Arc Hydro surface water tools.
The following sections, options, and fields are available:
- Source section – Select the current layer and field that will be assigned to the target layer and field.
- Layer – A drop-down listing available layers.
- Field – A drop-down of fields associated with the layer selected above.
- Target section – Select the target layer and field to which the target layer and field will be assigned.
- Layer – A drop-down listing available layers.
- Field – A drop-down of fields associated with the layer selected above.
- OK – Click close the Assign Related Identifiers dialog and assign the source layer and field to the target layer and field as selected in the drop-downs.
- Cancel – Discard any changes and close the Assign Related Identifiers dialog.
Example
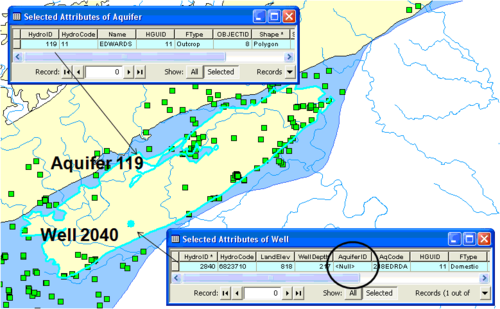
For example, instead of manually editing the AquiferID value in the well feature class, specify that the HydroID of the aquifer feature will be copied over to the AquiferID field of the well feature (see Example 1, below). The tool simplifies this attribution process.
After defining the input parameters, attribute the AquiferID of well features (target layer) by selecting the well, right-clicking on an aquifer feature (source layer) and selecting the Assign Attribute command. The AquiferID attribute in the well feature is updated to equal the HydroID of the associated aquifer feature (i.e., 119—see Example 2, below).


