User:Rcorrigan/AHGW Pro:Borehole Viewer: Difference between revisions
(Created page with "__NOINDEX__ 350px|thumb|right|''Borehole Editor'' dialog The ''Borehole Editor'' dialog is accessed by selecting ''Subsurface'' | '''B...") |
No edit summary |
||
| (12 intermediate revisions by the same user not shown) | |||
| Line 1: | Line 1: | ||
__NOINDEX__ | __NOINDEX__ | ||
[[File:ArcGIS Pro Borehole Viewer.png|350px|thumb|right|''Borehole Viewer'' pane]] | |||
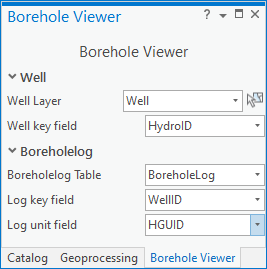
The ''Borehole Viewer'' pane is accessed by going to the ''Arc Hydro Groundwater'' ribbon in ArcGIS Pro and selecting '''[[File:ArcGIS Borehole-Well Editor and Advanced Editor icon 10 5.png|16 px]]Borehole Viewer'''. This tool allows visualization of boreholes in a ''Pop-up'' in ArcGIS Pro. | |||
Unlike former versions of ArcGIS, this tool cannot be used to edit the boreholes. Editing the boreholes requires actually going to the table for the boreholes in ArcGIS Pro and editing the information there. | |||
The following sections, options, and fields are available: | |||
*''Well'' section | |||
**''Well Layer'' – A drop-down populated with a list of point feature classes that could represent wells. | |||
**''Well key field'' – A drop-down populated by possible unique ID field names from the selected table. Typically, this is the HydroID field. | |||
*''Boreholelog'' section | |||
**''BoreholeLog Table'' – A drop-down populated by possible BoreholeLog tables. | |||
**''Log key field'' – A drop-down populated by possible unique ID field names from the selected table. Typically, this is the WellID field. | |||
**''Log unit field'' – A drop-down populated by attributes to display. | |||
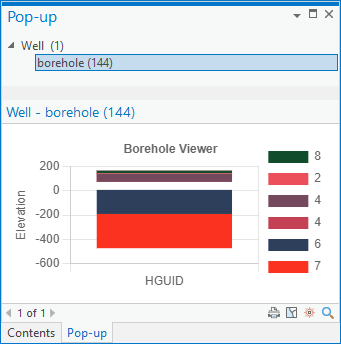
Once the fields are filled out, click the [[File:Arcgispro Slct.png|16 px]] icon to activate the ''Borehole Viewer'' tool. With the tool activated, use it to select wells/boreholes in the map. Once a well is selected, a ''Pop-up'' pane appears that displays the log unit field by depth of the selected borehole or well. | |||
[[File:ArcGIS Pro Borehole Pop up.png|350px|thumb|left|''Pop-up'' pane for ''Borehole Viewer'']] | |||
{{-}} | |||
==ArcGIS Notes== | |||
[[File:AHGW Borehole Editor dialog.png|350px|thumb|right|''Borehole Editor'' dialog]] | [[File:AHGW Borehole Editor dialog.png|350px|thumb|right|''Borehole Editor'' dialog]] | ||
In ArcGIS, this tool is called the ''Borehole Editor''. It has significant differences from the ''Borehole Viewer'' in ArcGIS Pro. If using ArcGIS, please refer to the documentation below. | |||
The ''Borehole Editor'' dialog is accessed by selecting ''Subsurface'' | '''Borehole/Well Editor''' on the [[AHGW:Arc Hydro Groundwater Toolbar|Arc Hydro Groundwater Toolbar]]. This tool allows boreholes and wells to be edited in [[ArcGIS]]. | The ''Borehole Editor'' dialog is accessed by selecting ''Subsurface'' | '''Borehole/Well Editor''' on the [[AHGW:Arc Hydro Groundwater Toolbar|Arc Hydro Groundwater Toolbar]]. This tool allows boreholes and wells to be edited in [[ArcGIS]]. | ||
Latest revision as of 15:57, 30 August 2022
The Borehole Viewer pane is accessed by going to the Arc Hydro Groundwater ribbon in ArcGIS Pro and selecting ![]() Borehole Viewer. This tool allows visualization of boreholes in a Pop-up in ArcGIS Pro.
Unlike former versions of ArcGIS, this tool cannot be used to edit the boreholes. Editing the boreholes requires actually going to the table for the boreholes in ArcGIS Pro and editing the information there.
Borehole Viewer. This tool allows visualization of boreholes in a Pop-up in ArcGIS Pro.
Unlike former versions of ArcGIS, this tool cannot be used to edit the boreholes. Editing the boreholes requires actually going to the table for the boreholes in ArcGIS Pro and editing the information there.
The following sections, options, and fields are available:
- Well section
- Well Layer – A drop-down populated with a list of point feature classes that could represent wells.
- Well key field – A drop-down populated by possible unique ID field names from the selected table. Typically, this is the HydroID field.
- Boreholelog section
- BoreholeLog Table – A drop-down populated by possible BoreholeLog tables.
- Log key field – A drop-down populated by possible unique ID field names from the selected table. Typically, this is the WellID field.
- Log unit field – A drop-down populated by attributes to display.
Once the fields are filled out, click the ![]() icon to activate the Borehole Viewer tool. With the tool activated, use it to select wells/boreholes in the map. Once a well is selected, a Pop-up pane appears that displays the log unit field by depth of the selected borehole or well.
icon to activate the Borehole Viewer tool. With the tool activated, use it to select wells/boreholes in the map. Once a well is selected, a Pop-up pane appears that displays the log unit field by depth of the selected borehole or well.
ArcGIS Notes
In ArcGIS, this tool is called the Borehole Editor. It has significant differences from the Borehole Viewer in ArcGIS Pro. If using ArcGIS, please refer to the documentation below.
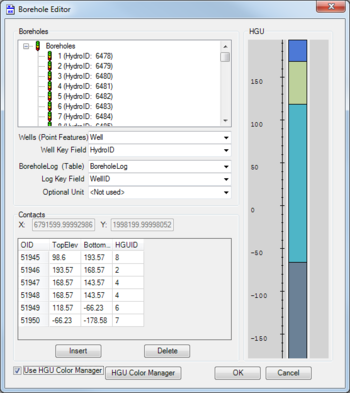
The Borehole Editor dialog is accessed by selecting Subsurface | Borehole/Well Editor on the Arc Hydro Groundwater Toolbar. This tool allows boreholes and wells to be edited in ArcGIS.
The following sections, options, and fields are available:
- Boreholes section – At the top of this section is a list of all the boreholes and wells in the project.
- Wells (Point Features) – A drop-down populated with a list of point feature classes that could represent wells.
- Well Key Field – A drop-down populated by possible unique ID field names from the selected table. Typically, this is the HydroID field.
- BoreholeLog (Table) – A drop-down populated by possible BoreholeLog tables.
- Log Key Field – A drop-down populated by possible unique ID field names from the selected table. Typically, this is the WellID field.
- Optional Unit – A drop-down populated by optional attributes to display. Default is "<Not used>".
- Contacts section –
- X and Y – List the X and Y coordinates of the selected borehole or well. Not editable in this dialog.
- The spreadsheet lists top and bottom elevations, HGUID of the selected well or borehole, the optional unit data (if selected), and and has the following columns:
- OID – Object ID from the table.
- TopElev – The top elevation of the borehole or well.
- BottomElev – The bottom elevation of the borehole or well.
- HGUID – The Hydrogeologic Unit ID of the OID displayed on that row.
- Option Unit identifier – The optional unit (if selected) for the OID on that row.
- Insert – Adds a row to the borehole log.
- Delete – Removes the selected row from the borehole log.
- HGU section – Shows the HGU by depth, as well as the optional unit (if selected) of the selected borehole or well.
- Use HGU Color Manager – Turn this on to activate the HGU Color Manager button.
- HGU Color Manager – Click to bring up the HGU Color Manager dialog.
- OK – Saves and changes and exits the Borehole Editor dialog.
- Cancel – Cancels any changes and exits the Borehole Editor dialog.


