AHGW:Export DIS File: Difference between revisions
From XMS Wiki
Jump to navigationJump to search
(Created page with "350px|thumb|right|''Export DIS File'' dialog The ''Export DIS File'' tool is accessed by double-clicking on "File:ArcGIS Tool icon 1...") |
m (Move page script moved page AHGW:Export DIS File to Test:Export DIS File without leaving a redirect) |
||
| (2 intermediate revisions by 2 users not shown) | |||
| Line 19: | Line 19: | ||
{{Navbox AHGW}} | {{Navbox AHGW}} | ||
[[Category:AHGW | [[Category:AHGW MODFLOW Analyst]] | ||
[[Category:AHGW Dialogs]] | |||
Latest revision as of 23:39, 9 September 2019
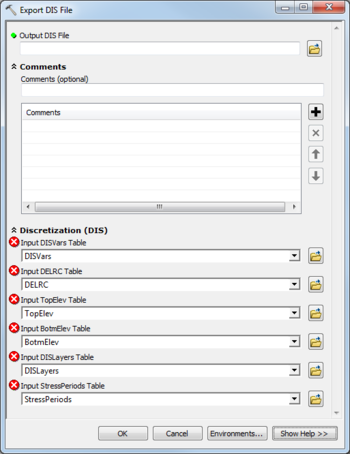
The Export DIS File tool is accessed by double-clicking on "![]() Export DIS File" under the "
Export DIS File" under the "![]() Export" toolset under the "
Export" toolset under the "![]() MODFLOW Analyst" toolset under the "
MODFLOW Analyst" toolset under the "![]() Arc Hydro Groundwater Tools" toolbox.
Arc Hydro Groundwater Tools" toolbox.
The following fields are available. Required fields are marked with a ![]() icon.
icon.
 Output DIS File – Click the
  button to bring up the Save As dialog in order to specify the name of the MODFLOW Discretization (DIS) file to be created. The DIS file defines the spatial and temporal discretization used in the model.
- Comments
- Comments – Optional comments to be written at the top of the Discretization (DIS) file. Use the
 button to add a comment, the
  button to remove the selected comment, and the Up and Down arrows to scroll through the list of comments below the comment field.
- Discretization (DIS)
One or more fields may be marked with a ![]() icon. This means the field is either not supported or the table doesn't exist.
icon. This means the field is either not supported or the table doesn't exist.
- Input DISVars Table – Click the
 button to bring up the Input DISVars Table dialog in order to specify the DISVars table containing the variables associated with the DIS file.
 - Input DELRC Table – Click the
 button to bring up the Input DELRC Table dialog in order to specify the DELRC table, storing the widths (discretization) of the rows and columns.
 - Input TopElev – Click the
 button to bring up the Input TopElev dialog in order to specify the TopElev table, storing the top elevation for the cells of the grid. Only the cells in the top layer are included. The top elevations for the remaining layers are assumed to be equivalent to the bottom elevations of the above layer as defined by the BotmElev table.
 - Input BotmElev – Click the
 button to bring up the Input BotmElev dialog in order to specify the BotmElev table, storing the bottom elevations for all the cells of the grid.
 - Input DISLayers Table – Click the
 button to bring up the Input DISLayers Table dialog in order to specify the DISLayers table contains variables defined on a layer-by-layer basis.
 - Input StressPeriods Table – Click the
 button to bring up the Input StressPeriods Table dialog in order to specify the StressPeriods table stores information on stress periods and time steps.
| [show] AHGW – Arc Hydro Groundwater Toolbox |
|---|

