AHGW:Create MODFLOW Cell3D: Difference between revisions
From XMS Wiki
Jump to navigationJump to search
(Created page with "350px|thumb|right|''Create MODFLOW Cell3D'' dialog The ''Create MODFLOW Cell3D'' tool is accessed by...") |
m (Move page script moved page AHGW:Create MODFLOW Cell3D to Test:Create MODFLOW Cell3D without leaving a redirect) |
||
| (One intermediate revision by one other user not shown) | |||
| Line 19: | Line 19: | ||
{{Navbox AHGW}} | {{Navbox AHGW}} | ||
[[Category:AHGW MODFLOW Analyst]] | [[Category:AHGW MODFLOW Analyst]] | ||
[[Category:AHGW Dialogs]] | |||
Latest revision as of 23:40, 9 September 2019
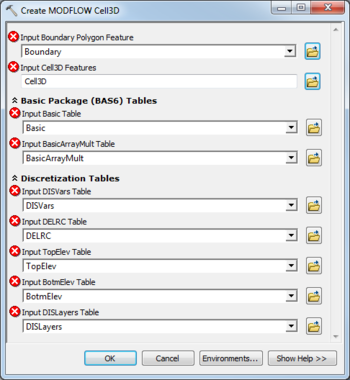
The Create MODFLOW Cell3D tool is accessed by double-clicking on "![]() Create MODFLOW Cell3D" under the "
Create MODFLOW Cell3D" under the "![]() Features" toolset under the "
Features" toolset under the "![]() MODFLOW Analyst" toolset under the "
MODFLOW Analyst" toolset under the "![]() Arc Hydro Groundwater Tools" toolbox.
Arc Hydro Groundwater Tools" toolbox.
The following fields are available. Fields marked with a ![]() icon may either not be supported or the table doesn't exist.
icon may either not be supported or the table doesn't exist.
- Input Boundary Polygon Feature – Click the
 button to bring up the Input Boundary Polygon Feature dialog in order to specify the polygon feature class that represents the two-dimensional extent of the MODFLOW model.
 - Input Cell3D Features – Click the
 button to bring up the Input Cell3D Features dialog in order to specify the multipatch, Z-enabled feature class where the Cell3D features will be created.
- Basic Package (BAS6) Tables
- Input Basic Table – Click the
 button to bring up the Input Basic Table dialog in order to specify the Basic Package (BAS6) in MODFLOW that contains the IBOUND array. The IBOUND array is used to define the active/inactive status of the MODFLOW grid.
 - Input BasicArrayMult Table – Click the
 button to bring up the Input BasicArrayMult Table dialog in order to specify the table that stores multipliers for the IBOUND array on a layer-by-layer basis.
- Discretization Tables
- Input DISVars Table – Click the
 button to bring up the Input DISVars Table dialog in order to specify the DISVars table, in MODFLOW Data Model format. This table contains variables associated with the DIS file.
 - Input DELRC Table – Click the
 button to bring up the Input DELRC Table dialog in order to specify the DELRC table, in MODFLOW Data Model format.
 - Input TopElev Table – Click the
 button to bring up the Input TopElev Table dialog in order to specify the TopElev table, in MODFLOW Data Model format.
 - Input BotmElev Table – Click the
 button to bring up the Input BotmElev Table dialog in order to specify the BotmElev table, in MODFLOW Data Model format.
 - Input DISLayers Table – Click the
 button to bring up the Input DISLayers Table dialog in order to specify the DISLayers table, in MODFLOW Data Model format.
| [show] AHGW – Arc Hydro Groundwater Toolbox |
|---|

