User:Rcorrigan/AHGW Pro:Assign Related ID: Difference between revisions
No edit summary |
No edit summary |
||
| (6 intermediate revisions by the same user not shown) | |||
| Line 1: | Line 1: | ||
__NOINDEX__ | __NOINDEX__ | ||
The ''Assign Related Identifier'' | The ''Assign Related Identifier'' pane is accessed by clicking [[File:ArcGIS Pro Assign Related ID Icon.png|16 px]] '''Assign Related ID''' on the [[AHGW:Arc Hydro Groundwater Toolbar|Arc Hydro Groundwater Ribbon]]. This tool assists in assigning a source layer and field to a target layer and field in ArcGIS Pro. | ||
:'''''ArcGIS Notes''''' – In [[ArcGIS]], the ''Assign Related Identifier'' dialog is accessed by clicking [[File:AHGW Assign Related Identifiers Icon.png]] '''Assign Related Identifier''' on the [[AHGW:Arc Hydro Groundwater Toolbar|Arc Hydro Groundwater Toolbar]]. | :'''''ArcGIS Notes''''' – In [[ArcGIS]], the ''Assign Related Identifier'' dialog is accessed by clicking [[File:AHGW Assign Related Identifiers Icon.png]] '''Assign Related Identifier''' on the [[AHGW:Arc Hydro Groundwater Toolbar|Arc Hydro Groundwater Toolbar]]. | ||
[[File:ArcGIS Pro Assign Related ID.png|350px|thumb|right|The ''Assign Related | [[File:ArcGIS Pro Assign Related ID.png|350px|thumb|right|The ''Assign Related ID'' pane]] | ||
The [[AHGW:Arc Hydro Groundwater Data Model|Arc Hydro Groundwater Data Model]] includes relationships between features, which are based on key fields. For example, well and aquifer features are related through the HydroID and AquiferID key attributes | The [[AHGW:Arc Hydro Groundwater Data Model|Arc Hydro Groundwater Data Model]] includes relationships between features, which are based on key fields. For example, well and aquifer features are related through the HydroID and AquiferID key attributes. They can also be related using similar means to nodes and cells of simulation model grids and meshes supported in the simulation component. The ''Assign Related ID'' tool simplifies the matching up of these IDs by allowing the user to interactively assign the value of one field in one layer to another field in another layer. The tool is similar to an existing tool in the Arc Hydro surface water tools. | ||
The following sections, options, and fields are available: | The following sections, options, and fields are available: | ||
*''Source'' section – Select the current layer and field that will be assigned to the target layer and field. | *''Source'' section – Select the current layer and field that will be assigned to the target layer and field. | ||
**''Layer'' – A drop-down listing available layers. | **''Layer'' – A drop-down listing available layers. | ||
**[[File:Arcgispro Slct.png|16 px]] – Selecting this icon activates the tool in ArcGIS Pro. Ensure all the options are set to their desired settings before activating the tool. If the tool is active, the mouse icon will change to a [[File:ArcGIS Pro Cross-hairs.png|16 px]] crosshairs icon. Once the tool is active, left-click on the desired source layer to select it. Then, hold down the ''Ctrl'' key and left-click on the target layer. This assigns the information from the source layer to the target layer. Hovering over the select button brings up a text box that also contains the instructions on how to use the tool. | |||
**''Field'' – A drop-down of fields associated with the layer selected above. | **''Field'' – A drop-down of fields associated with the layer selected above. | ||
*''Target'' section – Select the target layer and field to which the source layer and field will be assigned. | *''Target'' section – Select the target layer and field to which the source layer and field will be assigned. | ||
**''Layer'' – A drop-down listing available layers. | **''Layer'' – A drop-down listing available layers. | ||
**''Field'' – A drop-down of fields associated with the layer selected above. | **''Field'' – A drop-down of fields associated with the layer selected above. | ||
:'''''ArcGIS Feature Note''''' – The documentation for the following button applies only to older versions of ArcGIS, not to ArcGIS Pro. | |||
:*'''OK''' – Click to close the ''Assign Related Identifiers'' dialog and assign the source layer and field to the target layer and field as selected in the drop-downs. | :*'''OK''' – Click to close the ''Assign Related Identifiers'' dialog and assign the source layer and field to the target layer and field as selected in the drop-downs. | ||
:**Once the '''OK''' button has been clicked, use left-click on the mouse to select the source and right-click on the mouse to select the target. In ArcGIS, this assigns the desired information from the source layer to the target layer. | |||
==Example== | ==Example== | ||
For example, instead of manually editing the AquiferID value in the well feature class, specify that the HydroID of the aquifer feature will be copied over to the AquiferID field of the well feature (see Example 1, below). The tool simplifies this attribution process. | For example, instead of manually editing the AquiferID value in the well feature class, specify that the HydroID of the aquifer feature will be copied over to the AquiferID field of the well feature (see Example 1, below). The tool simplifies this attribution process. | ||
[[File:AHGW - The Assign Related Identifier tool assists in populating key fields.png|thumb|500px|none|Example 1: The Assign Related Identifier tool assists in populating key fields. For example, to support the Aquifer-Well relationship in Arc Hydro the AquiferID of the Well feature (shown as Null) should be set equal to the HydroID of the Aquifer feature (in this example equals 119).]] | [[File:AHGW - The Assign Related Identifier tool assists in populating key fields.png|thumb|500px|none|Example 1: The Assign Related Identifier tool assists in populating key fields. For example, to support the Aquifer-Well relationship in Arc Hydro the AquiferID of the Well feature (shown as Null) should be set equal to the HydroID of the Aquifer feature (in this example, it equals 119).]] | ||
After defining the input parameters, attribute the AquiferID of well features (target layer) by selecting the well, right-clicking on an aquifer feature (source layer) and selecting the '''Assign Attribute''' command. The AquiferID attribute in the well feature is updated to equal the HydroID of the associated aquifer feature (i.e., 119—see Example 2, below). | After defining the input parameters, attribute the AquiferID of well features (target layer) by selecting the well, right-clicking on an aquifer feature (source layer) and selecting the '''Assign Attribute''' command. The AquiferID attribute in the well feature is updated to equal the HydroID of the associated aquifer feature (i.e., 119—see Example 2, below). | ||
[[File:AHGW Updating key filed using the Assign Related Identifier tool.png|thumb|500px|none|Example 2: Updating key | [[File:AHGW Updating key filed using the Assign Related Identifier tool.png|thumb|500px|none|Example 2: Updating key field using the Assign Related Identifier tool.]] | ||
{{Navbox AHGW}} | {{Navbox AHGW}} | ||
[[Category:AHGW Groundwater Analyst]] | [[Category:AHGW Groundwater Analyst]] | ||
Latest revision as of 15:53, 30 August 2022
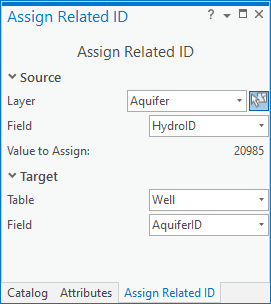
The Assign Related Identifier pane is accessed by clicking ![]() Assign Related ID on the Arc Hydro Groundwater Ribbon. This tool assists in assigning a source layer and field to a target layer and field in ArcGIS Pro.
Assign Related ID on the Arc Hydro Groundwater Ribbon. This tool assists in assigning a source layer and field to a target layer and field in ArcGIS Pro.
- ArcGIS Notes – In ArcGIS, the Assign Related Identifier dialog is accessed by clicking
 Assign Related Identifier on the Arc Hydro Groundwater Toolbar.
The Arc Hydro Groundwater Data Model includes relationships between features, which are based on key fields. For example, well and aquifer features are related through the HydroID and AquiferID key attributes. They can also be related using similar means to nodes and cells of simulation model grids and meshes supported in the simulation component. The Assign Related ID tool simplifies the matching up of these IDs by allowing the user to interactively assign the value of one field in one layer to another field in another layer. The tool is similar to an existing tool in the Arc Hydro surface water tools.
The following sections, options, and fields are available:
- Source section – Select the current layer and field that will be assigned to the target layer and field.
- Layer – A drop-down listing available layers.
 – Selecting this icon activates the tool in ArcGIS Pro. Ensure all the options are set to their desired settings before activating the tool. If the tool is active, the mouse icon will change to a
  crosshairs icon. Once the tool is active, left-click on the desired source layer to select it. Then, hold down the Ctrl key and left-click on the target layer. This assigns the information from the source layer to the target layer. Hovering over the select button brings up a text box that also contains the instructions on how to use the tool.
- Field – A drop-down of fields associated with the layer selected above.
- Target section – Select the target layer and field to which the source layer and field will be assigned.
- Layer – A drop-down listing available layers.
- Field – A drop-down of fields associated with the layer selected above.
- ArcGIS Feature Note – The documentation for the following button applies only to older versions of ArcGIS, not to ArcGIS Pro.
- OK – Click to close the Assign Related Identifiers dialog and assign the source layer and field to the target layer and field as selected in the drop-downs.
- Once the OK button has been clicked, use left-click on the mouse to select the source and right-click on the mouse to select the target. In ArcGIS, this assigns the desired information from the source layer to the target layer.
- OK – Click to close the Assign Related Identifiers dialog and assign the source layer and field to the target layer and field as selected in the drop-downs.
Example
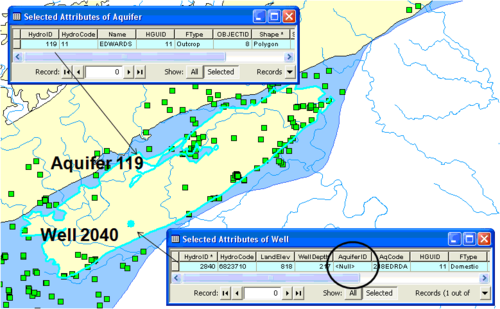
For example, instead of manually editing the AquiferID value in the well feature class, specify that the HydroID of the aquifer feature will be copied over to the AquiferID field of the well feature (see Example 1, below). The tool simplifies this attribution process.
After defining the input parameters, attribute the AquiferID of well features (target layer) by selecting the well, right-clicking on an aquifer feature (source layer) and selecting the Assign Attribute command. The AquiferID attribute in the well feature is updated to equal the HydroID of the associated aquifer feature (i.e., 119—see Example 2, below).


