GMS:Editing a TIN
TINs can be edited several ways. The selection and editing tools apply only to the active TIN. If going to edit vertices, the user must first turn off the TINs | Lock All Vertices menu command.
Contents
Editing TIN Vertices
Creating New TIN Vertices
New vertices can be created using the Create Vertices tool from the TIN tool palette. Clicking in the Graphics Window creates a new vertex at the point clicked (vertices can only be created when in Plan View). The default z value and other parameters governing the creation of new vertices can be set by selecting the TIN Settings command from the TINs menu.
Deleting TIN Vertices
Selected TIN vertices can be deleted by hitting the Delete key or by selecting the Delete command from the Edit menu. If the Confirm Deletions option in the Preferences dialog is on, the user is prompted to confirm each deletion.
Editing TIN Vertex Coordinates
Two methods of editing TIN vertex coordinates are available. To manipulate vertex coordinates, the Select Vertex tool must be selected from the TIN Tool Palette.
- A vertex can be moved to a new position by clicking on the vertex and holding down the mouse button while dragging the vertex to the desired position. If the current view is plan view, dragging the vertex causes it to move in the xy plane. GMS does not allow the vertex to be dragged to a position where one of the surrounding triangles becomes inverted. If the current view is not the plan view, the vertex moves along the z-axis.
- The vertex position and z value can also be manipulated by selecting the vertex and changing the XYZ values that will appear in the x, y, and z edit boxes in the Edit Window.
Snap Vertices to TIN
It is sometimes useful to snap the vertices of one TIN to another TIN. This is useful when modeling pinch out zones and truncations. The TIN containing the vertices to be moved should be the active TIN, since vertex selection can only be done for the active TIN. After the desired vertices have been selected, the Snap Vertices to TIN command of the TINs menu should be selected. GMS then prompts the user to select the TIN to which the vertices are snapped. The selected vertices' z coordinate values are then modified such that they lie on the selected TIN.
Editing Triangles of a TIN
Create Triangles
The Create Triangles tool is used to manually create new triangles. Triangles are normally created by triangulating a set of points automatically. However, this tool is useful for manually editing and refining a TIN. To use the Create Triangles tool:
- Select the three vertices of the triangle. The vertices can be selected in either clockwise or counter-clockwise order.
- Drag a box around three vertices of the triangle.
Deleting Triangles
- Using the Select Triangles tool, the triangles may be selected and deleted.
- Boundary Triangles – The perimeter of the TIN resulting from the triangulation process corresponds to or approximates the convex hull of the TIN vertices. This may result in some long thin triangles or "slivers" on the perimeter of the triangulated region. There are several ways to deal with the long thin triangles. Thin triangles can be selected and deleted using the normal selection procedures. There is also an option for selecting thin triangles when the Select Triangles tool is selected. If the Control key is held down, it is possible to drag a line with the mouse. All triangles intersecting the line are selected. Long thin triangles on the perimeter of the TIN can also be selected by selecting the Select Boundary Triangles command from the TINs menu. The Select Boundary Triangles command checks triangles on the outer boundary first. If the length ratio of the triangle is less than the critical length ratio, the triangle is selected and the triangles adjacent to the triangle are then checked. The process continues inward until none of the adjacent triangles violate the minimum length ratio. The critical length ratio for selecting thin triangles can be set by selecting the TINs | TIN Settings menu command. The length ratio is defined as the longest side of the triangle divided by the sum of the two shorter sides.
Changing Triangle Density
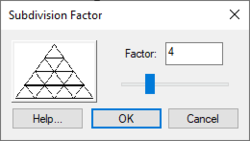
The density of a TIN can be quickly increased using the Uniformly Subdivide TIN command in the TINs menu. A dialog will ask for a subdivision factor and the factor is used to uniformly subdivide the TIN into sub-triangles as shown below:
Subdivide TIN
This command can be used to "smooth" a TIN. When using a TIN for contouring, the contours are computed using a linear interpolation of the triangles. If the vertices are sparse, the contours may not appear to be smooth. The contours can be smoothed by copying the vertices to a scatter point set, subdividing the TIN into sub-triangles, and interpolating the z values (or other datasets) from the scatter point set to the new vertices defining the sub-triangles.
Subdivision and smoothing can be accomplished using the following steps:
- If multiple TINs exist, make sure the TIN is the active TIN.
- Convert the TIN to a scatter point set using the TIN → Scatter Points command in the TINs menu.
- Subdivide the TIN by selecting the Subdivide TIN command from the TINs menu and use the Subdivision Factor dialog.
- Switch to the 2D Scatter Point module and select an interpolation method using the Interp. Options command in the Interpolation menu.
- Select the to Active TIN command from the Interpolation menu. This creates a new dataset for the selected TIN.
Adding Breaklines
A breakline is a feature line or polyline representing a ridge or some other feature to preserve in a mesh made up of triangular elements. In other words, a breakline is a series of edges to which the triangles should conform to, i.e., not intersect.
Breaklines can be processed using the Add Breaklines command from the Mesh menu. Before selecting the command, one or more sequences of nodes defining the breakline(s) should be selected using the Select Node Strings tool in the 2D Mesh Tool Palette.
As each breakline is processed, the triangles intersected by the breakline are modified by adding new nodes at necessary locations to ensure that the edges of the triangles will conform to the breakline. The elevations of the new nodes are based on a linear interpolation of the breakline segments. The locations of the new nodes are determined in such a way that the Delaunay criterion is satisfied.
| [hide]GMS – Groundwater Modeling System | ||
|---|---|---|
| Modules: | 2D Grid • 2D Mesh • 2D Scatter Point • 3D Grid • 3D Mesh • 3D Scatter Point • Boreholes • GIS • Map • Solid • TINs • UGrids | |
| Models: | FEFLOW • FEMWATER • HydroGeoSphere • MODAEM • MODFLOW • MODPATH • mod-PATH3DU • MT3DMS • MT3D-USGS • PEST • PHT3D • RT3D • SEAM3D • SEAWAT • SEEP2D • T-PROGS • ZONEBUDGET | |
| Aquaveo | ||


