AHGW:Import GeoVolume from XML: Difference between revisions
No edit summary |
No edit summary |
||
| Line 3: | Line 3: | ||
The following fields are available. Required fields are marked with a [[File:ArcGIS required - green circle icon.png|8px]] icon. Fields marked with a [[File:ArcGIS Error icon.png|10px]] icon may either not be supported or the table doesn't exist. | The following fields are available. Required fields are marked with a [[File:ArcGIS required - green circle icon.png|8px]] icon. Fields marked with a [[File:ArcGIS Error icon.png|10px]] icon may either not be supported or the table doesn't exist. | ||
*[[File:ArcGIS required - green circle icon.png|8px]]''XML Volume File'' – Click the [[File:ArcGIS Browse button 10_5.png|14px]] button to bring up the ''Open'' dialog in order to specify the XML solids file. | *[[File:ArcGIS required - green circle icon.png|8px]] ''XML Volume File'' – Click the [[File:ArcGIS Browse button 10_5.png|14px]] button to bring up the ''Open'' dialog in order to specify the XML solids file. | ||
*[[File:ArcGIS required - green circle icon.png|8px]]''GeoSections XML File'' – Click the [[File:ArcGIS Browse button 10_5.png|14px]] button to bring up the ''Open'' dialog in order to specify the multipatch GeoVolume layer to write to. | *[[File:ArcGIS required - green circle icon.png|8px]] ''GeoSections XML File'' – Click the [[File:ArcGIS Browse button 10_5.png|14px]] button to bring up the ''Open'' dialog in order to specify the multipatch GeoVolume layer to write to. | ||
*''Append to Existing GeoVolume Features'' – Optional. Turn on to append new GeoVolume features to the feature class. Turn off to clear the target feature class prior to creating the new GeoVolume(s). | *''Append to Existing GeoVolume Features'' – Optional. Turn on to append new GeoVolume features to the feature class. Turn off to clear the target feature class prior to creating the new GeoVolume(s). | ||
*'''OK''' – Saves all changes, closes the ''Import GeoVolume from XML'' dialog, and runs the tool. | *'''OK''' – Saves all changes, closes the ''Import GeoVolume from XML'' dialog, and runs the tool. | ||
Revision as of 20:40, 19 November 2019
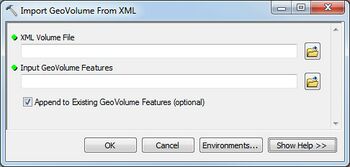
The Import GeoVolume from XML dialog is accessed by double-clicking on "![]() Import GeoVolume from XML" under the "
Import GeoVolume from XML" under the "![]() 3D Import" toolset under the "
3D Import" toolset under the "![]() Subsurface Analyst" toolset under the "
Subsurface Analyst" toolset under the "![]() Arc Hydro Groundwater Tools" toolbox. This tool imports GeoVolume features from an XML file.
Arc Hydro Groundwater Tools" toolbox. This tool imports GeoVolume features from an XML file.
The following fields are available. Required fields are marked with a ![]() icon. Fields marked with a
icon. Fields marked with a ![]() icon may either not be supported or the table doesn't exist.
icon may either not be supported or the table doesn't exist.
 XML Volume File – Click the
  button to bring up the Open dialog in order to specify the XML solids file.
 GeoSections XML File – Click the
  button to bring up the Open dialog in order to specify the multipatch GeoVolume layer to write to.
- Append to Existing GeoVolume Features – Optional. Turn on to append new GeoVolume features to the feature class. Turn off to clear the target feature class prior to creating the new GeoVolume(s).
- OK – Saves all changes, closes the Import GeoVolume from XML dialog, and runs the tool.
- Cancel – Discards all changes and closes the Import GeoVolume from XML dialog.
- Environments... – Brings up the Environment Settings dialog in ArcGIS.
- Show Help – Opens the Help slider on the right side of the dialog.
- Hide Help – Closes the Help slider on the right side of the dialog.
- Tool Help – Only visible if the Help slider is open. Click to open the ArcGIS help for this dialog.
XML Details
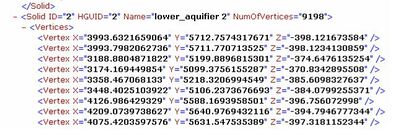
The Import GeoVolume from XML tool imports 3D volume features as 3D multipatches into the GeoVolume feature class in Arc Hydro Groundwater. The tool input is an XML file where volumes are defined as a set of triangles where each triangle is defined by three 3D vertices.
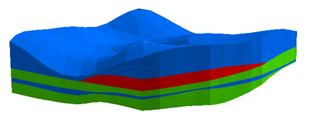
The 3D volumes represent 3D hydrogeologic units and can be viewed in ArcScene.


