User:Rcorrigan/AHGW Pro:Create GeoVolume Feature Class: Difference between revisions
From XMS Wiki
Jump to navigationJump to search
No edit summary |
No edit summary |
||
| (One intermediate revision by the same user not shown) | |||
| Line 1: | Line 1: | ||
__NOINDEX__ | __NOINDEX__ | ||
[[File: | [[File:ArcGIS Pro Create GeoVolume Feature Class.png|350px|thumb|right|''Create GeoVolume Feature Class'' tool in the ''Geoprocessing'' pane]] | ||
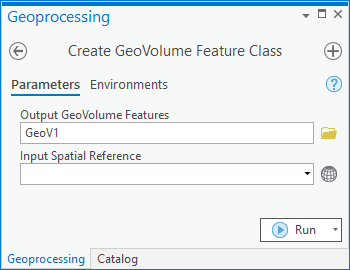
The ''Create GeoVolume Feature Class'' tool is accessed by double-clicking on "[[File:ArcGISPro Toolbx Tool.png|16 px]] Create GeoVolume Feature Class" under the "[[File:ArcGISPro Toolset.png|16 px]] Features" toolset under the "[[File:ArcGISPro Toolset.png|16 px]] Subsurface Analyst" toolset under the "[[File:ArcGISPro Toolbx Item.png|16 px]] ArcHydroGroundwater.pyt" toolbox. This tool creates an empty GeoVolume feature class (multipatch) based on the Arc Hydro Groundwater Data Model. | The ''Create GeoVolume Feature Class'' tool is accessed by double-clicking on "[[File:ArcGISPro Toolbx Tool.png|16 px]] Create GeoVolume Feature Class" under the "[[File:ArcGISPro Toolset.png|16 px]] Features" toolset under the "[[File:ArcGISPro Toolset.png|16 px]] Subsurface Analyst" toolset under the "[[File:ArcGISPro Toolbx Item.png|16 px]] ArcHydroGroundwater.pyt" toolbox. This tool creates an empty GeoVolume feature class (multipatch) based on the Arc Hydro Groundwater Data Model. | ||
:'''''ArcGIS Notes''''' – In older versions of ArcGIS, this tool appears as a dialog and is accessed through the "Arc Hydro Groundwater Tools" toolbox. | |||
The following fields are available. Required fields are marked with a [[File:ArcGIS Pro Red Required Symbol.png|8 px]] icon. In ArcGIS, they are marked with a [[File:ArcGIS required - green circle icon.png|8px]] icon. Fields marked with a [[File:ArcGIS Pro Warning Red.png|12 px]] icon may | :The icons vary between ArcGIS and ArcGIS Pro. | ||
The following fields are available. Required fields are marked with a [[File:ArcGIS Pro Red Required Symbol.png|8 px]] icon. In ArcGIS, they are marked with a [[File:ArcGIS required - green circle icon.png|8px]] icon. Fields marked with a [[File:ArcGIS Pro Warning Red.png|12 px]] icon may not be supported or the table may not exist. | |||
*''Output GeoVolume Features'' – Click the [[File:ArcGISPro Open.png|16 px]] button to bring up the ''Output GeoVolume Features'' dialog in order to specify the output GeoVolume multipatch feature class to create. | *''Output GeoVolume Features'' – Click the [[File:ArcGISPro Open.png|16 px]] button to bring up the ''Output GeoVolume Features'' dialog in order to specify the output GeoVolume multipatch feature class to create. | ||
*''Input Spatial Reference'' – Optional. Click the [[File:ArcGISPro SlctCoordnateSystm.png|16 px]] button to bring up the ''Coordinate System'' dialog where the desired coordinate system can be selected. | *''Input Spatial Reference'' – Optional. Click the [[File:ArcGISPro SlctCoordnateSystm.png|16 px]] button to bring up the ''Coordinate System'' dialog where the desired coordinate system can be selected. | ||
Latest revision as of 21:22, 15 August 2022
The Create GeoVolume Feature Class tool is accessed by double-clicking on "![]() Create GeoVolume Feature Class" under the "
Create GeoVolume Feature Class" under the "![]() Features" toolset under the "
Features" toolset under the "![]() Subsurface Analyst" toolset under the "
Subsurface Analyst" toolset under the "![]() ArcHydroGroundwater.pyt" toolbox. This tool creates an empty GeoVolume feature class (multipatch) based on the Arc Hydro Groundwater Data Model.
ArcHydroGroundwater.pyt" toolbox. This tool creates an empty GeoVolume feature class (multipatch) based on the Arc Hydro Groundwater Data Model.
- ArcGIS Notes – In older versions of ArcGIS, this tool appears as a dialog and is accessed through the "Arc Hydro Groundwater Tools" toolbox.
- The icons vary between ArcGIS and ArcGIS Pro.
The following fields are available. Required fields are marked with a ![]() icon. In ArcGIS, they are marked with a
icon. In ArcGIS, they are marked with a ![]() icon. Fields marked with a
icon. Fields marked with a ![]() icon may not be supported or the table may not exist.
icon may not be supported or the table may not exist.
- Output GeoVolume Features – Click the
 button to bring up the Output GeoVolume Features dialog in order to specify the output GeoVolume multipatch feature class to create.
 - Input Spatial Reference – Optional. Click the
 button to bring up the Coordinate System dialog where the desired coordinate system can be selected.

