SMS:Color Options: Difference between revisions
m (→Related Topics) |
No edit summary |
||
| (47 intermediate revisions by 2 users not shown) | |||
| Line 1: | Line 1: | ||
The Color Options dialog lets | [[Image:Color Options.png|thumb|300 px|''Color Options'' dialog]] | ||
The ''Color Options'' dialog lets determining how the contours and vectors will be colored. The ''Color Options'' dialog is opened from the [[SMS:Mesh Data Menu|''Data'' menu]], or from the '''Color Ramp...''' button on the [[SMS:Contours|''Contours'']] and [[SMS:Vector Display Options|''Vectors'']] tabs of the [[SMS:Display Options|''Display Options'']] dialog. | |||
The default color method is the Solid color option. This method uses a single color for all contours. As an alternative, | The default color method is the ''Solid'' color option. This method uses a single color for all contours. As an alternative, it's possible to define a ramp of colors. These colors are distributed across the range of contour values in a continuous fashion, giving each contour its own color. If specific contour values are specified, control whether the colors are distributed by index or by value in the upper right portion of the dialog. The following types of color ramps are supported by SMS: | ||
* Solid color | * ''Solid color'' – A single color is used for all values. | ||
* Intensity ramp | * ''Intensity ramp'' – The color ramp is defined as a continuous variation of the intensity of the default solid color. This is the same color used for the ''Solid color'' option. | ||
* Hue ramp | * ''Hue ramp'' – The ramp is a continuous variation of hues using the hue-saturation-value color model. | ||
* | * ''User Defined Palettes'' – User defined color ramp. | ||
If using an intensity ramp or hue ramp, the ramp can be edited to include only a portion of the entire ramp, or converted to a | If using an intensity ramp or hue ramp, the ramp can be edited to include only a portion of the entire ramp, or converted to a ''User Defined Palettes'' for further editing. Modify the portion of the ramp to be used by setting the minimum and maximum values for hue or intensity with the scroll bars in the ''Color Options'' dialog. These controls specify where the minimum value will be mapped into the ramp and where the maximum value will be mapped. The '''Reverse''' button changes the direction of the color gradation in the color ramp. | ||
==User Defined Palettes == | |||
It is possible to define and edit a color palette for use with contours. In the [[SMS:Display Options|''Display Options'']] dialog, on the [[SMS:Contour Options|''Contours tab'']], pressing the '''Color Ramp''' button opens the ''Color Options'' dialog. Inside the ''Color Options'' dialog, selecting the ''User defined'' option enables the following options: | |||
=== User Defined Palettes Frame === | |||
* '''New Palette''' – Create a new color palette. This opens the ''New Palette'' dialog, which is used to define a color ramp palette. Select a preset palette and the initial number of colors in the palette. The palette can be fine tuned once it is created in the ''Color Options'' dialog. | |||
* '''Delete Palette''' – Delete the selected palette. | |||
* '''Load Palettes''' – Load palettes from an SMS defined [[SMS:Color Palette Files *.pal|palette file]]. | |||
* '''Save Palettes''' – Save all of the user created palettes to a file using the format shown above. | |||
=== Current Palette Frame === | |||
The color pallet selected in the ''User Defined Palettes'' frame is displayed. Select, edit, and drag colors in the ''Color Palette'' using the following tools: | |||
* '''Select/Move cross section point''' [[File:ColorPalette CreateBreakpoint.svg|16 px]] tool | |||
** Click – Creates new breakpoints | |||
* '''Select an individual breakpoint''' [[File:ColorPalette SelectBreakpoint.svg|16 px]] tool | |||
** Click and drag – Changes the value associated with a breakpoint | |||
** Double-click – Opens the ''Color'' dialog to change the color associated with a breakpoint | |||
** Select, then press the ''Delete'' key – Delete the selected breakpoint | |||
*'''Value edit field''' – Change the value of a selected color. Changing a value will move the color inside the color palette window. | |||
*'''Edit Table''' – This button opens the ''Color Table'' dialog. Values and colors associated with each breakline can be viewed and edited. This dialog is useful for creating a palette with a logarithmic scale. It may be difficult to select colors very close to one another at the lower end of a log scale using the mouse left-click button, but the values can easily be specified in this dialog. | |||
* Display Value As – Show the value of each color as: | |||
** '''Percentages (0.0-1.0)''' – A percentage across the palette, with 0.0 being to the left of the palette and 1.0 at the right edge of the palette. | |||
** '''Numerical Values''' – The actual value of each color. Each color will represent a value such as elevation. | |||
===New Palette=== | |||
[[Image:SMS New Palette.png|thumb|250 px|''New Palette'' dialog]] | |||
The ''New Palette'' dialog is used to create a new user defined palette. The following palette options can be set: | |||
* ''Initial Color Ramp Type'': | |||
** Solid Color | |||
** Intensity Ramp | |||
** Hue Ramp | |||
** Elevation | |||
** Ocean | |||
** Magnitude Difference | |||
* ''Color'' – Only available for ''Solid Color'' and ''Intensity Ramp'' | |||
* ''Number of Colors'' – Only available for ''Solid Color'', ''Intensity Ramp'', and ''Hue Ramp'' | |||
* ''Palette name'' – Allows giving the palette a unique name. | |||
Once the general options have been set in the ''New Palette'' dialog, the palette can be fine tuned using the tools in the ''Color Options'' dialog. | |||
==Related Topics== | ==Related Topics== | ||
* [[SMS: | * [[SMS:Contour Options|Contour Options]] | ||
* [[SMS:Contour Labels|Contour Labels]] | * [[SMS:Contour Options#Contour Labels|Contour Labels]] | ||
* [[SMS:Display Options|Display Options]] | * [[SMS:Display Options|Display Options]] | ||
* [[SMS:Vector | * [[SMS:Vector Display Options|Vector Visualization]] | ||
{{Template: | {{Template:Navbox SMS}} | ||
[[Category:SMS Display Options|Contour Display Options]] | [[Category:SMS Display Options|Contour Display Options]] | ||
[[Category:SMS Display Dialogs]] | |||
Latest revision as of 22:07, 30 October 2019
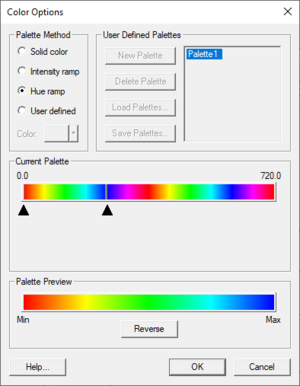
The Color Options dialog lets determining how the contours and vectors will be colored. The Color Options dialog is opened from the Data menu, or from the Color Ramp... button on the Contours and Vectors tabs of the Display Options dialog.
The default color method is the Solid color option. This method uses a single color for all contours. As an alternative, it's possible to define a ramp of colors. These colors are distributed across the range of contour values in a continuous fashion, giving each contour its own color. If specific contour values are specified, control whether the colors are distributed by index or by value in the upper right portion of the dialog. The following types of color ramps are supported by SMS:
- Solid color – A single color is used for all values.
- Intensity ramp – The color ramp is defined as a continuous variation of the intensity of the default solid color. This is the same color used for the Solid color option.
- Hue ramp – The ramp is a continuous variation of hues using the hue-saturation-value color model.
- User Defined Palettes – User defined color ramp.
If using an intensity ramp or hue ramp, the ramp can be edited to include only a portion of the entire ramp, or converted to a User Defined Palettes for further editing. Modify the portion of the ramp to be used by setting the minimum and maximum values for hue or intensity with the scroll bars in the Color Options dialog. These controls specify where the minimum value will be mapped into the ramp and where the maximum value will be mapped. The Reverse button changes the direction of the color gradation in the color ramp.
User Defined Palettes
It is possible to define and edit a color palette for use with contours. In the Display Options dialog, on the Contours tab, pressing the Color Ramp button opens the Color Options dialog. Inside the Color Options dialog, selecting the User defined option enables the following options:
User Defined Palettes Frame
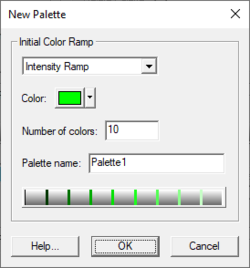
- New Palette – Create a new color palette. This opens the New Palette dialog, which is used to define a color ramp palette. Select a preset palette and the initial number of colors in the palette. The palette can be fine tuned once it is created in the Color Options dialog.
- Delete Palette – Delete the selected palette.
- Load Palettes – Load palettes from an SMS defined palette file.
- Save Palettes – Save all of the user created palettes to a file using the format shown above.
Current Palette Frame
The color pallet selected in the User Defined Palettes frame is displayed. Select, edit, and drag colors in the Color Palette using the following tools:
- Select/Move cross section point
 tool
tool
- Click – Creates new breakpoints
- Select an individual breakpoint
 tool
tool
- Click and drag – Changes the value associated with a breakpoint
- Double-click – Opens the Color dialog to change the color associated with a breakpoint
- Select, then press the Delete key – Delete the selected breakpoint
- Value edit field – Change the value of a selected color. Changing a value will move the color inside the color palette window.
- Edit Table – This button opens the Color Table dialog. Values and colors associated with each breakline can be viewed and edited. This dialog is useful for creating a palette with a logarithmic scale. It may be difficult to select colors very close to one another at the lower end of a log scale using the mouse left-click button, but the values can easily be specified in this dialog.
- Display Value As – Show the value of each color as:
- Percentages (0.0-1.0) – A percentage across the palette, with 0.0 being to the left of the palette and 1.0 at the right edge of the palette.
- Numerical Values – The actual value of each color. Each color will represent a value such as elevation.
New Palette
The New Palette dialog is used to create a new user defined palette. The following palette options can be set:
- Initial Color Ramp Type:
- Solid Color
- Intensity Ramp
- Hue Ramp
- Elevation
- Ocean
- Magnitude Difference
- Color – Only available for Solid Color and Intensity Ramp
- Number of Colors – Only available for Solid Color, Intensity Ramp, and Hue Ramp
- Palette name – Allows giving the palette a unique name.
Once the general options have been set in the New Palette dialog, the palette can be fine tuned using the tools in the Color Options dialog.
Related Topics
SMS – Surface-water Modeling System | ||
|---|---|---|
| Modules: | 1D Grid • Cartesian Grid • Curvilinear Grid • GIS • Map • Mesh • Particle • Quadtree • Raster • Scatter • UGrid |  |
| General Models: | 3D Structure • FVCOM • Generic • PTM | |
| Coastal Models: | ADCIRC • BOUSS-2D • CGWAVE • CMS-Flow • CMS-Wave • GenCade • STWAVE • WAM | |
| Riverine/Estuarine Models: | AdH • HEC-RAS • HYDRO AS-2D • RMA2 • RMA4 • SRH-2D • TUFLOW • TUFLOW FV | |
| Aquaveo • SMS Tutorials • SMS Workflows | ||

