SMS:Vector Display Options
At a glance
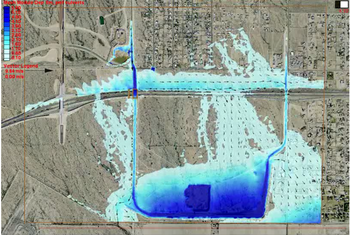
- Visualize vector datasets as arrows
- Constant size or vary by magnitude
- Show just a range of magnitudes
- Color by magnitude
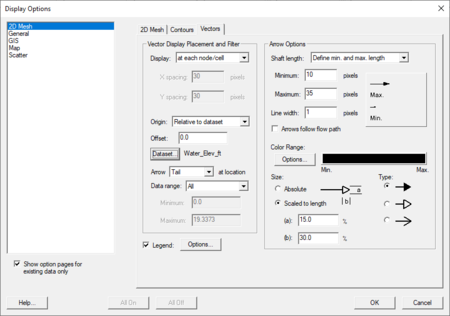
SMS can generate contours from a vector dataset. Vector display is enabled using in the Display Options dialog. Unique vector display options can be set for each module that uses vector datasets.
The options used to generate vectors can be edited by:
- The menu command Data | Vector Options. The Data menu is available in most modules. See Module Specific Menus for more information.
- Opening the Display Options dialog.
- The Vector Options
 macro.
Vector Display Placement and Filter
Display
The Vector Display Placement and Filter section controls the density of arrow to be displayed. In a very dense mesh, a large number of data points may be displayed very close together on the screen. Therefore, if a vector is displayed at every point, the picture can become a jumble of vectors on top of each other. One way to avoid this is to zoom in on a specific portion of the mesh, so the nodes are not displayed so close together. However, if the desired region of the mesh is still too dense, or zooming in is not acceptable, filter the displayed vectors. SMS provides the following display locations for filtering vectors:
- "At each node" – Display vectors at each node (data location). This will not function if there are more than 100,000 nodes in the mesh.
- "At corner nodes only" – Display vectors at corner nodes only (useful for quadratic elements).
- "On a grid" – Display vectors on a grid (uniform grid overlaying the mesh or grid geometry). The x and y spacing of the grid are specified in pixels, so regardless of the zoom level the grid remains constant.
- "On a coverage" – Display vectors on the vertices and nodes of feature arcs in the specified coverage (active or specified).
Origin
This combo box allows displaying arrows at a constant elevation. It has the following options:
- "Relative to bed" – – Places the vector dataset arrows at or above the geometry elevation.
- "Relative to max elevation" – Displays vector dataset arrows at or above the maximum elevation of the geometry.
- "Absolute elevation" – Places the vector dataset arrows at the elevation specified in the Offset field.
- "Relative to dataset" – Displays vector dataset arrows at or above the elevation of a selected dataset.
- Dataset – This button becomes active when the "Relative to dataset" option is used for the origin. Allows selecting which dataset in the Project Explorer to use.
Offset
To ensure that the vectors are visible, the Z-offset can be specified to display the vectors a distance above the geometry. The vectors can be filtered further by displaying only a range of magnitudes instead of all vectors.
Arrow Location
Vector arrows can be displayed with the following placement options:
- "Tip" – Display vectors with the vector arrow tip at the data location.
- "Tail" – Display vectors with the vector arrow tail at the data location.
- "Center" – Display vectors with the vector arrow shaft centered over the data location.
Arrow Options
The Arrow Options section specifies how the arrows will appear in the graphics window. Arrow shaft length can be a constant length, a scaled length, or a range of lengths. The line width of the arrow can also be adjusted. Arrows may be a constant color, or shaded according to magnitude. If a ramp of colors is desired, the color of the vector is extracted from a ramp. By default, the arrow with the smallest magnitude is displayed in the color at the bottom end of the ramp, and the arrow with the largest magnitude is displayed in the color at the top of the ramp. Intermediate magnitudes are interpolated to select an appropriate intermediate color. Alternately, define the magnitudes that map to the top and bottom of the ramp. If this option is used, any arrow with a magnitude lower than the minimum is displayed in the color at the bottom of the ramp, and any arrow with a magnitude greater than the maximum is displayed with the color at the top of the ramp. It's also possible to specify the shape of the arrow head with absolute head length and width values or values proportional arrow length. The style of arrow head is based on the selection of the solid, hollow, and line head types. A preview of the arrows (fixed, or maximum and minimum) based on the selected options are displayed in this section of the dialog.
Legend
The Vector Options also includes a toggle for the display of the vector legend. The vector legend displays the significance of the size of the vectors displayed on the grid. Selecting the legend Options button opens the Vector Legend Options window.
Vector Legend Options
The Vector Legend Options controls the formatting and location of a displayed legend. If a vector dataset exists and is displayed, the legend will be shown if the Legend check box on the Vector Display Options dialog is checked. This window is accessed only from the Legend Options button on the Vector Display Options page of the Display Options dialog.
The Formatting section includes fields for the Title and Units displayed with the legend, a Font selection button for text style, and Height and Width fields for legend size.
Since vector datasets can be displayed for multiple modules at the same time and, therefore, multiple vector legends can be displayed, the Title field can include keywords for convenient labeling. The following title keywords are case sensitive:
- "MODULE" – will be replaced with the title of the vector dataset's module
- "DS" – will be replaced with the name of the currently selected vector dataset
- "DS:TS" – will be replaced with the name of the currently selected vector dataset followed by the current time step
A title of "MODULE DS:TS" is best since it will automatically update as vector dataset selection changes.
The Units field includes the single case sensitive keyword of "DEFAULT", which will be replaced with the velocity units of meters per second (m/s) or feet per sceond (ft/s) based on the current coordinate system's horizontal units.
The Location section includes a combo box for specifying the location of the displayed legend. The locations include:
- "Top left corner"
- "Bottom left corner"
- "Top right corner"
- "Bottom right corner"
- "Screen location" – specify the location based on screen percentages
- "World location" – specify the coordinate location
Related Topics
SMS Display Options | |
|---|---|
| Modules | Mesh Module • Cartesian Grid Module • 3D Cartesian Grid Module • Scatter Module • Map Module • GIS Module • Particle Module |
| Datasets | Contour Options • Vector Options |
SMS – Surface-water Modeling System | ||
|---|---|---|
| Modules: | 1D Grid • Cartesian Grid • Curvilinear Grid • GIS • Map • Mesh • Particle • Quadtree • Raster • Scatter • UGrid |  |
| General Models: | 3D Structure • FVCOM • Generic • PTM | |
| Coastal Models: | ADCIRC • BOUSS-2D • CGWAVE • CMS-Flow • CMS-Wave • GenCade • STWAVE • WAM | |
| Riverine/Estuarine Models: | AdH • HEC-RAS • HYDRO AS-2D • RMA2 • RMA4 • SRH-2D • TUFLOW • TUFLOW FV | |
| Aquaveo • SMS Tutorials • SMS Workflows | ||


