AHGW:File Import Wizard: Difference between revisions
From XMS Wiki
Jump to navigationJump to search
(redirect) Tag: New redirect |
(Removed redirect to AHGW:Arc Hydro Groundwater Toolbar#File Import Wizard) Tag: Removed redirect |
||
| Line 1: | Line 1: | ||
# | {{TOC right}} | ||
The ''File Import Wizard'' dialog'' helps users to import data from their existing text files into a geodatabase. The tool works similarly to the Text Import Wizard in Microsoft Excel. There are two pages (or "steps") in this dialog: | |||
===Step 1 of 2=== | |||
[[File:AHGW File Import Wizard dialog - step 1.png|thumb|500px|right|''File Import Wizard'' dialog, step 1]] | |||
This page has the following sections and options: | |||
*''File import options'' section | |||
**''Delimited'' – Select if the text is delimited with something other than fixed widths or spacing. | |||
**''Fixed Width'' – Select if the text uses fixed widths to delimit the contents. | |||
**''Set the column delimiters'' – Select one or more options for how the text is delimited: | |||
***''Space'' | |||
***''Comma'' | |||
***''Tab'' | |||
***''Semicolon'' | |||
***''Other'' – If using a different delimiter character (such as a | (pipe)), turn on this option and enter a single instance of the character in the provided text field. | |||
***''Text qualifier''' – Select from the drop-down the qualifier used to denote text (such as labels). The options are a single quote, a double quote, or "none". The selected qualifier must appear at the beginning and ending of any such text. | |||
***''Treat consecutive delimiters as one'' – Turn on to treat two delimiters in a row as a single delimiter. Turn off to treat them as separate delimiters. | |||
***''Skip leading delimiters'' – Turn on to ignore any delimiters appearing at the beginning of a line. | |||
*''Start import at row'' – Enter the desired start row. | |||
*''Heading row'' – Turn on if there is a heading row (a row indicating the contents of each column). | |||
*''File preview'' section – This section previews how the data will be handled. When changing the above options, this section displays a preview of how the data will be interpreted on import. | |||
*'''Next''' – Switch to the [[#Step 2 of 2|Step 2 of 2]] page of the ''File Import Wizard'' dialog. | |||
*'''Cancel''' – Discard any changes and close the ''File Import Wizard'' dialog. | |||
===Step 2 of 2=== | |||
[[File:AHGW File Import Wizard dialog - step 2.png|thumb|500px|right|''File Import Wizard'' dialog, step 2]] | |||
This page has the following sections and options: | |||
*''Create Features/Rows in'' – Select the desired feature class from the drop-down. | |||
*''No data flag'' – Turn on to enable the no data flag to be set. Enter the flag in the provided text field. The default no data flag is "-999.0". | |||
*''Automatically assign HydroID'' – Turn on to automatically assign a HydroID to the table or features after the text file is imported. Requires the Arc Hydro (surface water) toolbox to be loaded. | |||
*''File preview'' section – Displays the data that will be imported. On the ''Type'' row, double-click on the "<Not Mapped>" field for the desired column to activate a drop-down of possible fields to which to map the data in the column. | |||
*'''Back''' – Switch to the [[#Step 1 of 2|Step 1 of 2]] page of the ''File Import Wizard'' dialog. | |||
*'''Finish''' – Save any changes and close the ''File Import Wizard'' dialog. | |||
*'''Cancel''' – Discard any changes and close the ''File Import Wizard'' dialog. | |||
{{Navbox AHGW}} | |||
[[Category:AHGW General Information|Toolbars]] | |||
Revision as of 23:39, 12 November 2019
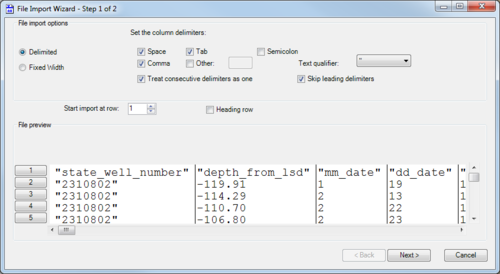
The File Import Wizard dialog helps users to import data from their existing text files into a geodatabase. The tool works similarly to the Text Import Wizard in Microsoft Excel. There are two pages (or "steps") in this dialog:
Step 1 of 2
This page has the following sections and options:
- File import options section
- Delimited – Select if the text is delimited with something other than fixed widths or spacing.
- Fixed Width – Select if the text uses fixed widths to delimit the contents.
- Set the column delimiters – Select one or more options for how the text is delimited:
- Space
- Comma
- Tab
- Semicolon
- Other – If using a different delimiter character (such as a | (pipe)), turn on this option and enter a single instance of the character in the provided text field.
- Text qualifier' – Select from the drop-down the qualifier used to denote text (such as labels). The options are a single quote, a double quote, or "none". The selected qualifier must appear at the beginning and ending of any such text.
- Treat consecutive delimiters as one – Turn on to treat two delimiters in a row as a single delimiter. Turn off to treat them as separate delimiters.
- Skip leading delimiters – Turn on to ignore any delimiters appearing at the beginning of a line.
- Start import at row – Enter the desired start row.
- Heading row – Turn on if there is a heading row (a row indicating the contents of each column).
- File preview section – This section previews how the data will be handled. When changing the above options, this section displays a preview of how the data will be interpreted on import.
- Next – Switch to the Step 2 of 2 page of the File Import Wizard dialog.
- Cancel – Discard any changes and close the File Import Wizard dialog.
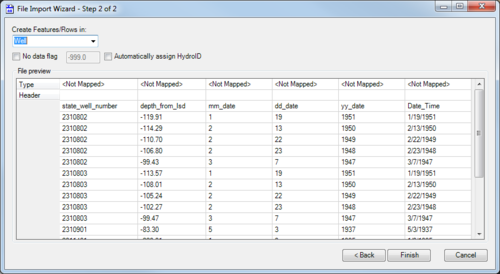
Step 2 of 2
This page has the following sections and options:
- Create Features/Rows in – Select the desired feature class from the drop-down.
- No data flag – Turn on to enable the no data flag to be set. Enter the flag in the provided text field. The default no data flag is "-999.0".
- Automatically assign HydroID – Turn on to automatically assign a HydroID to the table or features after the text file is imported. Requires the Arc Hydro (surface water) toolbox to be loaded.
- File preview section – Displays the data that will be imported. On the Type row, double-click on the "<Not Mapped>" field for the desired column to activate a drop-down of possible fields to which to map the data in the column.
- Back – Switch to the Step 1 of 2 page of the File Import Wizard dialog.
- Finish – Save any changes and close the File Import Wizard dialog.
- Cancel – Discard any changes and close the File Import Wizard dialog.


