User:Rcorrigan/AHGW Pro:HGU Color Manager
The HGU Color Manager pane is accessed by selecting ![]() HGU Color Manager on the Arc Hydro Groundwater ribbon in ArcGIS Pro.
HGU Color Manager on the Arc Hydro Groundwater ribbon in ArcGIS Pro.
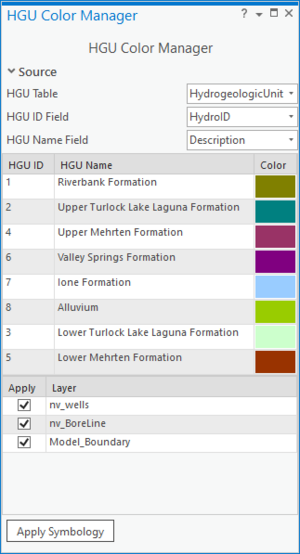
This tool allows for managing the symbology of layers based on a common attribute using a single interface. The tool is based on the "HydrogeologicUnit" table which defines a set of conceptual hydrogeologic units that are associated with different spatial instances such as volumes, cross sections, borehole intervals, geologic picks, and outcrops. The following section, options, and buttons are available in this dialog:
- Source section
- HGU Table – Specifies which table defines the hydrogeologic units.
- HGU ID Field – Specifies the column in the HGU table whose values will be filled in for the HGU ID column in the spreadsheet.
- HGU Name Field – Specifies the column in the HGU table whose values will be filled in for the HGU name column in the spreadsheet.
- HGUColor spreadsheet – There are three columns:
- HGU ID – Displays the values from the HGU table associated with the field selected in the HGU ID Field drop-down.
- HGU Name – Displays the values from the HGU table associated with the field selected in the HGU Name Field drop-down.
- Color – Displays the colors associated with each HGU. Double-clicking in the colored box in this column opens a menu for editing the color of the HGU represented in that row. Clicking on the Color Properties button at the bottom of the menu, opens a Color Editor dialog with advanced options for adjusting the color associated with the selected HGU.
- Application Table
- Apply – Check the checkboxes to specify which layers should have the HGU color settings applied to them.
- Layer – The names of the layers that are going to have the HGU color settings applied to them based on the checkbox in the Apply column.
- Apply Symbology – Click to immediately apply the changes made in the spreadsheet. Please note that this resets some changes made to certain features. For example, if the Symbology pane has been used to adjust the width of BoreLine features, this will reset them to their default width (1 pt).
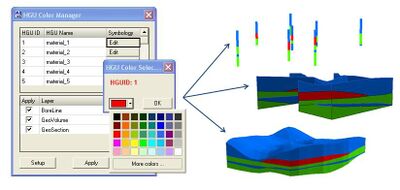
The following image demonstrates how the colors are applied across layers:
Color Palette
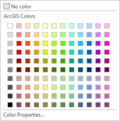
The color palette is a drop-down. The drop-down contains a palette of 120 common colors and a Color Properties... button. Click on the desired color to close the drop-down.
Clicking the Color Properties... button brings up a Color Editor dialog, where more specific colors can be selected.
- ArcGIS Feature Note – The following documentation applies only to older versions of ArcGIS, not to ArcGIS Pro.
- The color palette can be either a drop-down (first image on right) or the Color dialog. The drop-down contains a palette of 40 common colors and a More colors... button. Click on the desired color to close the drop-down. Clicking the More colors... button brings up the standard Windows Color dialog, where more specific colors can be selected.
ArcGIS Notes
There are significant differences between the options included with the HGU Color Manger in ArcGIS and the HGU Color Manager in ArcGIS Pro. As a result, some of the settings are included in two different sections to avoid confusion. The documentation specific to the tools in ArcGIS is below.
In ArcGIS, the HGU Color Manager dialog is accessed by selecting Subsurface | HGU Color Manager from the Arc Hydro Groundwater Toolbar. It can also be accessed via a button at the bottom of the Borehole/Well Editor dialog.
The following options and buttons are available in this dialog:
- HGUColor spreadsheet – There are three columns:
- HGUColor –
- HGUColor –
- Symbology – Click the drop-down to open the color palette.
- Lower spreadsheet –
- Setup... – Click to bring up the HGU Setup dialog.
- Apply Symbology – Click to immediately apply the changes made in the HGUColor spreadsheet.
- Save and Exit – Save the changes and close the HGU Color Manager dialog.
- Cancel – Discard the changes and close the HGU Color Manager dialog.
HGU Setup
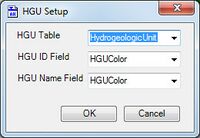
The HGU Setup dialog contains the following options:
- HGU Table – Select the desired HGU table from the drop-down.
- HGU ID Field – Select the desired HGUID field from the drop-down.
- HGU Name Field – Select the desired name field from the drop-down.
- OK – Saves any changes and closes the HGU Setup dialog.
- Cancel' – Discards any changes and closes the HGU Setup dialog.


