SMS:Raster Module Interface
| This contains information about features no longer in use for the current release of SMS. The content may not apply to current versions. |
Clicking the raster module icon ![]() in the module tool bar will bring the raster module interface to display on the screen. The raster module interface can also be brought to display by clicking on a raster item
in the module tool bar will bring the raster module interface to display on the screen. The raster module interface can also be brought to display by clicking on a raster item ![]() in the Project Explorer. The raster module interface consists of the menu, tools, and Project Explorer right-click menus.
in the Project Explorer. The raster module interface consists of the menu, tools, and Project Explorer right-click menus.
Starting in SMS 12.0, the module interface has been incorporated into the GIS module.
Raster Menu Items
The menu bar that appears in the raster module:
- File – Has standard features as in other models.
- Edit – Has standard features as in other models.
- Display – Under the Raster tab in Display Options, choose to Display as raster or Display as surface. Display as raster is a 2D representation, while Display as surface uses data from pixels as elevation to show a 3D surface. It should be noted that these display options affect performance. Display as raster takes less memory and performs faster because it is a more efficient data structure. If Display as surface is selected, options are available to turn on or off contours, edges, or boundaries.
- Web – Has standard features as in other models.
- Window – Has standard features as in other models.
- Help – Has standard features as in other models.
Raster Tools
The raster module contains only one dynamic tool called the Select Points tool. Using this tool, one can edit/select one or more corners (points) of the pixels which make up the raster. Selecting cells with the Select Points tool will show information about the points in the status bar.
Right-Click Option
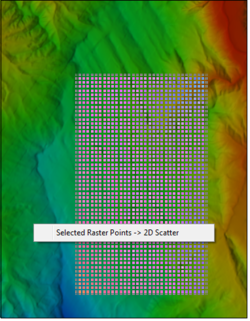
When one or more points are selected, one can right-click in the Main Graphics window, and the option to convert selected raster points to a scatter set appears. If this option is clicked, a new scatter set will appear in the Project Explorer.
Raster Right-Click Menus
Right-Click Menu of Raster Set Project Explorer Item
Right-clicking on the raster set ![]() item in the Project Explorer will bring up the following options:
item in the Project Explorer will bring up the following options:
- Delete – Removes the current coverage.
- Rename – Allows changing the current coverage name.
- Options – Clicking this will bring up a Raster Options dialog. This specifies if the z values are elevations. If NCLD land data is being used, specify that raster values are not elevations. Then if the projections are changed, the z values that store the land data would not be affected.
- Interpolate – Data from raster sets may be interpolated to already existing TINs, meshes and 2D grids.
Right-Click Menu of Raster Project Explorer Item
Right-clicking on the raster ![]() item in the Project Explorer will bring up the following options:
item in the Project Explorer will bring up the following options:
- Delete – Removes the raster set.
- Rename – Allows changing the raster set name.
- Convert – SMS allows rasters to be converted into TINs.
- Zoom to Raster
Right-Click Menu of Dynamic Tools
See Raster Tools above.
Related Topics
SMS – Surface-water Modeling System | ||
|---|---|---|
| Modules: | 1D Grid • Cartesian Grid • Curvilinear Grid • GIS • Map • Mesh • Particle • Quadtree • Raster • Scatter • UGrid |  |
| General Models: | 3D Structure • FVCOM • Generic • PTM | |
| Coastal Models: | ADCIRC • BOUSS-2D • CGWAVE • CMS-Flow • CMS-Wave • GenCade • STWAVE • WAM | |
| Riverine/Estuarine Models: | AdH • HEC-RAS • HYDRO AS-2D • RMA2 • RMA4 • SRH-2D • TUFLOW • TUFLOW FV | |
| Aquaveo • SMS Tutorials • SMS Workflows | ||
