GMS:Horizons Wizard: Difference between revisions
From XMS Wiki
Jump to navigationJump to search
No edit summary |
(→Step 1) |
||
| (44 intermediate revisions by 5 users not shown) | |||
| Line 1: | Line 1: | ||
{{Horizons Links}} | {{Horizons Links}} | ||
The Horizons Wizard is used to create [[GMS:Solid Module|solids]], a [[GMS:3D Mesh Module|3D mesh]], or [[GMS:HUF Package|HUF]] layers from [[GMS:Horizons|horizon]] data. The wizard is started via the ''[[GMS:Horizons to Solids|Horizons | The ''Horizons Wizard'' is used to create [[GMS:Solid Module|solids]], a [[GMS:3D Mesh Module|3D mesh]], or [[GMS:HUF Package|HUF]] layers from [[GMS:Horizons|horizon]] data. The wizard is started via the '''[[GMS:Horizons to Solids|Horizons → Solids]]''', '''[[GMS:Horizons to 3D Mesh|Horizons → 3D Mesh]]''', [[GMS:Horizons to UGrid|'''Horizons → UGrid''']], and '''[[GMS:Horizons to HUF|Horizons → HUF]]''' commands. These commands are in the ''TIN'' and ''Boreholes'' menus. | ||
==Step 1== | ==Step 1== | ||
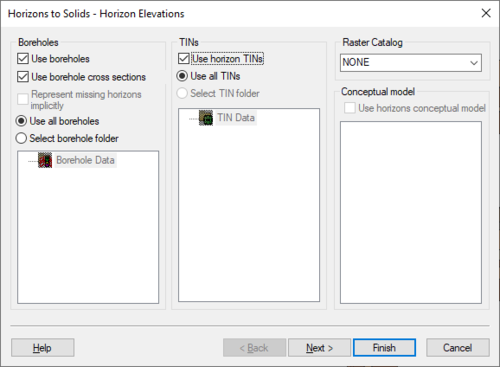
The first step is to define the inputs to be used, which can include [[GMS:Boreholes|boreholes]], [[GMS:TIN Module|TINs]], and a [[GMS:Horizon Conceptual Model|Horizon Conceptual | The first step is to define the inputs to be used, which can include [[GMS:Boreholes|boreholes]], [[GMS:TIN Module|TINs]], and a [[GMS:Horizon Conceptual Model|Horizon Conceptual model]]. | ||
*''Boreholes'' – This section contains options for using boreholes. | |||
**''Use boreholes'' – Specifies to use borehole data in creating the solid or mesh. | |||
**''Use borehole cross sections'' – Specifies to use borehole cross sectional data in creating the solid or mesh. | |||
**''Representing missing horizons implicitly'' – If cross sections are not available, this option can be used. | |||
**''Use all boreholes'' – All boreholes in the project will be using in creating the solid or mesh. | |||
**''Select borehole folder'' – Allows selecting a borehole folder from a list below this option. Only borehole data in the folder will be used. | |||
*''TINs'' – This section has options for using TINs. | |||
**''Use horizon TINs'' – Indicates to use available TIN data in creating the solid or mesh. | |||
**Use all TINs – All TINs in the project will be using in creating the solid or mesh. | |||
**''Select TIN folder'' – Allows selecting a TIN folder from a list below this option. Only TIN data in the folder will be used. | |||
*''Raster Catalog'' – The dropdown allows selecting a [[GMS:Raster Catalog|raster catalog]] in the project. | |||
*''Conceptual model'' – This section has options for using horizon conceptual models. The desired conceptual modal can be selected from the list below this option. | |||
<!--Beginning with GMS 9.0, a [[GMS:Raster Catalog|raster catalog]] can be included as input.--> | |||
:[[File:HorizonsWizard1.png|thumb|none|500 px|The ''Horizon Elevation'' step of the ''Horizons'' wizard]] | |||
==Step 2== | ==Step 2== | ||
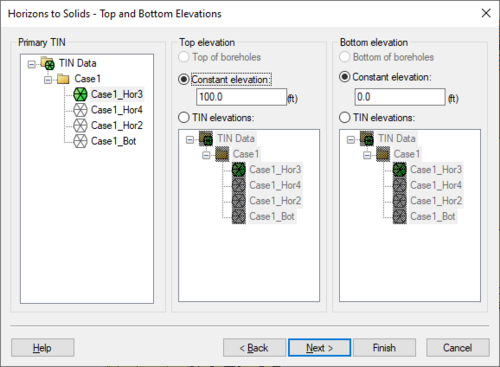
The second step is to define the top and bottom of the solid, mesh, or HUF layers. When creating HUF data, | The second step is to define the top and bottom of the solid, mesh, or HUF layers. When creating HUF data, the grid elevations can be edited. | ||
*''Primary TIN'' – When there are multiple TINs in the project, a TIN should be selected as the primary TIN in order to resolve potential conflicts between TIN data. | |||
*''Top Elevation'' – This section designate what data to use for the top elevation in the solid or mesh. | |||
**''Top of boreholes'' – Designates to use the top elevations in the borehole data. | |||
**''Constant elevation'' – Use a constant elevation value for the top elevation. | |||
**''Tin elevations'' – Allows selecting a TIN from the list below this option. The selected TIN will be used for the top elevation. | |||
*''Bottom elevation'' This section designate what data to use for the bottom elevation in the solid or mesh. | |||
**''Bottom of boreholes'' – Designates to use the bottom elevations in the borehole data. | |||
**''Constant elevation'' – Use a constant elevation value for the bottom elevation. | |||
**''TIN elevations'' – Allows selecting a TIN from the list below this option. The selected TIN will be used for the bottom elevation. | |||
:[[File:HorizonsWizard2.png|thumb|none|500 px|The ''Top and Bottom Elevations'' step of the ''Horizons'' wizard]] | |||
==Step 3== | ==Step 3== | ||
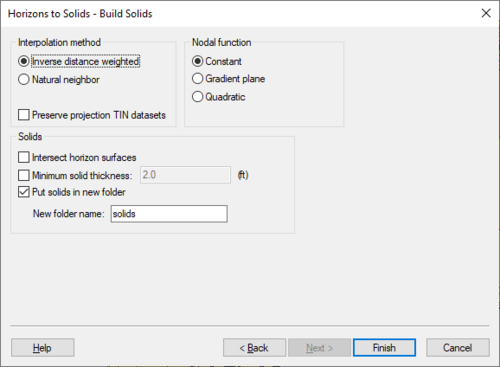
The third step is to define the [[GMS:Interpolation|interpolation]] method to be used, as well as options specific to creating solids, a mesh, or HUF package. | The third step is to define the [[GMS:Interpolation|interpolation]] method to be used, as well as options specific to creating solids, a mesh, or HUF package. | ||
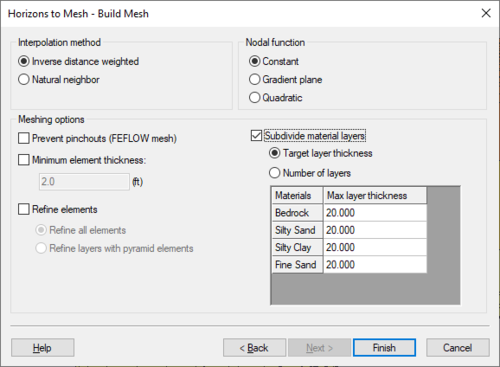
*''Interpolation method'' – Select the interpolation method to use in creating the solid or mesh. | |||
Beginning with GMS 7.0, when creating solids, the user can choose the option ''Preserve projection TIN | **''Inverse distance weighted'' – Use the [[GMS:Inverse Distance Weighted|inverse distance weighed]] interpolation method. | ||
**''Natural neighbor'' – – Use the [[GMS:Natural Neighbor|natural neighbor]] interpolation method. | |||
**''Preserve projection TIN datasets'' – <!--Beginning with GMS 7.0, when creating solids, the user can choose the option ''Preserve projection TIN datasets''.--> This option will create a new TIN that will have a dataset for each horizon. This is often useful in order to see the result of the interpolation process for each Horizon. The user can then edit the TIN by hand and include the TIN when executing the '''Horizons→Solids''' command. | |||
*''Nodal function'' – Select the nodal function option to use with the interpolation method. | |||
**''Constant'' – Apply a [[GMS:Shepard's Method|constant nodal function]] (Shepard's Method). | |||
**''Gradient plane'' – Apply a [[GMS:Gradient Plane Nodal Functions|gradient plane nodal function]]. | |||
**''Quadratic'' – Apply a [[GMS:Quadratic Nodal Functions|quadratic nodal function]]. | |||
*''Solids'' – Options for the generated solids. | |||
**''Intersect horizon surfaces'' – Allows the solids to intersect with horizon surfaces. | |||
**''Minimum solid thickness'' – Set a minimum thickness value for generated solids. | |||
**''Put solids in new folder'' – Places the generated solids in a new folder in the Project Explorer. | |||
***''New folder name'' – Enter a name for the new folder where the generated solids will be placed in the Project Explorer. | |||
:[[File:HorizonsWizard3b.png|thumb|none|500 px|The ''Build Solids'' step of the ''Horizons'' wizard]] | |||
When creating a 3D mesh for a FEFLOW simulation, make sure to turn on the ''Prevent pinchouts (FEFLOW mesh)'' option. This will ensure that the mesh will contain all prism elements and that every mesh layer is continuous throughout the mesh. | |||
:[[File:HorizonsWizard3.png|thumb|none|500 px|The ''Build Mesh'' step of the ''Horizons'' wizard]] | |||
{{Navbox GMS}} | {{Navbox GMS}} | ||
[[Category:Stratigraphy]] | [[Category:Stratigraphy]] | ||
[[Category:Horizons]] | [[Category:Horizons|Wiz]] | ||
[[Category:Horizons Dialogs]] | |||
[[Category:Needs Update]] | |||
