GMS:Coverages: Difference between revisions
From XMS Wiki
Jump to navigationJump to search
No edit summary |
|||
| Line 1: | Line 1: | ||
__TOC__ | |||
{{Map links}} | {{Map links}} | ||
[[GMS:Feature Objects|Feature Objects]] in the Map module are grouped into coverages. Coverages are grouped into [[GMS:Conceptual Model|conceptual models]]. | [[GMS:Feature Objects|Feature Objects]] in the Map module are grouped into coverages. Coverages are grouped into [[GMS:Conceptual Model|conceptual models]]. | ||
| Line 7: | Line 8: | ||
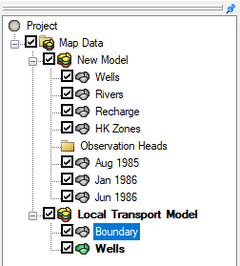
Coverages are managed using the [[GMS:The GMS Window|Project Explorer]]. Coverages are organized below conceptual models. When GMS is first launched, no coverage exists. If no coverage exists and the user creates [[GMS:Feature Objects|feature objects]] then a new coverage will automatically be created. When multiple coverages are created, one coverage is designated the "active" coverage. New feature objects are always added to the active coverage and only objects in the active coverage can be edited. The figure below shows several coverages in the [[GMS:Project Explorer|Project Explorer]]. The active coverage is displayed with a color icon and bold text. A coverage is made the active coverage by selecting it from the Project Explorer. In some cases it is useful to hide some or all of the coverages. The visibility of a coverage is controlled using the check box next to the coverage in the Project Explorer. | Coverages are managed using the [[GMS:The GMS Window|Project Explorer]]. Coverages are organized below conceptual models. When GMS is first launched, no coverage exists. If no coverage exists and the user creates [[GMS:Feature Objects|feature objects]] then a new coverage will automatically be created. When multiple coverages are created, one coverage is designated the "active" coverage. New feature objects are always added to the active coverage and only objects in the active coverage can be edited. The figure below shows several coverages in the [[GMS:Project Explorer|Project Explorer]]. The active coverage is displayed with a color icon and bold text. A coverage is made the active coverage by selecting it from the Project Explorer. In some cases it is useful to hide some or all of the coverages. The visibility of a coverage is controlled using the check box next to the coverage in the Project Explorer. | ||
A new coverage can be created by right-clicking on a folder or conceptual model and selecting the '''New Coverage''' command in the pop-up menu. | {{Anchor|New Coverage}}A new coverage can be created by right-clicking on a folder or conceptual model and selecting the '''New Coverage''' command in the pop-up menu. | ||
{{hide in print|[[Image:Tree_Map.png|thumb|none|240 px|Example of the tree map in the Project Explorer]]}} | {{hide in print|[[Image:Tree_Map.png|thumb|none|240 px|Example of the tree map in the Project Explorer]]}} | ||


