GMS:Exporting Pathlines
| MODPATH | |
|---|---|
| Pre-processing | |
| MODPATH Commands | |
| MODPATH Particle Tracking | |
| MODPATH Particle Sets | |
| MODPATH Zone Codes | |
| Post-processing | |
| MODPATH Display Options | |
| Exporting Pathlines | |
| Tutorials | |
| MODPATH Tutorials | |
MODPATH pathlines can be exported from GMS in a few different ways:
Contents
Capture Zones to Arcs
The MODPATH | Capture Zones → Arcs command will convert the capture zone outline to feature arcs, creating a separate coverage for each well. Coverages can be exported as a shapefile or converted to CAD data. Capture zones are defined using the Delineate by well and Delineate by zone code options in the MODPATH Display Options dialog.
Pathlines to Arcs
The MODPATH | Pathlines → Arcs command works similar to the MODPATH | Capture Zones → Arcs but instead of converting the capture zone boundary, all of the pathlines in the capture zone are converted.
Starting Locations to 3D Scatter Points
Starting locations can be converted to 3D scatter points and vice versa. If the MODPATH | Starting Locations → 3D Scatter Points menu command is selected, a new 3D scatter point set will be created from each particle set that is visible. If the command is executed by right-clicking on a particle set in the Project Explorer, a new 3D scatter point set will be created from only that particle set.
Tab delimited file
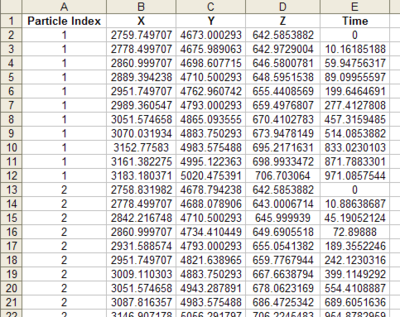
Pathlines can be exported by right-clicking on a particle set in the Project Explorer and selecting the Export option. This saves the pathline geometry to a tab-delimited text file that can be imported directly into Excel:
Right-clicking on the particle set data ![]() folder and selecting the Export command will generate tab-delimited text file with all particle sets in the data folder included in the file.
folder and selecting the Export command will generate tab-delimited text file with all particle sets in the data folder included in the file.
Spreadsheet report
The user can bring up a spreadsheet report showing the pathline XYZ data in GMS. See MODPATH Particle Sets, Spreadsheet Report.
| GMS – Groundwater Modeling System | ||
|---|---|---|
| Modules: | 2D Grid • 2D Mesh • 2D Scatter Point • 3D Grid • 3D Mesh • 3D Scatter Point • Boreholes • GIS • Map • Solid • TINs • UGrids | |
| Models: | FEFLOW • FEMWATER • HydroGeoSphere • MODAEM • MODFLOW • MODPATH • mod-PATH3DU • MT3DMS • MT3D-USGS • PEST • PHT3D • RT3D • SEAM3D • SEAWAT • SEEP2D • T-PROGS • ZONEBUDGET | |
| Aquaveo | ||
