WMS:TR-20 Reservoir Data: Difference between revisions
No edit summary |
|||
| (10 intermediate revisions by 2 users not shown) | |||
| Line 1: | Line 1: | ||
[[File: | [[File:TR20resevoirrouting.png|thumb|225 px|Example of the ''TR-20 Resevoir Routing'' dialog.]] | ||
TR-20 allows | TR-20 allows routing a hydrograph through a reservoir using the RESVOR TR20 file card. Define these reservoir routing parameters in the ''TR-20 Reservoir Routing'' dialog. Reservoirs and other types of structures (such as detention basins) can be defined from the ''TR-20 Reservoir Data'' dialog. | ||
Define reservoir data by pressing the '''Define reservoir data''' button. This will bring up a dialog where the elevation-discharge-storage relationship for the reservoir can be defined. Enter up to twenty elevation-discharge-storage relationships for each reservoir. To assign a particular set of data to a reservoir, select the reservoir and select the '''OK''' button on the ''TR-20 Reservoir data'' dialog. | |||
''Reservoir Name'' – The ''Reservoir Name'' is used to associate resulting hydrographs with the appropriate reservoir when reading a hydrograph file after a TR-20 run. The name should be unique and no longer than eight characters. | |||
The | |||
''Define Reservoir Routing'' – Routing can be toggled on by selecting this button. After selecting it, reservoir routing will be defined at the selected tree nodes. If this option is not selected, routing will not be defined at the selected tree node. | |||
Routing can be toggled on by selecting | |||
''Define Start Routing Elevation'' – When selected, allows the ability to enter a value for the ''Start Routing Elevation'' | |||
''Start Routing Elevation'' – The ''Start Routing Elevation'' is the water surface elevation, in feet, that routing begins for the reservoir or structure. | |||
One or more input hydrographs can be defined for a reservoir. WMS will combine any input hydrographs with other input hydrographs to the reservoir. The resulting hydrograph will then be routed through the reservoir. This option is useful for defining measured stream flows into a reservoir. | |||
'''Define Reservoir Data''' – Select to open ''Define Reservoir Data'' dialog. | |||
'''Define Input Hydrograph''' – One or more input hydrographs can be defined for a reservoir. WMS will combine any input hydrographs with other input hydrographs to the reservoir. The resulting hydrograph will then be routed through the reservoir. This option is useful for defining the measured stream flows into a reservoir. | |||
'''Reservoir Output Control''' – Select to open ''Reservoir Output Control'' dialog. | |||
[[File:TR20resevoirdata.png|thumb|none|500 px|Example of the ''TR-20 Resevoir Data'' dialog.]] | |||
| Line 23: | Line 26: | ||
{{WMSMain}} | {{WMSMain}} | ||
{{stub}} | |||
[[Category:TR-20|R]] | [[Category:TR-20|R]] | ||
[[Category: | [[Category:TR-20 Dialogs|R]] | ||
[[Category:Reservoirs]] | |||
Latest revision as of 20:58, 13 December 2023
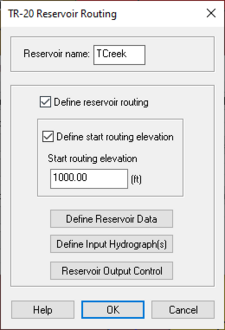
TR-20 allows routing a hydrograph through a reservoir using the RESVOR TR20 file card. Define these reservoir routing parameters in the TR-20 Reservoir Routing dialog. Reservoirs and other types of structures (such as detention basins) can be defined from the TR-20 Reservoir Data dialog.
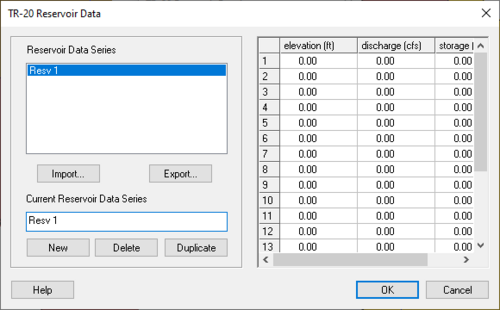
Define reservoir data by pressing the Define reservoir data button. This will bring up a dialog where the elevation-discharge-storage relationship for the reservoir can be defined. Enter up to twenty elevation-discharge-storage relationships for each reservoir. To assign a particular set of data to a reservoir, select the reservoir and select the OK button on the TR-20 Reservoir data dialog.
Reservoir Name – The Reservoir Name is used to associate resulting hydrographs with the appropriate reservoir when reading a hydrograph file after a TR-20 run. The name should be unique and no longer than eight characters.
Define Reservoir Routing – Routing can be toggled on by selecting this button. After selecting it, reservoir routing will be defined at the selected tree nodes. If this option is not selected, routing will not be defined at the selected tree node.
Define Start Routing Elevation – When selected, allows the ability to enter a value for the Start Routing Elevation
Start Routing Elevation – The Start Routing Elevation is the water surface elevation, in feet, that routing begins for the reservoir or structure.
Define Reservoir Data – Select to open Define Reservoir Data dialog.
Define Input Hydrograph – One or more input hydrographs can be defined for a reservoir. WMS will combine any input hydrographs with other input hydrographs to the reservoir. The resulting hydrograph will then be routed through the reservoir. This option is useful for defining the measured stream flows into a reservoir.
Reservoir Output Control – Select to open Reservoir Output Control dialog.
Related Topics
WMS – Watershed Modeling System | ||
|---|---|---|
| Modules: | Terrain Data • Drainage • Map • Hydrologic Modeling • River • GIS • 2D Grid • 2D Scatter |  |
| Models: | CE-QUAL-W2 • GSSHA • HEC-1 • HEC-HMS • HEC-RAS • HSPF • MODRAT • NSS • OC Hydrograph • OC Rational • Rational • River Tools • Storm Drain • SMPDBK • SWMM • TR-20 • TR-55 | |
| Toolbars: | Modules • Macros • Units • Digitize • Static Tools • Dynamic Tools • Drawing • Get Data Tools | |
| Aquaveo | ||

