WMS:What's new in WMS version 9.1: Difference between revisions
No edit summary |
|||
| (31 intermediate revisions by 2 users not shown) | |||
| Line 1: | Line 1: | ||
{{TOCright}} | |||
The WMS software development team is excited about the release of WMS 9.1! This page lists the exciting new features that have been added to WMS 9.1. | The WMS software development team is excited about the release of WMS 9.1! This page lists the exciting new features that have been added to WMS 9.1. | ||
| Line 9: | Line 10: | ||
[[Image:AddDataCommand.png]] | [[Image:AddDataCommand.png]] | ||
The Add GIS Data command in the Get Data toolbar allows | The '''Add GIS Data''' command in the ''Get Data'' toolbar allows a user to read many formats of vector and raster GIS data. After reading the data, it can be viewed or converted to a format that can be used for hydrologic modeling in WMS. | ||
<br style="clear:both;"/> | <br style="clear:both;"/> | ||
==== Raster Display Options ==== | ==== Raster Display Options ==== | ||
[[Image:RasterDisplayAndElevationMenu.png|thumb|400px|right|There are various options to view and convert raster elevation data grids to data that can be used in WMS for hydrologic modeling. There are also options for other types of raster data.]] | [[Image:RasterDisplayAndElevationMenu.png|thumb|400px|right|There are various options to view and convert raster elevation data grids to data that can be used in WMS for hydrologic modeling. There are also options for other types of raster data.]] | ||
If | If there is raster elevation data read using the '''Add GIS Data''' command or if there is online data that contains raster elevations, there are various options for displaying hill shading on the raster data. A user can also convert any raster elevation data to a DEM. | ||
<br style="clear:both;"/> | <br style="clear:both;"/> | ||
==== GIS Vector Data Conversions ==== | ==== GIS Vector Data Conversions ==== | ||
:[[Image:VectorDataConvert.png]] | |||
[[Image:VectorDataConvert.png]] | GIS Vector Data can be converted to a shapefile. Once the GIS data is converted to a shapefile, it can be used in any of the hydrologic modeling computations for tasks like computing curve numbers and infiltration coefficients. | ||
GIS Vector Data can be converted to a shapefile. Once | |||
<br style="clear:both;"/> | <br style="clear:both;"/> | ||
| Line 31: | Line 29: | ||
==== Raster Data Conversions ==== | ==== Raster Data Conversions ==== | ||
[[Image:RasterDataExport.png]] | :[[Image:RasterDataExport.png]] | ||
Raster data with information about land use or soil type can be converted to a land use or soil type grid by right-clicking on the layer. USGS NLCD and European CORINE Land use data can also be downloaded for anywhere in the United States and Europe using the Get Data tool. More information about the new data sources available in WMS 9.1 can be viewed [[Import_from_Web|here]]. | Raster data with information about land use or soil type can be converted to a land use or soil type grid by right-clicking on the layer. USGS NLCD and European CORINE Land use data can also be downloaded for anywhere in the United States and Europe using the '''Get Data''' tool. More information about the new data sources available in WMS 9.1 can be viewed [[Import_from_Web|here]]. | ||
WMS DEMs can be exported to several digital elevation file formats, including the following: | WMS DEMs can be exported to several digital elevation file formats, including the following: | ||
| Line 52: | Line 50: | ||
* Windsim GWS | * Windsim GWS | ||
All these files as well as many other formats can also be imported using the Add GIS Data button. | All these files as well as many other formats can also be imported using the '''Add GIS Data''' button. | ||
<br style="clear:both;"/> | <br style="clear:both;"/> | ||
| Line 58: | Line 56: | ||
==== Vector/Shapefile Data Conversions ==== | ==== Vector/Shapefile Data Conversions ==== | ||
[[Image:VectorDataExport.png]] | :[[Image:VectorDataExport.png|300 px]] | ||
Vector GIS data that is read into WMS can be converted to a shapefile and used in WMS or saved to one of the many other supported formats. The supported formats include: | Vector GIS data that is read into WMS can be converted to a shapefile and used in WMS or saved to one of the many other supported formats. The supported formats include: | ||
| Line 77: | Line 75: | ||
==== GIS Module ==== | ==== GIS Module ==== | ||
All images, raster GIS data, and vector GIS data are now stored in the GIS module. In the GIS module, | All images, raster GIS data, and vector GIS data are now stored in the GIS module. In the GIS module, a user can import, export, and convert GIS data to different formats. A user can also map data in the GIS module to data in WMS that can be used to build the watershed models. | ||
<br style="clear:both;"/> | <br style="clear:both;"/> | ||
| Line 85: | Line 83: | ||
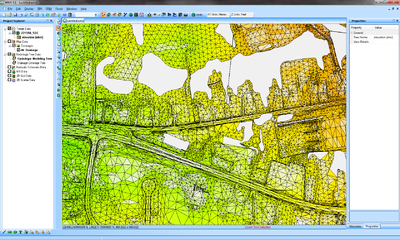
[[Image:LandXMLFile.png|thumb|400px|right|LandXML TIN imported into WMS.]] | [[Image:LandXMLFile.png|thumb|400px|right|LandXML TIN imported into WMS.]] | ||
WMS 9.1 allows | WMS 9.1 allows the user to read LandXML files as a TIN. This command to import LandXML files preserves the points and the triangle connections that were built in the CAD program that was used to generate the LandXML file. | ||
<br style="clear:both;"/> | <br style="clear:both;"/> | ||
| Line 99: | Line 97: | ||
[[Image:MultipleDEMs.png]] | [[Image:MultipleDEMs.png]] | ||
WMS 9.1 allows | WMS 9.1 allows the user to read and manage multiple DEMs in the project explorer. Each of these DEMs can have flow directions and accumulations for watershed delineation. A user can clip and modify single DEMs or merge multiple DEMs from different sources into a single DEM. A user can convert raster elevation data in the GIS module to DEMs. These DEMs can be merged and exported to any of the raster elevation formats supported by WMS. | ||
<br style="clear:both;"/> | <br style="clear:both;"/> | ||
| Line 107: | Line 105: | ||
[[Image:OnlineDataTools.png]] | [[Image:OnlineDataTools.png]] | ||
WMS 9.1 has three tools for obtaining online data: The Get Data tool, the Get Data From Map command, and the Get Online Maps command. All of these tools can be used to obtain various types of raster data: Images, elevation data, land use data, vegetation data, and more. | WMS 9.1 has three tools for obtaining online data: '''The Get Data''' tool, the '''Get Data From Map''' command, and the '''Get Online Maps''' command. All of these tools can be used to obtain various types of raster data: Images, elevation data, land use data, vegetation data, and more. | ||
==== Get Data ==== | ==== Get Data ==== | ||
| Line 115: | Line 113: | ||
[[Image:GetDataDialog.png|thumb|400px|right|The Get Data dialog.]] | [[Image:GetDataDialog.png|thumb|400px|right|The Get Data dialog.]] | ||
The Get Data tool and the Get Data From Map command work in much the same way. | The '''Get Data''' tool and the '''Get Data From Map''' command work in much the same way. The user needs to set the current projection before using either of these tools. The difference is that with the '''Get Data''' tool, the user selects the area where data is desired from the WMS window. With the '''Get Data From Map''' command, the user selects the area from the ''Virtual Earth Map Locator'' window. This ''Virtual Earth'' window pops up after selecting the '''Get Data From Map''' command. In either case, the user goes to the area of interested and WMS will bring up another window that allows the user to select the type of data to be downloaded. With all the raster data sources, specify a resolution of the data to be downloaded and WMS will download the data. | ||
Several new data sources have been added to the Get Data tools in WMS, including various sources for high-quality imagery. Samples of many of the data sources are shown in the new Get Data dialog. | Several new data sources have been added to the Get Data tools in WMS, including various sources for high-quality imagery. Samples of many of the data sources are shown in the new ''Get Data'' dialog. | ||
<br style="clear:both;"/> | <br style="clear:both;"/> | ||
| Line 123: | Line 121: | ||
==== Get Online Maps ==== | ==== Get Online Maps ==== | ||
The Get Online Maps command allows | The '''Get Online Maps''' command allows a user to define online data sources to be added to the display. This command was introduced in WMS 9.0, and has been improved in WMS 9.1. WMS 9.1 launches a separate process to download the online data when it is downloading so the user no longer needs to wait for the data to download before working. WMS 9.1 also has tools to convert online data to static data and to convert it to various formats that can be used for watershed modeling. | ||
<br style="clear:both;"/> | <br style="clear:both;"/> | ||
| Line 129: | Line 127: | ||
=== Texture Mapping on TINs === | === Texture Mapping on TINs === | ||
The capability to texture map images to TINs has been added. This capability allows | [[Image:TextureMapping.png|thumb|400px|right|A delineated watershed with a texture mapped image.]] | ||
The capability to texture map images to TINs has been added. This capability allows a user to read or download an image using the Get Data tools and then texture map the image on a TIN. This gives the option to create a nice image of the watershed model and to visualize the locations and terrain surrounding hydraulic structures in the watershed. A user can also use the texture mapping capabilities to view flood locations and contours from a HEC-RAS analysis. | |||
<br style="clear:both;"/> | <br style="clear:both;"/> | ||
| Line 136: | Line 136: | ||
==== GSSHA Snowmelt ==== | ==== GSSHA Snowmelt ==== | ||
[[Image:GSSHASnowmelt.png|thumb|400px|right|GSSHA Snowmelt Options Dialog.]] | |||
Several options to support the GSSHA snowmelt models have been added to the WMS interface. When running long-term GSSHA simulations, the GSSHA snowmelt parameters can be modified in the easy-to-use WMS interface. WMS 9.1 also has options to define raster HMET files for use in GSSHA long term simulations. | Several options to support the GSSHA snowmelt models have been added to the WMS interface. When running long-term GSSHA simulations, the GSSHA snowmelt parameters can be modified in the easy-to-use WMS interface. WMS 9.1 also has options to define raster HMET files for use in GSSHA long term simulations. | ||
| Line 143: | Line 145: | ||
==== HEC-RAS Water Surface Elevations ==== | ==== HEC-RAS Water Surface Elevations ==== | ||
If | If there is an existing HEC-RAS model and the user wants to bring it into WMS, there has not previously been a way to read the water surface elevations from the HEC-RAS solution. Now if the user exports the water surface elevations with the GIS file that's exported from HEC-RAS, WMS reads these water elevations. | ||
<br style="clear:both;"/> | <br style="clear:both;"/> | ||
| Line 149: | Line 151: | ||
==== SWMM Attributes ==== | ==== SWMM Attributes ==== | ||
If the correct attributes have been assigned to arcs in a shapefile, WMS now imports storm drain attributes such as names, shapes, diameters, lengths, and upstream and downstream invert elevations to | [[Image:SWMMAttributes.png|thumb|400px|right|A user can map attributes from shapefiles to SWMM models in WMS 9.1.]] | ||
If the correct attributes have been assigned to arcs in a shapefile, WMS now imports storm drain attributes such as names, shapes, diameters, lengths, and upstream and downstream invert elevations to the SWMM model in WMS. This makes the SWMM modeling easier because the user doesn't have to re-enter the pipe attributes that are already defined in a shapefile. | |||
<br style="clear:both;"/> | <br style="clear:both;"/> | ||
== | == Release Notes == | ||
To view the list of bugs fixed in WMS 9.1, visit the [[WMS:Release Notes_WMS|WMS release notes page]]. | |||
{{WMSMain}} | |||
[[Category:What's New]] | |||
Latest revision as of 23:36, 9 January 2023
The WMS software development team is excited about the release of WMS 9.1! This page lists the exciting new features that have been added to WMS 9.1.
What's new in WMS 9.1
Support of new GIS and CAD File Formats for Import and Export
Add GIS Data Command
The Add GIS Data command in the Get Data toolbar allows a user to read many formats of vector and raster GIS data. After reading the data, it can be viewed or converted to a format that can be used for hydrologic modeling in WMS.
Raster Display Options
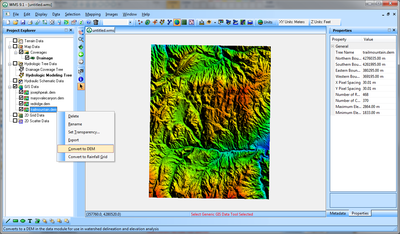
If there is raster elevation data read using the Add GIS Data command or if there is online data that contains raster elevations, there are various options for displaying hill shading on the raster data. A user can also convert any raster elevation data to a DEM.
GIS Vector Data Conversions
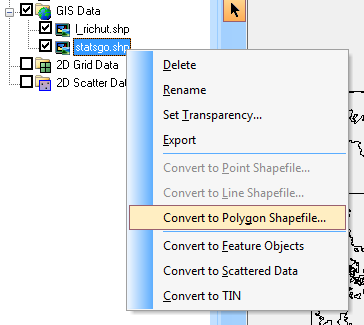
GIS Vector Data can be converted to a shapefile. Once the GIS data is converted to a shapefile, it can be used in any of the hydrologic modeling computations for tasks like computing curve numbers and infiltration coefficients.
Raster Data Conversions
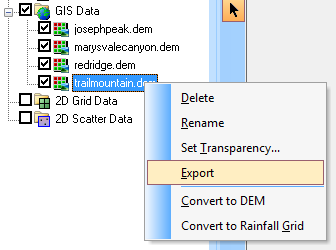
Raster data with information about land use or soil type can be converted to a land use or soil type grid by right-clicking on the layer. USGS NLCD and European CORINE Land use data can also be downloaded for anywhere in the United States and Europe using the Get Data tool. More information about the new data sources available in WMS 9.1 can be viewed here.
WMS DEMs can be exported to several digital elevation file formats, including the following:
- GeoTiff
- BIL
- ERDAS Imaging IMG
- Surfer ASCII Grid
- Surfer Binary Grid
- USGS ASCII DEM
- XYZ ASCII Grid
- ArcInfo ASCII Grid
- DXF 3D Point
- Float/Grid
- DTED
- MapInfo Grid
- GlobalMapper Grid
- Windsim GWS
All these files as well as many other formats can also be imported using the Add GIS Data button.
Vector/Shapefile Data Conversions
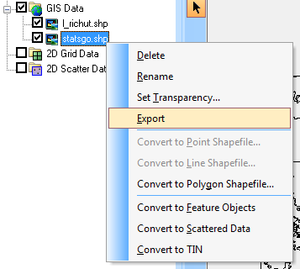
Vector GIS data that is read into WMS can be converted to a shapefile and used in WMS or saved to one of the many other supported formats. The supported formats include:
- DXF Files (*.dxf)
- Area Shapefiles (*.shp)
- Line Shapefiles (*.shp)
- Point Shapefiles (*.shp)
- Google Earth KMZ Files (*.kmz)
- MapInfo MIF/MID Files (*.mif)
- MapInfo TAB/MAP Files (*.map)
- Simple ASCII Text Files (*.txt)
- CSV (Comma-separated value) Files (*.csv)
- SVG Files (*.svg)
GIS Module
All images, raster GIS data, and vector GIS data are now stored in the GIS module. In the GIS module, a user can import, export, and convert GIS data to different formats. A user can also map data in the GIS module to data in WMS that can be used to build the watershed models.
TIN Elevations from LandXML Files
WMS 9.1 allows the user to read LandXML files as a TIN. This command to import LandXML files preserves the points and the triangle connections that were built in the CAD program that was used to generate the LandXML file.
DGN, DWG, and other CAD File Support
WMS 9.1 supports most of the latest DGN, DWG, and DXF file formats through the Teigha library. Currently, WMS 9.1 uses version 3.05.01 of the Teigha library.
Multiple DEMs
WMS 9.1 allows the user to read and manage multiple DEMs in the project explorer. Each of these DEMs can have flow directions and accumulations for watershed delineation. A user can clip and modify single DEMs or merge multiple DEMs from different sources into a single DEM. A user can convert raster elevation data in the GIS module to DEMs. These DEMs can be merged and exported to any of the raster elevation formats supported by WMS.
Improved Web Service (Online Data) Tools
WMS 9.1 has three tools for obtaining online data: The Get Data tool, the Get Data From Map command, and the Get Online Maps command. All of these tools can be used to obtain various types of raster data: Images, elevation data, land use data, vegetation data, and more.
Get Data
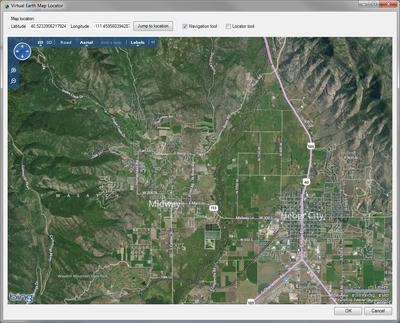
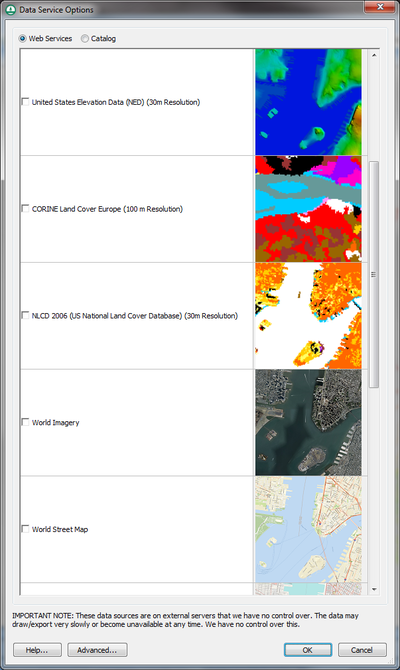
The Get Data tool and the Get Data From Map command work in much the same way. The user needs to set the current projection before using either of these tools. The difference is that with the Get Data tool, the user selects the area where data is desired from the WMS window. With the Get Data From Map command, the user selects the area from the Virtual Earth Map Locator window. This Virtual Earth window pops up after selecting the Get Data From Map command. In either case, the user goes to the area of interested and WMS will bring up another window that allows the user to select the type of data to be downloaded. With all the raster data sources, specify a resolution of the data to be downloaded and WMS will download the data.
Several new data sources have been added to the Get Data tools in WMS, including various sources for high-quality imagery. Samples of many of the data sources are shown in the new Get Data dialog.
Get Online Maps
The Get Online Maps command allows a user to define online data sources to be added to the display. This command was introduced in WMS 9.0, and has been improved in WMS 9.1. WMS 9.1 launches a separate process to download the online data when it is downloading so the user no longer needs to wait for the data to download before working. WMS 9.1 also has tools to convert online data to static data and to convert it to various formats that can be used for watershed modeling.
Texture Mapping on TINs
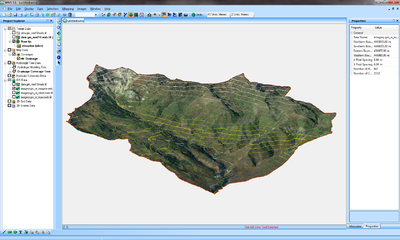
The capability to texture map images to TINs has been added. This capability allows a user to read or download an image using the Get Data tools and then texture map the image on a TIN. This gives the option to create a nice image of the watershed model and to visualize the locations and terrain surrounding hydraulic structures in the watershed. A user can also use the texture mapping capabilities to view flood locations and contours from a HEC-RAS analysis.
Model Improvements
GSSHA Snowmelt
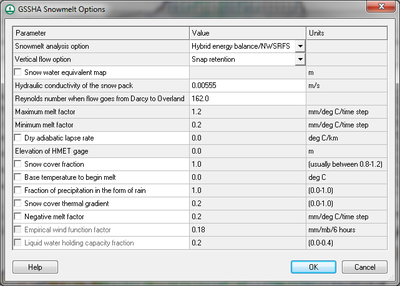
Several options to support the GSSHA snowmelt models have been added to the WMS interface. When running long-term GSSHA simulations, the GSSHA snowmelt parameters can be modified in the easy-to-use WMS interface. WMS 9.1 also has options to define raster HMET files for use in GSSHA long term simulations.
HEC-RAS Water Surface Elevations
If there is an existing HEC-RAS model and the user wants to bring it into WMS, there has not previously been a way to read the water surface elevations from the HEC-RAS solution. Now if the user exports the water surface elevations with the GIS file that's exported from HEC-RAS, WMS reads these water elevations.
SWMM Attributes
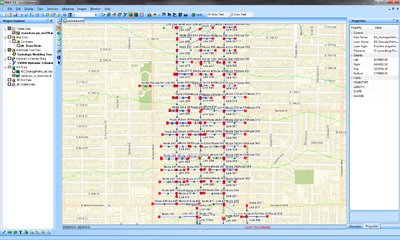
If the correct attributes have been assigned to arcs in a shapefile, WMS now imports storm drain attributes such as names, shapes, diameters, lengths, and upstream and downstream invert elevations to the SWMM model in WMS. This makes the SWMM modeling easier because the user doesn't have to re-enter the pipe attributes that are already defined in a shapefile.
Release Notes
To view the list of bugs fixed in WMS 9.1, visit the WMS release notes page.
WMS – Watershed Modeling System | ||
|---|---|---|
| Modules: | Terrain Data • Drainage • Map • Hydrologic Modeling • River • GIS • 2D Grid • 2D Scatter |  |
| Models: | CE-QUAL-W2 • GSSHA • HEC-1 • HEC-HMS • HEC-RAS • HSPF • MODRAT • NSS • OC Hydrograph • OC Rational • Rational • River Tools • Storm Drain • SMPDBK • SWMM • TR-20 • TR-55 | |
| Toolbars: | Modules • Macros • Units • Digitize • Static Tools • Dynamic Tools • Drawing • Get Data Tools | |
| Aquaveo | ||
