WMS:Exporting Dialog: Difference between revisions
From XMS Wiki
Jump to navigationJump to search
No edit summary |
No edit summary |
||
| Line 1: | Line 1: | ||
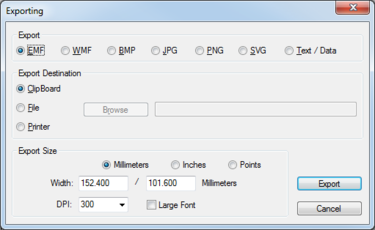
[[Image:WMS Exporting Plot Data.jpg|thumb|375 px|''Exporting'' dialog]] | [[Image:WMS Exporting Plot Data.jpg|thumb|375 px|''Exporting'' dialog]] | ||
The ''Exporting'' dialog allows exporting the plot data to the desired format. The dialog is reached | The ''Exporting'' dialog allows exporting the plot data to the desired format. The dialog is reached in the following ways: | ||
* Clicking the '''Export...''' button in the [[WMS:Customization Dialog|''Customization...'' dialog]]. | |||
* Right-clicking on a plot and selecting the '''Export/Print...''' option. | |||
The following buttons are at the bottom of the dialog: | The following buttons are at the bottom of the dialog: | ||
Latest revision as of 18:35, 22 May 2019
The Exporting dialog allows exporting the plot data to the desired format. The dialog is reached in the following ways:
- Clicking the Export... button in the Customization... dialog.
- Right-clicking on a plot and selecting the Export/Print... option.
The following buttons are at the bottom of the dialog:
- Export – Once all the desired options are selected, click this button to export the plot.
- Cancel – Exit the Exporting dialog without exporting the plot.
Export
- Image Export – This option selects the image format the plot data will be exported as. The following image formats are available:
- EMF – Windows enhanced metafile.
- WMF – Windows metafile.
- BMP – Bitmap image file format.
- JPG – Joint photographic experts group file format.
- PNG – Portable network graphics file format.
- SVG – Scalable vector graphics file format.
- Text / Data – This option will export the data as a simple text file.
Export Destination
In this section, select where WMS will send the plot data when exporting.
- ClipBoard – Sends the plot data to the clipboard memory of the computer.
- File – Creates an ASCII text file of the data. Selecting the Browse button allows specifying the location where the file will be saved.
- Printer – Exports the data to an active printer.
Export Size
If exporting to an image format, allows the image size and resolution to be specified. Default values will be entered in these fields based on the generated plot. These values can be changed if desired. This section contains the following options:
- Millimeters – Export size will be in millimeters.
- Inches – Export size will be in inches.
- Points – Export size will be in points.
- Width – Enter the desired size based on the units selected.
- DPI – Select a desired resolution between Off and 600dpi (in increments of 100).
- Large Font – If turned on, the output will use large fonts for any text.
Related Topics
WMS – Watershed Modeling System | ||
|---|---|---|
| Modules: | Terrain Data • Drainage • Map • Hydrologic Modeling • River • GIS • 2D Grid • 2D Scatter |  |
| Models: | CE-QUAL-W2 • GSSHA • HEC-1 • HEC-HMS • HEC-RAS • HSPF • MODRAT • NSS • OC Hydrograph • OC Rational • Rational • River Tools • Storm Drain • SMPDBK • SWMM • TR-20 • TR-55 | |
| Toolbars: | Modules • Macros • Units • Digitize • Static Tools • Dynamic Tools • Drawing • Get Data Tools | |
| Aquaveo | ||
