WMS:Get Data Toolbar: Difference between revisions
No edit summary |
|||
| Line 24: | Line 24: | ||
== | == Hydrologic Modeling Wizard == | ||
The WMS Hydrologic Modeling Wizard ([[Image:HydrologicModelingWizardTool.jpg]]) is a simple tool that walks you through all the steps involved in creating a hydrologic model. It can be accessed by selecting the hydrologic modeling wizard tool in the [[WMS:Get Data Toolbar|get data toolbar]] ([[Image:GetDataToolbar1.png]]). | The WMS Hydrologic Modeling Wizard ([[Image:HydrologicModelingWizardTool.jpg]]) is a simple tool that walks you through all the steps involved in creating a hydrologic model. It can be accessed by selecting the hydrologic modeling wizard tool in the [[WMS:Get Data Toolbar|get data toolbar]] ([[Image:GetDataToolbar1.png]]). | ||
See the article [[WMS:Hydrologic_Modeling_Wizard|Hydrologic Modeling Wizard]] for more information. | |||
{{WMSMain}} | {{WMSMain}} | ||
Revision as of 23:57, 5 March 2013
The Get Data Toolbar (![]() ) is used to get data.
) is used to get data.
Common problems when beginning a project in WMS include the need to locate the necessary data (e.g. DEMs, Topo Map images, shape files of land use and soils, etc.), make sure the file format is correct, open in WMS, and then insure that all of the data are in a common coordinate system. This can be tedious, especially if many users of the same organization frequently use the same data and therefore repeat this process over and over again on the same set of files. For agencies like flood control districts, departments of transportation, counties, etc. that manage large data for a community of users it is convenient to catalog the necessary files. WMS can read a database catalog and then automatically open any files that fit within a user specified bounding box.
 Measure Tool
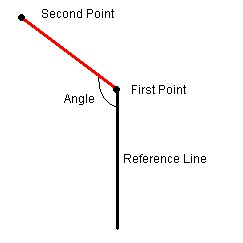
The Measure tool can be used to measure the distance and slope (providing a TIN or DEM is present) along any user defined path. When this tool is active a series of line segments can be defined that make up a path. When the path is terminated by double-clicking, the distance and slope of path are reported in red text in the help message window at the bottom of the screen. Slope is computed as the distanced-weighted average of the slopes of each segment. The slope of each segment is determined by dividing the change in elevation between the beginning point and ending point by the plan (xy) distance of the segment. The units of the distance will be the same as the units of the coordinates (feet or meters) and the slopes are in ft/ft or m/m.
If a line only has two points then an angle (in radians) is also reported. The angle is determined as the angle from a reference line that is in a direction south of the first point, to the line segment defined by the two points. This is illustrated in the following picture.
Get Data Tool
The Get Data tool is used to get data from the web or from a catalog file.
Common problems when beginning a project in WMS include the need to locate the necessary data (e.g. DEMs, Topo Map images, shape files of land use and soils, etc.), make sure the file format is correct, open in WMS, and then ensure that all of the data are in a common coordinate system. This can be tedious, especially if many users of the same organization frequently use the same data and therefore repeat this process over and over again on the same set of files. For agencies like flood control districts, departments of transportation, counties, etc. that manage large data for a community of users it is convenient to catalog the necessary files. WMS can read a database catalog and then automatically open any files that fit within a user specified bounding box.
See the article Get Data Tool for more on how to use the Get Data tool.
Get Data From Map
Hydrologic Modeling Wizard
The WMS Hydrologic Modeling Wizard (![]() ) is a simple tool that walks you through all the steps involved in creating a hydrologic model. It can be accessed by selecting the hydrologic modeling wizard tool in the get data toolbar (
) is a simple tool that walks you through all the steps involved in creating a hydrologic model. It can be accessed by selecting the hydrologic modeling wizard tool in the get data toolbar (![]() ).
).
See the article Hydrologic Modeling Wizard for more information.
WMS – Watershed Modeling System | ||
|---|---|---|
| Modules: | Terrain Data • Drainage • Map • Hydrologic Modeling • River • GIS • 2D Grid • 2D Scatter |  |
| Models: | CE-QUAL-W2 • GSSHA • HEC-1 • HEC-HMS • HEC-RAS • HSPF • MODRAT • NSS • OC Hydrograph • OC Rational • Rational • River Tools • Storm Drain • SMPDBK • SWMM • TR-20 • TR-55 | |
| Toolbars: | Modules • Macros • Units • Digitize • Static Tools • Dynamic Tools • Drawing • Get Data Tools | |
| Aquaveo | ||
