GMS:Building Solids and 3D Meshes with TINs
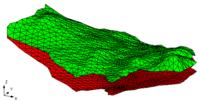
TINs can be used to build 3D solid models as well as 3D meshes. This can be done by selecting the following commands in the Build TIN menu:
- Horizons → Solids
- Horizons → 3D Mesh
- Fill Between TINs → 3D Mesh
The preferred method for creating solids is the Horizons method mentioned above. The following commands are legacy operations that are less robust and not supported.
- TINs → Extruded Solid – This command creates a new solid from each of the selected TINs by extruding each of the TINs up or down to an elevation specified by the user. Extruded TINs are useful in the construction of solid models of soil stratigraphy.
- Fill Between TINs → Solid – This command provides a quick way to create a solid bounded above and below by two or more selected TINs. The TIN defining the top of the boundary of the solid should be selected first. The remaining TIN(s) are then selected. All selected TINs are extruded down to an arbitrary elevation below that of all the selected TINs. GMS then performs a difference set operation.
TINs can be used to build three-dimensional solid models of the soil layers. The transformation from TINs to solids is accomplished using a TIN extrusion and set operation procedure illustrated in two dimensions in the following figure. A two-dimensional cross section of three TINs, labeled p, q, and r, is shown in part (a).
The TINs are converted into temporary solid primitives that represent approximations of the soil layers. The conversion is accomplished by projecting the outer boundary (perimeter) of each TIN down to a horizontal plane. This can be thought of as an extrusion process where a two-dimensional surface is extruded into a three-dimensional solid. A three-dimensional illustration of this process is shown in the figure below.
Boundaries are created around the perimeter of the solid and one large boundary is created at the base of the solid. The elevation of the horizontal plane is chosen so that the resulting solid is below the lowest point of interest. A series of two-dimensional cross sections of the primitive solids P, Q, and R formed by extruding the TINs in part (a) of the figure above is shown in part (b).
The final step of the modeling process consists of combining the primitive solids to form solid models of the soil layers. This is accomplished using set operations. Portions of the solids that overlap other solids are "trimmed" away and adjacent solids are forced to match precisely at the boundaries. This step of the modeling process is illustrated in part c. Primitive Q is subtracted from primitive P to produce the temporary solid P-Q. Primitive R is then subtracted from P-Q to produce the solid P'. The solid Q' is formed by subtracting primitive R from primitive Q. The primitive R does not intersect other solids and needs no trimming. Cross sections of the completed solid models of the soil layers are shown in part (d).
The combination extrusion/set operation process can be simplified in some cases. For example, within GMS it is possible to create solid P' directly by "filling" between TIN p and the two TINs q and r. GMS accomplishes this by combining the process described above for creating solid P' into a single operation. The user simply selects TINs p, q, and r and performs the Fill Between TINs → Solid command in the Build TINs menu of the TIN module.
The combination of TIN editing, TIN extrusion, and set operations represents a powerful and flexible tool that makes it possible to model complex stratigraphic relationships such as truncations, faults, embedded seams, and pinchout zones. Once the models are constructed, the volumes of the solids can be viewed using the Get Info command in the File menu. In addition, the models can be further modified using set operations to simulate complex excavations. Cross sections and fence diagrams can be constructed from the solid models at any location and at any orientation.
See also
| GMS – Groundwater Modeling System | ||
|---|---|---|
| Modules: | 2D Grid • 2D Mesh • 2D Scatter Point • 3D Grid • 3D Mesh • 3D Scatter Point • Boreholes • GIS • Map • Solid • TINs • UGrids | |
| Models: | FEFLOW • FEMWATER • HydroGeoSphere • MODAEM • MODFLOW • MODPATH • mod-PATH3DU • MT3DMS • MT3D-USGS • PEST • PHT3D • RT3D • SEAM3D • SEAWAT • SEEP2D • T-PROGS • ZONEBUDGET | |
| Aquaveo | ||
