WMS:GIS Tables: Difference between revisions
No edit summary |
No edit summary |
||
| (One intermediate revision by one other user not shown) | |||
| Line 8: | Line 8: | ||
After selecting the '''Join Table to Layer''' command, a prompt will ask for the database file to join using the standard select file dialog. The ''Join Table'' dialog will then appear and ask to select the ''Join Field'' from the GIS data layer attributes and the ''Join Field'' from the table to be joined to the GIS data layer. Often these field names will be the same as in the example below, but they are not required to be the same. The important thing is that they contain similar information from which a join can be made. Finally, select to join all of the attributes from the join table or just add a specific field, as is shown in the example below where we are only interested in adding the field representing hydrologic soil groups. | After selecting the '''Join Table to Layer''' command, a prompt will ask for the database file to join using the standard select file dialog. The ''Join Table'' dialog will then appear and ask to select the ''Join Field'' from the GIS data layer attributes and the ''Join Field'' from the table to be joined to the GIS data layer. Often these field names will be the same as in the example below, but they are not required to be the same. The important thing is that they contain similar information from which a join can be made. Finally, select to join all of the attributes from the join table or just add a specific field, as is shown in the example below where we are only interested in adding the field representing hydrologic soil groups. | ||
[[File:Join Table. | [[File:Join Table.png|thumb|none|left|250 px|''Join Table'' dialog]] | ||
The join does not permanently alter the GIS data layer on the hard drive of the computer, it only exists within the WMS application. | The join does not permanently alter the GIS data layer on the hard drive of the computer, it only exists within the WMS application. | ||
| Line 14: | Line 14: | ||
==Related Topics== | ==Related Topics== | ||
* [[WMS:GIS Module|GIS Module]] | * [[WMS:GIS Module|GIS Module]] | ||
* [[WMS:Soil|Soil Coverages]] | * [[WMS:Soil Type Coverage|Soil Coverages]] | ||
* [[WMS:Mapping to Feature Objects|Mapping to Feature Objects]] | * [[WMS:Mapping to Feature Objects|Mapping to Feature Objects]] | ||
Latest revision as of 22:09, 18 December 2019
Open Attribute Table
The Open Attribute Table command, available by right-clicking on a GIS layer, opens up a spreadsheet dialog that shows all of the attribute names (as columns) and the values associated with each feature in the layer (as rows). Tables cannot be edited within WMS; this is only a way to explore and discover the nature of the database associated with the GIS layer. It is important to understand both the names of attribute fields and feature values in order to better understand how the data might be mapped to feature objects in a map coverage.
Joining Tables
The Join Table to Layer command, available when right-clicking on a layer in the Project Explorer, allows joining the attributes of one database file (DBF) to the features of a GIS layer based on a key attribute field. This is particularly important when dealing with NRCS soils data since the features are stored in a shapefile with a minimal set of attributes. The hydrologic soil group and other soil classifications are stored in a separate DBF file. The two files are related based on an attribute field named MUID. Other GIS data layers may be similar where the features contain some kind of key indexing field and the attributes are stored in a separate table that can be joined to the features based on the index field values.
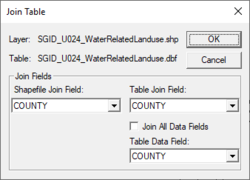
After selecting the Join Table to Layer command, a prompt will ask for the database file to join using the standard select file dialog. The Join Table dialog will then appear and ask to select the Join Field from the GIS data layer attributes and the Join Field from the table to be joined to the GIS data layer. Often these field names will be the same as in the example below, but they are not required to be the same. The important thing is that they contain similar information from which a join can be made. Finally, select to join all of the attributes from the join table or just add a specific field, as is shown in the example below where we are only interested in adding the field representing hydrologic soil groups.
The join does not permanently alter the GIS data layer on the hard drive of the computer, it only exists within the WMS application.
Related Topics
WMS – Watershed Modeling System | ||
|---|---|---|
| Modules: | Terrain Data • Drainage • Map • Hydrologic Modeling • River • GIS • 2D Grid • 2D Scatter |  |
| Models: | CE-QUAL-W2 • GSSHA • HEC-1 • HEC-HMS • HEC-RAS • HSPF • MODRAT • NSS • OC Hydrograph • OC Rational • Rational • River Tools • Storm Drain • SMPDBK • SWMM • TR-20 • TR-55 | |
| Toolbars: | Modules • Macros • Units • Digitize • Static Tools • Dynamic Tools • Drawing • Get Data Tools | |
| Aquaveo | ||
