WMS:Editing DEM Elevations: Difference between revisions
| (8 intermediate revisions by the same user not shown) | |||
| Line 3: | Line 3: | ||
==Editing Single Points== | ==Editing Single Points== | ||
A single elevation can be edited by selecting it with the '''Select DEM Points''' [[ | A single elevation can be edited by selecting it with the '''Select DEM Points''' [[File:WMS SelectDEMpointsTool.svg|13 px]] tool and adjusting the z value in the [[WMS:Properties Window|''Edit Window'']], or by double-clicking and bringing up the [[WMS:DEM Point Attributes|''DEM Point Attributes'']] dialog. Other properties such as defining a depression point or manually changing the flow direction can also be edited in the [[WMS:DEM Point Attributes|''DEM Point Attributes'']] dialog. | ||
:[[Image:DEMpoint att.png|thumb|none|left|325 px|''DEM Points Attributes'' dialog]] | |||
==Editing Elevations with a Feature Arc== | ==Editing Elevations with a Feature Arc== | ||
| Line 9: | Line 11: | ||
The '''Edit Elevations''' command in the ''DEM'' menu is used in conjunction with a selected arc to adjust the elevations of all DEM cells that lie beneath the selected arc. Double-clicking on an arc while in the Terrain Data module will also activate the ''Edit DEM Elevations'' dialog. | The '''Edit Elevations''' command in the ''DEM'' menu is used in conjunction with a selected arc to adjust the elevations of all DEM cells that lie beneath the selected arc. Double-clicking on an arc while in the Terrain Data module will also activate the ''Edit DEM Elevations'' dialog. | ||
:[[File:EditDEMElevations. | :[[File:EditDEMElevations.png|thumb|none|left|400 px|''Edit DEM Elevations'' dialog]] | ||
The tools at the top of the dialog can be used to select and edit individual locations along the DEM, zoom, pan, refresh, or re-center. There are three ways to edit the elevations: | The tools at the top of the dialog can be used to select and edit individual locations along the DEM, zoom, pan, refresh, or re-center. There are three ways to edit the elevations: | ||
= | ===Set/Offset all elevations by a given value=== | ||
==Set/Offset all elevations by a given value== | |||
It is possible to set all elevations to a constant elevation, or enter an elevation to adjust all selected DEM points up (positive offset) or down (negative offset). | It is possible to set all elevations to a constant elevation, or enter an elevation to adjust all selected DEM points up (positive offset) or down (negative offset). | ||
:[[Image:EditDEMconstant. | :[[Image:EditDEMconstant.png|thumb|none|left|400 px|''Edit DEM Elevations'' dialog showing the ''Constant DEM elevation'' dialog as reached by using the '''Set to constant elevation''' button]] | ||
==Linearly Interpolate between first and last elevation== | ===Linearly Interpolate between first and last elevation=== | ||
It is possible to linearly interpolate all elevations between the first and last elevation. Some may wish to edit the first and last elevation first. Of course this will make the channel artificially smooth, but it still may be more realistic for the channel than the irregular nature of DEM elevations as a result. In this fashion, adjust the channel to slope to a known value. | It is possible to linearly interpolate all elevations between the first and last elevation. Some may wish to edit the first and last elevation first. Of course this will make the channel artificially smooth, but it still may be more realistic for the channel than the irregular nature of DEM elevations as a result. In this fashion, adjust the channel to slope to a known value. Start with selecting the first and last node, then click the '''Interpolate''' button. | ||
:[[Image:Edit DEM Elevations Interpolate. | :[[Image:Edit DEM Elevations Interpolate.png|thumb|none|left|400 px|''Edit DEM Elevations'' dialog after using the '''Interpolate''' button]] | ||
==Related Topics== | ==Related Topics== | ||
Latest revision as of 17:10, 2 October 2023
While DEMs are simple to use and more commonly available than TIN data, they are more difficult to edit or adjust, primarily because of the number of elevation points that must be changed in order to have a corresponding effect on the drainage characteristics of a watershed. However, there are a few things that can be done, and if kept to a reasonable amount can be powerful in using a DEM for watershed delineation, but remember that data can not be manufactured. If making numerous unexpected edits, then consider acquiring a different elevation source.
Editing Single Points
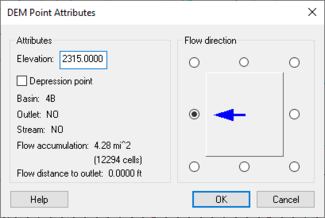
A single elevation can be edited by selecting it with the Select DEM Points ![]() tool and adjusting the z value in the Edit Window, or by double-clicking and bringing up the DEM Point Attributes dialog. Other properties such as defining a depression point or manually changing the flow direction can also be edited in the DEM Point Attributes dialog.
tool and adjusting the z value in the Edit Window, or by double-clicking and bringing up the DEM Point Attributes dialog. Other properties such as defining a depression point or manually changing the flow direction can also be edited in the DEM Point Attributes dialog.
Editing Elevations with a Feature Arc
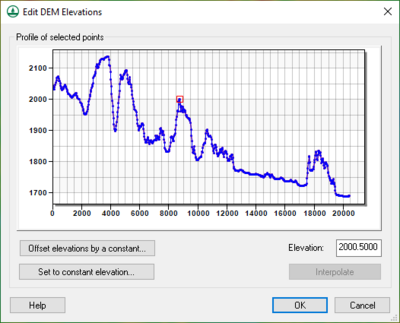
The Edit Elevations command in the DEM menu is used in conjunction with a selected arc to adjust the elevations of all DEM cells that lie beneath the selected arc. Double-clicking on an arc while in the Terrain Data module will also activate the Edit DEM Elevations dialog.
The tools at the top of the dialog can be used to select and edit individual locations along the DEM, zoom, pan, refresh, or re-center. There are three ways to edit the elevations:
Set/Offset all elevations by a given value
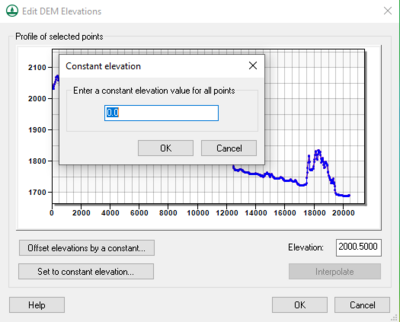
It is possible to set all elevations to a constant elevation, or enter an elevation to adjust all selected DEM points up (positive offset) or down (negative offset).
Linearly Interpolate between first and last elevation
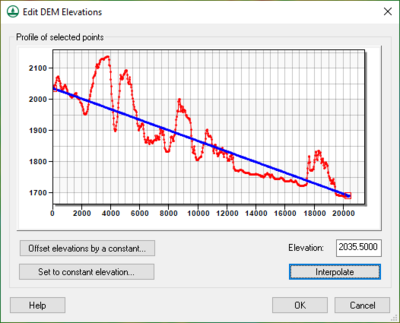
It is possible to linearly interpolate all elevations between the first and last elevation. Some may wish to edit the first and last elevation first. Of course this will make the channel artificially smooth, but it still may be more realistic for the channel than the irregular nature of DEM elevations as a result. In this fashion, adjust the channel to slope to a known value. Start with selecting the first and last node, then click the Interpolate button.
Related Topics
WMS – Watershed Modeling System | ||
|---|---|---|
| Modules: | Terrain Data • Drainage • Map • Hydrologic Modeling • River • GIS • 2D Grid • 2D Scatter |  |
| Models: | CE-QUAL-W2 • GSSHA • HEC-1 • HEC-HMS • HEC-RAS • HSPF • MODRAT • NSS • OC Hydrograph • OC Rational • Rational • River Tools • Storm Drain • SMPDBK • SWMM • TR-20 • TR-55 | |
| Toolbars: | Modules • Macros • Units • Digitize • Static Tools • Dynamic Tools • Drawing • Get Data Tools | |
| Aquaveo | ||


