WMS:Editing DEMs: Difference between revisions
No edit summary |
|||
| (6 intermediate revisions by 2 users not shown) | |||
| Line 1: | Line 1: | ||
==Trimming DEMs== | ==Trimming DEMs== | ||
[[Image:WMS DEM Trim by Elevation. | [[Image:WMS DEM Trim by Elevation.png|thumb|225 px|''DEM Trim by Elevation'' dialog]] | ||
The '''Trim''' command is used to set the area of DEM that will be worked with. A DEM by definition includes a rectangular area, but some may not need to process in the entire area to delineate a watershed, or prepare information for a hydraulic model so it is convenient to be able to trim away the parts of the DEM that are not needed. | The '''Trim''' command is used to set the area of DEM that will be worked with. A DEM by definition includes a rectangular area, but some may not need to process in the entire area to delineate a watershed, or prepare information for a hydraulic model so it is convenient to be able to trim away the parts of the DEM that are not needed. | ||
| Line 7: | Line 7: | ||
[[Image:WMSImageSetActiveRgn.png]] | [[Image:WMSImageSetActiveRgn.png]] | ||
When choosing the '''Trim''' command, enter a polygon interactively or select an existing feature polygon in order to identify the region of interest within the DEM. If a polygon is already selected prior to choosing the '''Trim''' command then the selected polygon will be used for trimming without a prompt. When trimming with a polygon, only the DEM points within the polygon will have active elevations as everything outside the polygon, but within the bounding rectangle of the polygon is set to a NODATA value as illustrated in the figures below. | When choosing the '''Trim''' command, enter a polygon interactively<!-- or select an existing feature polygon in order to identify the region of interest within the DEM. If a polygon is already selected prior to choosing the '''Trim''' command then the selected polygon will be used for trimming without a prompt-->. When trimming with a polygon, only the DEM points within the polygon will have active elevations as everything outside the polygon, but within the bounding rectangle of the polygon is set to a NODATA value as illustrated in the figures below. | ||
[[Image:WMS DEM TrimArea.png]] [[Image:WMS DEM trimmed.png]] | [[Image:WMS DEM TrimArea.png]] [[Image:WMS DEM trimmed.png]] | ||
| Line 13: | Line 13: | ||
==Filling Gaps Between DEMs== | ==Filling Gaps Between DEMs== | ||
When reading in [[WMS:Importing USGS DEMs|multiple DEM files that are adjacent]], a small area or gap between the DEMs may have no elevation data. The Fill command will interpolate an elevation for the selected DEM cells (or scan automatically for all such regions if a cell block is not selected) that are classified as "NODATA." The elevation for a selected NODATA cell is determined using [[WMS:Inverse Distance Weighted Interpolation|inverse distance weighted interpolation]] from its eight nearest neighbor cells (if any of the eight neighboring cells are NODATA cells then they are not used in the interpolation). This command is intended to correct single isolated DEM points or a single row/column, and is not intended to create data for large regions of NODATA cells, especially regions on the border of the DEM. | When reading in [[WMS:Importing USGS DEMs|multiple DEM files that are adjacent]], a small area or gap between the DEMs may have no elevation data. The '''Fill''' command will interpolate an elevation for the selected DEM cells (or scan automatically for all such regions if a cell block is not selected) that are classified as "NODATA." The elevation for a selected NODATA cell is determined using [[WMS:Inverse Distance Weighted Interpolation|inverse distance weighted interpolation]] from its eight nearest neighbor cells (if any of the eight neighboring cells are NODATA cells then they are not used in the interpolation). This command is intended to correct single isolated DEM points or a single row/column, and is not intended to create data for large regions of NODATA cells, especially regions on the border of the DEM. | ||
==Deleting DEMs== | ==Deleting DEMs== | ||
| Line 29: | Line 29: | ||
[[Category:DEM|E]] | [[Category:DEM|E]] | ||
[[Category:DEM Dialogs]] | [[Category:DEM Dialogs]] | ||
[[Category:Needs Update]] | |||
Latest revision as of 16:59, 9 August 2022
Trimming DEMs
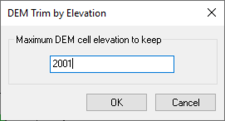
The Trim command is used to set the area of DEM that will be worked with. A DEM by definition includes a rectangular area, but some may not need to process in the entire area to delineate a watershed, or prepare information for a hydraulic model so it is convenient to be able to trim away the parts of the DEM that are not needed.
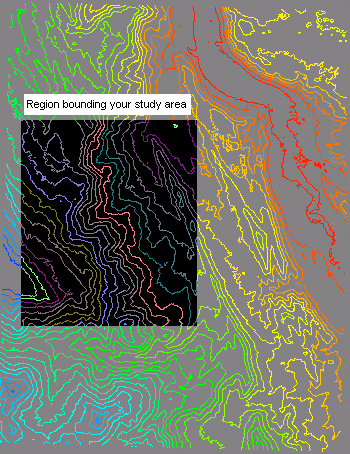
The illustration belows indicates a rectangle that bounds the area of interest within a larger DEM model.
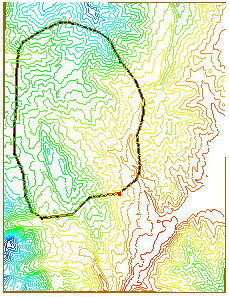
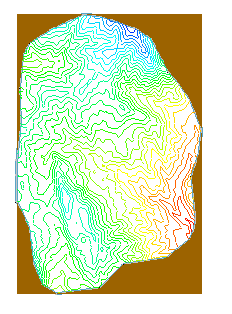
When choosing the Trim command, enter a polygon interactively. When trimming with a polygon, only the DEM points within the polygon will have active elevations as everything outside the polygon, but within the bounding rectangle of the polygon is set to a NODATA value as illustrated in the figures below.
Filling Gaps Between DEMs
When reading in multiple DEM files that are adjacent, a small area or gap between the DEMs may have no elevation data. The Fill command will interpolate an elevation for the selected DEM cells (or scan automatically for all such regions if a cell block is not selected) that are classified as "NODATA." The elevation for a selected NODATA cell is determined using inverse distance weighted interpolation from its eight nearest neighbor cells (if any of the eight neighboring cells are NODATA cells then they are not used in the interpolation). This command is intended to correct single isolated DEM points or a single row/column, and is not intended to create data for large regions of NODATA cells, especially regions on the border of the DEM.
Deleting DEMs
The Delete command in the DEM menu will delete from memory (not the hard drive) the current DEM. A DEM may also be deleted by right-clicking in the Project Explorer and choosing the Delete command.
Related Topics
WMS – Watershed Modeling System | ||
|---|---|---|
| Modules: | Terrain Data • Drainage • Map • Hydrologic Modeling • River • GIS • 2D Grid • 2D Scatter |  |
| Models: | CE-QUAL-W2 • GSSHA • HEC-1 • HEC-HMS • HEC-RAS • HSPF • MODRAT • NSS • OC Hydrograph • OC Rational • Rational • River Tools • Storm Drain • SMPDBK • SWMM • TR-20 • TR-55 | |
| Toolbars: | Modules • Macros • Units • Digitize • Static Tools • Dynamic Tools • Drawing • Get Data Tools | |
| Aquaveo | ||


