WMS:Project Explorer Contents for Terrain Data Module: Difference between revisions
(→DEM Object Right-Click Menu: Noted trimming/cropping a raster option) |
|||
| Line 82: | Line 82: | ||
==DEM Object Right-Click Menu== | ==DEM Object Right-Click Menu== | ||
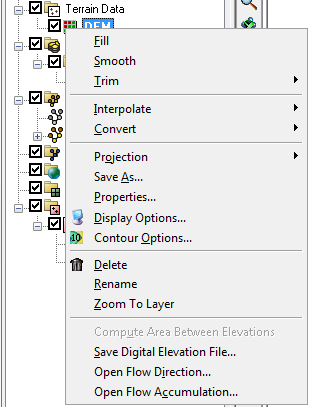
Right-clicking on a DEM [[File:DEM Data icon in Project Explorer.png]] allows selecting any of the DEM processing or visualization options in WMS. All DEMs are created by either reading a file or converting from another data object, such as a TIN or from raster GIS data. If multiple DEMs exist, these DEMs can be selected and merged together into a single DEM. There is only one active DEM. This active DEM is used for watershed delineation and for all other processes that require elevation data in WMS. | Right-clicking on a DEM [[File:DEM Data icon in Project Explorer.png]] allows selecting any of the DEM processing or visualization options in WMS. All DEMs are created by either reading a file or converting from another data object, such as a TIN or from raster GIS data. If multiple DEMs exist, these DEMs can be selected and merged together into a single DEM. There is only one active DEM. This active DEM is used for watershed delineation and for all other processes that require elevation data in WMS. A DEM raster can be cropped with a freehand polygon by selecting the Trim | Polygon option. | ||
:[[Image:TerrainProjectExplorer5.png]] | :[[Image:TerrainProjectExplorer5.png]] | ||
Revision as of 22:25, 26 August 2016
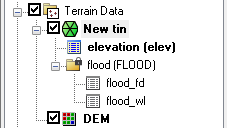
In the Terrain Data module, TINs and DEMs are listed in the Project Explorer. A toggle is next to each object; the toggle controls the visibility. The display is automatically updated when the toggle is checked or unchecked.
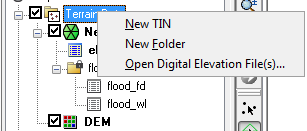
Right-clicking on the main Terrain Data folder ![]() allows creating a New folder or TIN. Because TINs can be created by digitizing in WMS, a new, blank TIN can be created. However, DEMs are only created by opening a DEM file type. If neither a TIN nor a DEM exists, then a Reprojection can be performed on any existing terrain data. There is also an option to open a digital elevation file. Opening a digital elevation file using this option will open an elevation grid as a WMS DEM.
allows creating a New folder or TIN. Because TINs can be created by digitizing in WMS, a new, blank TIN can be created. However, DEMs are only created by opening a DEM file type. If neither a TIN nor a DEM exists, then a Reprojection can be performed on any existing terrain data. There is also an option to open a digital elevation file. Opening a digital elevation file using this option will open an elevation grid as a WMS DEM.
TIN Object Right-Click Menu
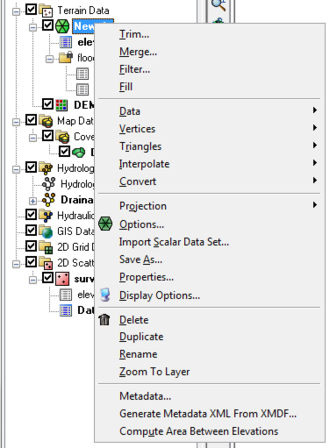
Right-clicking on a TIN allows selecting any of the TIN processing or visualization options in WMS. The commands in this menu are as follows:
- Trim: Opens the Polygon Selection Options dialog.
- Merge: Opens the Merge TINs dialog.
- Filter: Brings up the Maximum filter angle dialog.
- Fill:
- Data: A submenu for adjusting datasets in the TIN. It contains the following commands:
- Calculator: Launches the Data Calculator dialog for modifying or creating datasets in the TIN.
- Smooth Dataset: Rounds the data values and creates a new dataset under the TIN with the smoothed values.
- Map Elevation
- Film Loop: Starts the Film Loop Setup dialog for creating a animation from the TIN.
- Vertices: A submenu for adjusting vertices in the TIN. It contains the following commands:
- Lock/Unlock
- Delete Duplicates
- Smooth Pits
- Transform
- Triangles: A submenu for triangulatin options in the TIN. It contains the following commands:
- Triangulate
- Insert Breaklines
- Optimization Triangulation
- Check Long/Thin Triangles
- Remove Flat Triangles
- Interpolate: A submenu for interpolating the TIN data to another module or TIN. It contains the following commands:
- To 2D Grid
- To TIN
- To Feature Objects
- Convert: A submenu for converting the TIN data to another module or DEM. It contains the following commands:
- TIN Contours→Feature
- TIN Boundary→Feature
- TIN→2D Scatter Points
- TIN→DEM
- Projection: A submenu for changing the coordinate system of the TIN. It contains the following commands:
- Projection
- Set as Display Projection
- Reproject
- Transform
- Options: Brings up the TIN Options dialog.
- Import Scalar Dataset: Imports a scalar dataset by first selecting the type of scalar dataset to import and then launching the Open dialog.
- Save As: Used to designate the path and prefix file name for saving a TIN.
- Properties: Brings up the Properties window for the TIN.
- Display Options: Brings up the Display Options dialog.
- Delete: Removes the TIN from the project.
- Duplicate: Creates a copy of the TIN.
- Rename: Lets the name of the TIN be changed in the Project Explorer.
- Zoom To Layer: Will resize the TIN data so it fills the Graphics Window.
- Metadata: Brings up a Metadata dialog.
- Generate Metadata XML From XMDF
- Compute Area Between Elevations
A TIN by default has a single elevation dataset, but additional datasets can be created, such as flood depth and water surface elevation datasets when delineating a flood plain. For more information on datasets see Datasets.
TIN Dataset Righ-Click Menu
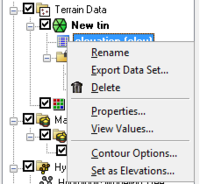
Right-clicking on a dataset of a TIN allows the following options:
- Rename: Changes the name of the dataset in the Project Explorer.
- Export Dataset: Selects the file format and save the dataset.
- Delete: Removes the dataset from the TIN.
- Properties: Brings up the Properties window for the dataset.
- View Values: Opens the Edit Dataset Values dialog.
- Contour Options: Brings up the Contour Options dialog.
- Set as Elevations: Assigns the dataset as the elevation dataset for the TIN.
DEM Object Right-Click Menu
Right-clicking on a DEM ![]() allows selecting any of the DEM processing or visualization options in WMS. All DEMs are created by either reading a file or converting from another data object, such as a TIN or from raster GIS data. If multiple DEMs exist, these DEMs can be selected and merged together into a single DEM. There is only one active DEM. This active DEM is used for watershed delineation and for all other processes that require elevation data in WMS. A DEM raster can be cropped with a freehand polygon by selecting the Trim | Polygon option.
allows selecting any of the DEM processing or visualization options in WMS. All DEMs are created by either reading a file or converting from another data object, such as a TIN or from raster GIS data. If multiple DEMs exist, these DEMs can be selected and merged together into a single DEM. There is only one active DEM. This active DEM is used for watershed delineation and for all other processes that require elevation data in WMS. A DEM raster can be cropped with a freehand polygon by selecting the Trim | Polygon option.
Related Topics
WMS – Watershed Modeling System | ||
|---|---|---|
| Modules: | Terrain Data • Drainage • Map • Hydrologic Modeling • River • GIS • 2D Grid • 2D Scatter |  |
| Models: | CE-QUAL-W2 • GSSHA • HEC-1 • HEC-HMS • HEC-RAS • HSPF • MODRAT • NSS • OC Hydrograph • OC Rational • Rational • River Tools • Storm Drain • SMPDBK • SWMM • TR-20 • TR-55 | |
| Toolbars: | Modules • Macros • Units • Digitize • Static Tools • Dynamic Tools • Drawing • Get Data Tools | |
| Aquaveo | ||
