WMS:SMPDBK: Difference between revisions
| Line 74: | Line 74: | ||
[[Category:External Links]] | [[Category:External Links]] | ||
[[Category:SMPDBK Dialogs]] | [[Category:SMPDBK Dialogs]] | ||
[[Category:WMS Menus]] | |||
Revision as of 16:16, 12 January 2017
The Simplified Dam-Break (SMPDBK) model was developed in 1988 by the National Weather Service (NWS) for predicting downstream flooding produced by a dam failure. This 32-bit program is still capable of producing the information necessary to estimate flooded areas resulting from dam-break floodwaters while substantially reducing the amount of time, data, and expertise required to run a simulation of the more sophisticated unsteady NWS DAMBRK, now called FLDWAV. It is important to note that a 64-bit machine will need to run a DOS emulation program to run the SMPDBK executable. The SMPDBK method is useful for situations where reconnaissance level results are adequate, and when data and time available to prepare the simulation are sparse. Unlike the more sophisticated versions of DAMBRK and FLDWAV, the SMPDBK method does not account for backwater effects created by natural channel constrictions of those due to such obstacles as downstream dams or bridge embankments. The other most common alternative which WMS supports is HEC-HMS. Other options for modeling dam breaks using Aquaveo software includes using SMS to run SRH-2D, FESWMS, RiverFlo-2D, and TUFLOW (SMS gives an interface for these four models).
The SMPDBK model can be added to a paid edition of WMS.
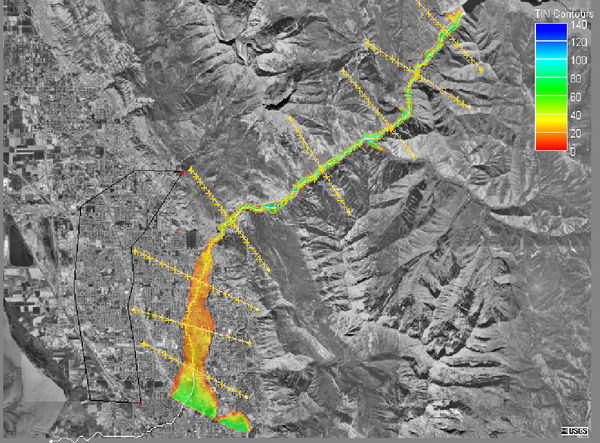
The input required for a SMPDBK model is a stream centerline, cross sections, and information regarding the storage and failure of the dam being modeled. WMS saves the model data to a properly formatted input file for SMPDBK and then launches the executable. The executable is the same version distributed by the NWS. When a model is successfully run, WMS will automatically read the results and create a water surface elevation data set that can be used for automated floodplain delineation as illustrated in the picture below.
Centerline
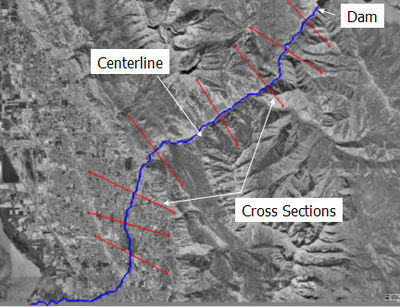
The centerline must be defined in a 1D-Hydraulic Centerline coverage and consists of a single feature arc that should start at the dam being modeled and end at or just after the last cross section. The centerline determines the extents of the simulation and helps to establish the stationing of cross sections that are defined along its length. Create centerlines from the upstream (dam side) end to the downstream end in order to provide the proper direction to the model.
Cross Sections
Cross sections for a simplified dam-break analysis must be defined in a 1D-Hydraulic Cross Section coverage. A minimum of two cross sections are required (upstream and downstream ends of the river to be modeled), but sufficient cross sections to define the floodplain should be included. If using a digital terrain model to extract cross sections, then it is fairly simple to include additional cross sections without the requirement of a field survey.
SMPDBK uses a table of top-widths corresponding to incremental elevations to define the cross sections. WMS will compute 8 incremental depths automatically for each cross section since this is the maximum number of increments allowed by SMPDBK. The eight increments are equal and determined based on the low and high elevations of the cross section. Manning's roughness values can be determined for segments of the cross section based on an area property coverage.
SMPDBK Menu
The SMPDBK menu, included in the Hydraulic module, has the following commands:
- Export SMPDBK File – Saves the model parameters as a SMPDBK file (*.dat).
- Run Simulation – Launches the SMPDBK simulation run.
- Read Solution – Opens a SMPDBK output file (*.out) generated from the simulation run.
- Edit Parameters – Brings up the SMPDBK dam Properties dialog.
- Materials – Opens the Materials Data dialog.
- Material Properties &ndash: Brings up the HEC-RAS Material Properties dialog for assigning roughness values to the materials.
- Model Control – Brings up the HEC-RAS Model Control dialog.
SMPDBK Dam Properties
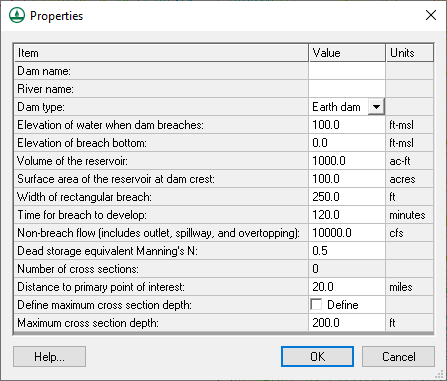
The Dam Properties dialog (from Edit Parameters of the SMPDBK menu) is used to set several options which describe the dam. This dialog is pictured below.
Data for this dialog can be collected by searching for the data on the Internet. Data could also be obtained from the National Inventory of Dams web site (2004).
Running a Simulation
The SMPDBK executable is distributed with WMS and should be present in the WMS program directory (SMPDBK.EXE). When choosing the Run Simulation command, a prompt will ask for a file name that WMS will use to write the properly formatted input based on the centerline, cross section, roughness, and dam properties defined. After writing the input file WMS will launch the SMPDBK executable and pass the newly created input file as a command line argument.
- Important note: If running on a 64-bit Windows operating system, it will not be possible to run SMPDBK from within WMS and the file must be exported (see below).
Export Simulation
If wanting to save a completed SMPDBK input file that is properly formatted, choose the Export SMPDBK File command.Then continue to edit/prepare the file in a text editing program such as Notepad or Wordpad and then run it through the SMPDBK program outside of WMS. However, an SMPDBK formatted input file is always generated when running a simulation from within WMS.
To run SMPDBK on a 64-bit machine use a DOS command prompt by installing a DOS emulation program such as DOSBOX (see the SMPDBK Tutorial PDF on the WMS Tutorial page). Once the DOS emulator is opened the user will type the following case-sensitive entries:
1. mount C C:\
2. c:
3. cd c:\Users\Username\DOCUME~1\WMS9~1.0\TUTORI~1\HYDRAU~1\SMPDBK (this is where the .dat file is often stored)
4. c:\PROGRA~1\WMS9~1.0\Smpdbk.exe
5. NO
6. YES
7. SMPDBK.DAT
8. NO
9. SMPDBK.OUT
Related Topics
WMS – Watershed Modeling System | ||
|---|---|---|
| Modules: | Terrain Data • Drainage • Map • Hydrologic Modeling • River • GIS • 2D Grid • 2D Scatter |  |
| Models: | CE-QUAL-W2 • GSSHA • HEC-1 • HEC-HMS • HEC-RAS • HSPF • MODRAT • NSS • OC Hydrograph • OC Rational • Rational • River Tools • Storm Drain • SMPDBK • SWMM • TR-20 • TR-55 | |
| Toolbars: | Modules • Macros • Units • Digitize • Static Tools • Dynamic Tools • Drawing • Get Data Tools | |
| Aquaveo | ||


