User:Jcreer/GMS:TVM Package: Difference between revisions

From XMS Wiki
Jump to navigationJump to search
No edit summary
No edit summary
 
(3 intermediate revisions by 2 users not shown)
Line 2: Line 2:
{{future feature}}
{{future feature}}
{{MODFLOW Links}}
{{MODFLOW Links}}
The '''Time-Variant Materials''' (TVM) package works with [[GMS:MODFLOW-USG Transport|MODLOW-USG Transport]] in [[GMS:GMS|GMS]]. The TVM package allows hydraulic conductivity and storage values to be changed as a step function between stress periods or in a continuous manner through a transient simulation. This [[GMS:MODFLOW Packages Supported in GMS#Optional Packages|optional package]] must be turned on in the [[GMS:MODFLOW Packages Supported in GMS|''MODFLOW Packages / Processes'' dialog]].
The '''Time-Variant Materials''' (TVM) package works only with [[GMS:MODFLOW-USG Transport|MODLOW-USG Transport]] in [[GMS:GMS|GMS]]. The TVM package allows hydraulic conductivity and storage values to be changed as a step function between stress periods or in a continuous manner through a transient simulation. This [[GMS:MODFLOW Packages Supported in GMS#Optional Packages|optional package]] must be turned on in the [[GMS:MODFLOW Packages Supported in GMS|''MODFLOW Packages / Processes'' dialog]].


==TVM Package Dialog==
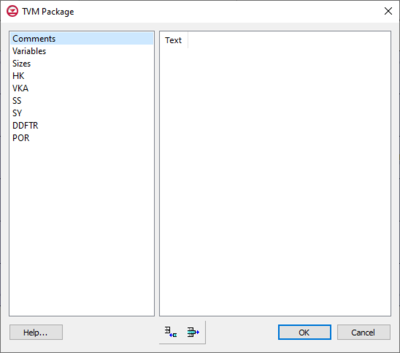
The ''TVM Package'' dialog is accessed by selecting ''MODFLOW'' | ''Optional Packages'' | '''TVM - Time Varying Material...''' in GMS.  
The ''TVM Package'' dialog is accessed by selecting ''MODFLOW'' | ''Optional Packages'' | '''TVM – Time Varying Material...''' in GMS.  


[[File:TVM Package dialog.png|thumb|none|400 px|The ''TVM Package'' dialog.]]
[[File:TVM Package dialog.png|thumb|none|400 px|The ''TVM Package'' dialog.]]
Line 70: Line 70:
*'''Delete Row''' [[File:Delete Row Icon.svg|13px]] – Deletes the selected text row from the ''Comments'' section.
*'''OK''' – Saves all changes and closes the ''TVM Package'' dialog.  
*'''Cancel''' – Discards all changes and closes the ''TVM Package'' dialog.  
*'''Cancel''' – Discards all changes and closes the ''TVM Package'' dialog.


==Dataset Name==
==Dataset Name==
[[File:TVM Package - Dataset Name dialog.png|thumb|right|250 px|The ''Dataset Name'' dialog for the TVM Package.]]
[[File:TVM Package - Dataset Name dialog.png|thumb|right|250 px|The ''Dataset Name'' dialog for the TVM Package.]]
The ''Dataset Name'' dialog is accessed by clicking '''Array to Dataset''' on the several of the pages of the ''TVM Package'' dialog. Used to create a new dataset from data in the selected array.
The ''Dataset Name'' dialog is accessed by clicking '''Array to Dataset''' on several of the pages of the ''TVM Package'' dialog. Used to create a new dataset from data in the selected array.
*Enter the desired dataset name in the ''Name of new dataset'' field
*'''OK''' – Saves all changes and closes the ''Dataset Name'' dialog.  
Line 81: Line 81:
==Select Dataset==
==Select Dataset==
[[File:TVM Package - Select Dataset dialog.png|thumb|right|250 px|The ''Select Dataset'' dialog for the TVM Package.]]
[[File:TVM Package - Select Dataset dialog.png|thumb|right|250 px|The ''Select Dataset'' dialog for the TVM Package.]]
The ''Select Dataset'' dialog is accessed by clicking '''Dataset to Array''' on the several of the pages of the ''TVM Package'' dialog. Used to copy data from an existing dataset into the selected array.
The ''Select Dataset'' dialog is accessed by clicking '''Dataset to Array''' on several of the pages of the ''TVM Package'' dialog. Used to copy data from an existing dataset into the selected array.


The following fields and buttons are found in this dialog:
Line 93: Line 93:


{{Navbox GMS}}
{{Navbox GMS}}
[[Category:MODFLOW-USG|TVM]]

Latest revision as of 15:44, 5 October 2020

MODFLOW
Pre-processing
MODFLOW Commands
Building a MODFLOW Model
Map to MODFLOW
Calibration
Packages Supported in GMS
Saving a MODFLOW Simulation
Importing MODFLOW Files
Unsupported MODFLOW Features
Run MODFLOW
Post-processing
MODFLOW Display Options
MODFLOW Post-Processing Viewing Options
Reading a MODFLOW Simulation
Tutorials
Packages
Flow: BCF6, HUF, LPF, UPW
Solvers:

DE4, GMG, NWT, PCG,

PCGN, LMG, SIP, SOR,

SMS
Other:

BAS6, BFH, CHD1, CLN,

DRN1, DRT1, EVT1, ETS1,

GAGE, GHB1, GNC, HFB1,

HUF, LAK3, MNW1, MNW2,

OUT1, RCH1, RIV1, SFR2,

STR1, SUB1, SWI2, WEL1,

UZF1

The Time-Variant Materials (TVM) package works only with MODLOW-USG Transport in GMS. The TVM package allows hydraulic conductivity and storage values to be changed as a step function between stress periods or in a continuous manner through a transient simulation. This optional package must be turned on in the MODFLOW Packages / Processes dialog.

TVM Package Dialog

The TVM Package dialog is accessed by selecting MODFLOW | Optional Packages | TVM – Time Varying Material... in GMS.

The TVM Package dialog.

The list on the left of the dialog contains the following options:

  • Comments
    • Text – Create rows where text can be entered by clicking the Add Row Insert Row Icon.svg button at the bottom of the dialog.
  • Variables
    • ITVMPRINT – A print flag determining how much information the TVM package will print to the listing file.
    • TVMLOGBASEHK – Specifies the type of interpolation to use between starting and ending horizontal hydraulic conductivity (HK) property values in each stress period.
    • TVLOGBASEVKA – Specifies the type of interpolation to use between starting and ending vertical hydraulic conductivity (VKA) property values in each stress period.
    • TVMLOGBASESS – Specifies the type of interpolation to use between starting and ending specific storage property values in each stress period.
    • TVMLOGBASESY – Specifies the type of interpolation to use between starting and ending specific yield property values in each stress period.
    • TVMDDFTR – Specifies the type of interpolation to use between starting and ending dual domain rate transfer coefficient property values in each stress period.
    • TVMLOGBASEPOR – Specifies the type of interpolation to use between starting and ending specific yield property values in each stress period.
  • Sizes
    • Stress period boundary – Select the stress period boundary, then enter the sizes for the following size columns:
      • NTVMHK – The number of horizontal hydraulic conductivity (HK) values that will be changed at this stress period boundary.
      • NTVMVKA – The number of vertical hydraulic conductivity (VKA) values that will be changed at this stress period boundary.
      • NTVMSS – The number of Ss values that will be changed at this stress period boundary.
      • NTVMSY – The number of Sy values that will be changed at this stress period boundary.
      • NTVMDDFTR – The number of DDFTR values that will be changed at this stress period boundary.
      • NTVMPOR – The number of porosity values that will be changed at this stress period boundary.
  • HK
    • Stress period boundary – Select the stress period boundary, then edit the data in the ITVMHK and HKNEW columns. The data in both columns is editable.
      • ITVMHK – The cell number for which horizontal hydraulic conductivity (HK) will be changed.
      • HKNEW – The value of horizontal hydraulic conductivity (HK) that should be assigned to the cell at this stress period boundary.
    • Array to Dataset – Clicking this button brings up the Dataset Name dialog. Use to copy the data in the array to a new dataset.
    • Dataset to Array – Clicking this button brings up the Select Dataset dialog. Use to copy the data from an existing dataset into the array.
  • VKA
    • Stress period boundary – Select the stress period boundary, then edit the data in the ITVMVKA and VKANEW columns. The data in both columns is editable.
      • ITVMVKA – The cell number for which vertical hydraulic conductivity (VKA) will be changed.
      • VKANEW – The value of vertical hydraulic conductivity (VKA) that should be assigned to the cell at this stress period boundary.
    • Array to Dataset – Clicking this button brings up the Dataset Name dialog. Use to copy the data in the array to a new dataset.
    • Dataset to Array – Clicking this button brings up the Select Dataset dialog. Use to copy the data from an existing dataset into the array
  • SS
    • Stress period boundary – Select the stress period boundary, then edit the data in the ITVMSS and SSNEW columns. The data in both columns is editable.
      • ITVMSS – The cell number for which Ss will be changed.
      • SSNEW – The value of Ss that should be assigned to the cell at this stress period boundary.
    • Array to Dataset – Clicking this button brings up the Dataset Name dialog. Use to copy the data in the array to a new dataset.
    • Dataset to Array – Clicking this button brings up the Select Dataset dialog. Use to copy the data from an existing dataset into the array
  • SY
    • Stress period boundary – Select the stress period boundary, then edit the data in the ITVMSY and SYNEW columns. The data in both columns is editable.
      • ITVMSY – The cell number for which Sy will be changed.
      • SYNEW – The value of Sy that should be assigned to the cell at this stress period boundary.
    • Array to Dataset – Clicking this button brings up the Dataset Name dialog. Use to copy the data in the array to a new dataset.
    • Dataset to Array – Clicking this button brings up the Select Dataset dialog. Use to copy the data from an existing dataset into the array
  • DDFTR
    • Stress period boundary – Select the stress period boundary, then edit the data in the ITVMDDFTR and DDFTRNEW columns. The data in both columns is editable.
      • ITVMDDFTR – The cell number for which DDFTR will be changed.
      • DDFTRNEW – The value of DDFTR that should be assigned to the cell at this stress period boundary.
    • Array to Dataset – Clicking this button brings up the Dataset Name dialog. Use to copy the data in the array to a new dataset.
    • Dataset to Array – Clicking this button brings up the Select Dataset dialog. Use to copy the data from an existing dataset into the array
  • POR
    • Stress period boundary – Select the stress period boundary, then edit the data in the ITVPOR and PORNEW columns. The data in both columns is editable.
      • ITVPOR – The cell number for which porosity will be changed.
      • PORNEW – The value of porosity that should be assigned to the cell at this stress period boundary.
    • Array to Dataset – Clicking this button brings up the Dataset Name dialog. Use to copy the data in the array to a new dataset.
    • Dataset to Array – Clicking this button brings up the Select Dataset dialog. Use to copy the data from an existing dataset into the array

The buttons at the bottom of the dialog include the following:

  • Help... – Clicking this button opens this page in a web browser.
  • Add Row Insert Row Icon.svg – Adds a text row in the Comments section.
  • Delete Row Delete Row Icon.svg – Deletes the selected text row from the Comments section.
  • OK – Saves all changes and closes the TVM Package dialog.
  • Cancel – Discards all changes and closes the TVM Package dialog.

Dataset Name

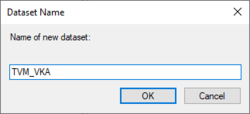
The Dataset Name dialog for the TVM Package.

The Dataset Name dialog is accessed by clicking Array to Dataset on several of the pages of the TVM Package dialog. Used to create a new dataset from data in the selected array.

  • Enter the desired dataset name in the Name of new dataset field
  • OK – Saves all changes and closes the Dataset Name dialog.
  • Cancel – Discards all changes and closes the Dataset Name dialog.


Select Dataset

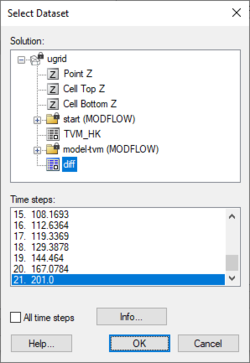
The Select Dataset dialog for the TVM Package.

The Select Dataset dialog is accessed by clicking Dataset to Array on several of the pages of the TVM Package dialog. Used to copy data from an existing dataset into the selected array.

The following fields and buttons are found in this dialog:

  • Solution section – Select the desired dataset from which to import the data into the array.
  • Time steps section – Select the desired time step to use.
  • All time steps – Turn on to use all time steps from the list in the Time steps section.
  • Info... – Opens the Dataset Info dialog.
  • Help... – Opens the Datasets article in a web browser.
  • OK – Saves all changes and closes the Select Dataset dialog.
  • Cancel – Discards all changes and closes the Select Dataset dialog.