WMS:Mapping to Feature Objects: Difference between revisions
No edit summary |
No edit summary |
||
| (2 intermediate revisions by the same user not shown) | |||
| Line 1: | Line 1: | ||
While future versions of WMS may be able to process some commands directly from the GIS data layers, currently map all features to use as part of model development to feature objects in a map coverage. One way to do this is to import an entire shapefile directly to map coverage (this is the only way available in previous versions), but often the extents of the GIS data layer are much larger (i.e. an entire state) and so it may be more efficient to select only those GIS features (points, lines, polygons) that overlay the study area and map those to feature objects in a map coverage. | While future versions of WMS may be able to process some commands directly from the GIS data layers, currently map all features to use as part of model development to feature objects in a map coverage. One way to do this is to import an entire shapefile directly to map coverage (this is the only way available in previous versions), but often the extents of the GIS data layer are much larger (i.e. an entire state) and so it may be more efficient to select only those GIS features (points, lines, polygons) that overlay the study area and map those to feature objects in a map coverage. | ||
A mapping wizard guides through the process of converting the GIS data layer features to feature objects in a map coverage. Before beginning the mapping process, first go to the map module and make sure that the currently active coverage is the coverage to map GIS data layer features to. For example, the default coverage in WMS is a drainage coverage and so, if | A mapping wizard guides through the process of converting the GIS data layer features to feature objects in a map coverage. Before beginning the mapping process, first go to the map module and make sure that the currently active coverage is the coverage to map GIS data layer features to. For example, the default coverage in WMS is a drainage coverage and so, if about to map soil polygons, create a new coverage and make sure that it has an attribute set of Soil Type. After making sure WMS will be mapping to the correct coverage, select the polygons which overlay the study area to be mapped. (This is done with the selection tool(s) in the GIS module) If wanting to map all features, choose the '''Select All''' command from the ''Edit Window'', or just move to the '''Mapping''' command (a prompt will ask if wanting to convert all features since none are selected). | ||
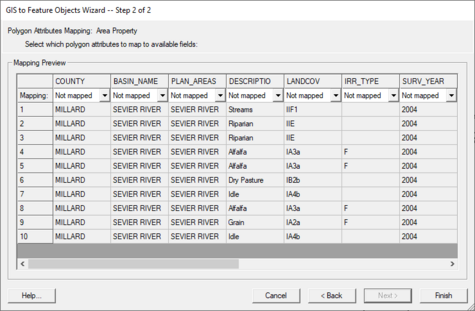
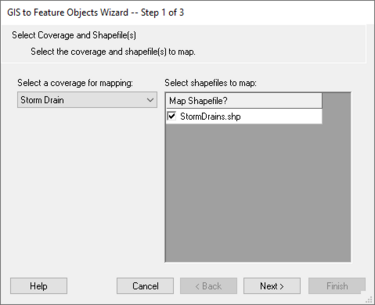
If ArcObjects are enabled, the '''ArcObjects→Feature Objects''' command is activated. If ArcObjects is not enabled, the '''Shapes→Feature Objects''' command is activated. After choosing the appropriate mapping command the mapping wizard will appear as shown below. This wizard will guides through the rest of the process. The first dialog in the mapping wizard contains instructions and marks the beginning point of mapping for selected features. The first of two steps is to map the attribute fields of the features to attributes used by WMS. WMS recognizes some attribute names as commonly used for certain attributes and maps them automatically (i.e. HYDRGRP for hydrologic soil groups and LU_CODE for land use ID's). | If ArcObjects are enabled, the '''ArcObjects→Feature Objects''' command is activated. If ArcObjects is not enabled, the '''Shapes→Feature Objects''' command is activated. After choosing the appropriate mapping command the mapping wizard will appear as shown below. This wizard will guides through the rest of the process. The first dialog in the mapping wizard contains instructions and marks the beginning point of mapping for selected features. The first of two steps is to map the attribute fields of the features to attributes used by WMS. WMS recognizes some attribute names as commonly used for certain attributes and maps them automatically (i.e. HYDRGRP for hydrologic soil groups and LU_CODE for land use ID's). | ||
[[File:GIS to Feature Objects Wizard -- Step 1 of 2.jpg|475 px]] | :[[File:GIS to Feature Objects Wizard -- Step 1 of 2.jpg|475 px]] | ||
The second step marks the end of the wizard, and after selecting '''Finish''', all selected features will be converted to feature objects within the active coverage. Attributes of mapped fields will be saved accordingly as attributes of the feature objects. | The second step marks the end of the wizard, and after selecting '''Finish''', all selected features will be converted to feature objects within the active coverage. Attributes of mapped fields will be saved accordingly as attributes of the feature objects. | ||
{| | :{| | ||
|- | |- | ||
|[[Image:WMS GIS to Feature Objects Wizard1.jpg|thumb|none|left|375 px|''GIS to Feature Objects Wizard'' showing step 1 after using the '''Shapes→Feature Objects''' command in the ''Mapping'' menu]] | |[[Image:WMS GIS to Feature Objects Wizard1.jpg|thumb|none|left|375 px|''GIS to Feature Objects Wizard'' showing step 1 after using the '''Shapes→Feature Objects''' command in the ''Mapping'' menu]] | ||
| Line 22: | Line 22: | ||
{{WMSMain}} | {{WMSMain}} | ||
[[Category:WMS GIS|M]] | [[Category:WMS GIS|M]] | ||
[[Category:WMS Feature Objects| | [[Category:WMS Feature Objects|Mapping]] | ||
[[Category:WMS GIS Dialogs]] | [[Category:WMS GIS Dialogs]] | ||
Latest revision as of 17:28, 2 October 2017
While future versions of WMS may be able to process some commands directly from the GIS data layers, currently map all features to use as part of model development to feature objects in a map coverage. One way to do this is to import an entire shapefile directly to map coverage (this is the only way available in previous versions), but often the extents of the GIS data layer are much larger (i.e. an entire state) and so it may be more efficient to select only those GIS features (points, lines, polygons) that overlay the study area and map those to feature objects in a map coverage.
A mapping wizard guides through the process of converting the GIS data layer features to feature objects in a map coverage. Before beginning the mapping process, first go to the map module and make sure that the currently active coverage is the coverage to map GIS data layer features to. For example, the default coverage in WMS is a drainage coverage and so, if about to map soil polygons, create a new coverage and make sure that it has an attribute set of Soil Type. After making sure WMS will be mapping to the correct coverage, select the polygons which overlay the study area to be mapped. (This is done with the selection tool(s) in the GIS module) If wanting to map all features, choose the Select All command from the Edit Window, or just move to the Mapping command (a prompt will ask if wanting to convert all features since none are selected).
If ArcObjects are enabled, the ArcObjects→Feature Objects command is activated. If ArcObjects is not enabled, the Shapes→Feature Objects command is activated. After choosing the appropriate mapping command the mapping wizard will appear as shown below. This wizard will guides through the rest of the process. The first dialog in the mapping wizard contains instructions and marks the beginning point of mapping for selected features. The first of two steps is to map the attribute fields of the features to attributes used by WMS. WMS recognizes some attribute names as commonly used for certain attributes and maps them automatically (i.e. HYDRGRP for hydrologic soil groups and LU_CODE for land use ID's).
The second step marks the end of the wizard, and after selecting Finish, all selected features will be converted to feature objects within the active coverage. Attributes of mapped fields will be saved accordingly as attributes of the feature objects.
Related Topics
WMS – Watershed Modeling System | ||
|---|---|---|
| Modules: | Terrain Data • Drainage • Map • Hydrologic Modeling • River • GIS • 2D Grid • 2D Scatter |  |
| Models: | CE-QUAL-W2 • GSSHA • HEC-1 • HEC-HMS • HEC-RAS • HSPF • MODRAT • NSS • OC Hydrograph • OC Rational • Rational • River Tools • Storm Drain • SMPDBK • SWMM • TR-20 • TR-55 | |
| Toolbars: | Modules • Macros • Units • Digitize • Static Tools • Dynamic Tools • Drawing • Get Data Tools | |
| Aquaveo | ||


