| MODFLOW |
|---|
| Pre-processing |
|---|
|
MODFLOW Commands |
|
Building a MODFLOW Model |
|
Map to MODFLOW |
|
Calibration |
|
Packages Supported in GMS |
|
Saving a MODFLOW Simulation |
|
Importing MODFLOW Files |
|
Unsupported MODFLOW Features |
|
Run MODFLOW |
| Post-processing |
|---|
|
MODFLOW Display Options |
|
MODFLOW Post-Processing Viewing Options |
|
Reading a MODFLOW Simulation |
| Tutorials |
|---|
| Packages |
|---|
| Flow: |
BCF6, HUF, LPF, UPW |
|---|
| Solvers: |
DE4, GMG, NWT, PCG,
PCGN, LMG, SIP, SOR,
SMS |
|---|
| Other: |
BAS6, BFH, CHD1, CLN,
DRN1, DRT1, EVT1, ETS1,
GAGE, GHB1, GNC, HFB1,
HUF, LAK3, MNW1, MNW2,
OUT1, RCH1, RIV1, SFR2,
STR1, SUB1, SWI2, WEL1,
UZF1 |
|---|
|
In the original version of MODFLOW, specified head boundaries are defined using a combination of the IBOUND array and the starting heads array. Since both of these arrays are static, boundaries where the head varies with time could not be simulated. To address this type of boundary, a new package called the Time Variant Specified Head (CHD) package has been developed. The Constant Head Designation (CHD) reads data every stress period, which makes changing the head at constant-head cells (designated with a negative IBOUND value) throughout a simulation possible. CHD Package is available in the ZONEBUDGET tutorial files.
NOTE: GMS does not support parameters for the Time Variant Specified Head (CHD) package.
Specifying Transient Head Values
Transient data are handled in a unique fashion with the CHD package. When transient values are assigned to the other stress packages, one value is assigned per stress period. The value represents the value at the beginning of the stress period. This results in a stair step definition of the time series as shown in part a of the following figure. With the CHD package, two values are assigned per stress period: a value at the beginning of the stress period and a value at the end of the stress period. This makes it possible to specify a piece-wise linear time series as shown in part b.

Specifying Transient Values Using (a) the Traditional Approach and (b) the Approach Used in the CHD Package. 
The
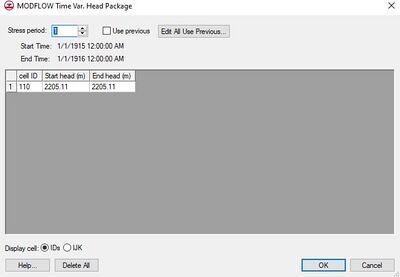
MODFLOW Time Var. Head Package dialog.
Defining Time Variant Specified Head Boundaries
A time variant specified head boundary can be defined using a conceptual model in the Map module simply by using the Transient option when entering the head value in the Attributes dialog. When the specified head attribute is assigned to a polygon, the head is assigned uniformly over the entire polygon. When assigned to an arc, separate head values are applied to each of the nodes on the ends of the arc and the head is assumed to vary linearly between the nodes. When the attribute is assigned to a point, the head is assigned directly to the cell containing the point. For cell-by-cell editing, a selected set of cells can be designated as time variant specified head cells using the Point Sources/Sinks command described above. When the head vs. time values are entered using the XY Series Editor, two values (beginning and ending values) must be entered per stress period. Once a set of cells has been specified, the Time Variant Specified Head Package dialog can be used to view and edit the values assigned to the cells.
Stress Period
This field shows the current stress period and allows users to cycle through the stress periods and view the different head properties for those stress periods in the spreadsheet below.
Use Previous
Use this option on a stress period to use the values from the previous stress period for the current stress period. This option is unavailable for steady state models and the first stress period of transient models.
Edit All Use Previous
This button brings up a spreadsheet allowing the user to quickly edit the Use Previous flag for all stress periods.
Spreadsheet
For cells where CHD type boundary conditions have been assigned, the starting and ending heads assigned to each cell are displayed in the spreadsheet portion at the lower part of the dialog. The spreadsheet can be used to edit the row, column, layer, starting head, and ending head values. For a transient simulation, the values displayed in the spreadsheet are for an individual stress period. The values associated with other stress periods can be edited by entering the number of the desired stress period in the stress period edit box in the center of the dialog. If the Use previous option is selected for a given stress period, the values from the previous stress period are used and the spreadsheet is dimmed.
Delete All
This button deletes all values in the dialog.

