SMS:Converting Feature Objects
| Map Module | |
|---|---|
 | |
| Map | |
| Feature Objects | |
| Coverages | |
| More | |
| Map Module Interface | |
| Map Display Options | |
| Map Module Tools | |
| Feature Objects Menu | |
| Map Project Explorer | |
Feature objects can be converted to other data types in SMS such as meshes, grids, scatter sets and cross sections. This can be accomplished by either right-clicking on a coverage in the project explorer and selecting a convert command or by selecting the following commands from the Feature Objects menu:
Extract Cross Section
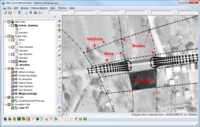
The Extract Cross Sections command uses the cross section arcs and a digital terrain model (TINs are the only source that can currently be used) to extract the elevations at vertices of the feature arc cross-sections, or at the intersection points with the triangles.
Cross Sections for individual arcs may be extracted by selecting the arc(s) before choosing the Extract Cross Sections command. If not cross-sections are selected then the Use All Cross Sections option is used.
Point properties (thalweg, left bank, right bank) can be defined from a 1D-Hydraulic Centerline coverage, or by AutoMark. The AutoMark option will examine the elevations of the extracted cross sections and try to infer the thalweg (low point) and the left and right bank points (change of slope) automatically.
Line properties can be determined from an area property coverage by intersecting the cross-section arcs with the area property polygons and marking them in the cross section database.
Cross Section Database
When extracting the cross sections, a prompt will ask for the name of a cross section database file. SMS stores all of the cross section information in a text database file. The cross section database can also be edited independently using the Cross Section Editor tools. Extracting cross sections with feature arcs is only way to generate cross section information, they also can be imported from spreadsheet files (cut and paste), or entered manually.
Map to 2D Mesh
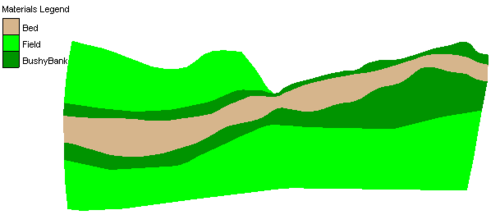
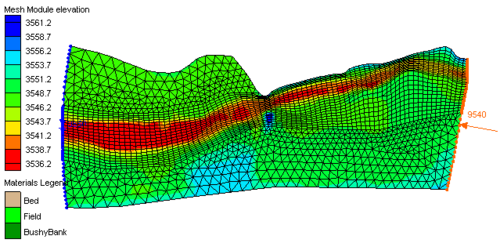
Once a set of feature objects has been created for a coverage (conceptual model) associated with a finite element based model such as RMA2, FESWMS, ADCIRC or CGWAVE , the Map → 2D Mesh command can be used to generate a 2D finite element mesh from the objects. The Map → 2D Mesh command creates a 2D mesh on the interior of all of the polygons in the current coverage. The figure domain of a floodplain using the feature objects in the Map Module. The second figure shows a 2D mesh created from the polygons.
The recommended method for creating unstructured grids (meshes) in SMS for use with either finite element or finite volume engines is to use the conceptual modeling approach. This method includes the following general steps:
- Define a bathymetric source (scatter set or raster/DEM).
- Define a map module coverage consisting of polygons that cover the modeling domain. This is the region to be covered by the mesh.
- Assign attributes to the points/arcs/polygons in the coverage to control the mesh characteristics.
- Point meshing attributes:
- Used to force the creation of a mesh node at a specific location.
- Used to specify the element density in the area of the point location by assigning refine point attributes.
- Arc meshing attributes:
- Used to define linear features such as a river thalweg or an embankment toe/shoulder. Mesh nodes will be created along the arc.
- Used to control element density if a size function (scalar paving) is not utilized. Vector spacing on the arc controls mesh node spacing for all mesh generation options except scalar paving.
- Polygon meshing attributes:
- Specify a bathymetry source for each polygon
- Specify a meshing type for each polygon. Choose from:
- Patching – create quad dominant elements conforming to a topographic rectangle.
- Paving – create triangular elements layer by layer from the polygon boundary inward.
- Scalar Paving – create triangular elements as with paving with the spacing controlled by a size function defined on an associated scatter set
- Point meshing attributes:
- Optionally, define an area property coverage to define the source of material attributes.
- Issue the Map → 2D Mesh command is used to create a 2D mesh using the feature objects in a 2D mesh coverage. When the Map → 2D Mesh command is selected, the 2D Mesh Options dialog opens.
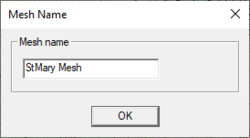
- After completing the 2D Mesh Options dialog, the Mesh Name dialog will appear. After assigning a name to the new mesh, the mesh will appear.
Mesh Name Dialog
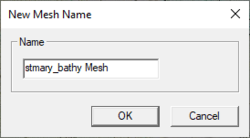
When using the Map → 2D Mesh, 2D grid → 2D Mesh, or Scatter → 2D Mesh commands, the Mesh Name or New Mesh Name dialog will appear. SMS requires that every mesh created be named. These dialogs give the option to enter a user specified name. A default name will be entered in the dialog and used for the new mesh if a new name is not specified.
Note that when entering name, a mesh name cannot contain an apostrophe or special characters. Including an apostrophe or special characters may cause errors.
Map to 2D Grid
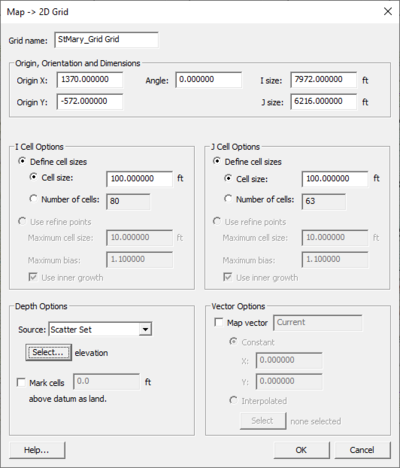
The Map → 2D Grid command is used to create a 2D grid using the feature objects in a 2D grid coverage. When the Map → 2D Grid command is selected, the Create Grid dialog appears. A grid frame must have been defined. The size and location of the grid frame are used to initialize the fields in the Create Grid dialog. In most cases, these values will not need to be changed then select the OK button to create the grid. If a grid frame has not been defined, the size and location of the grid are initialized so that the grid just surrounds the currently defined feature objects. If desired, the grid dimensions can be edited prior to selecting the OK button to create the grid.
Grid Frame Properties
The grid frame properties dialog allows specifying the attributes applied to the grid frame when performing a Map → 2D Grid operation. These properties are as follows:
- Grid name – Specified name of the grid being created. Apostrophes and special characters should not be used.
- Origin – Starting location of the grid frame.
- Orientation
- Directional properties (u and v direction)
- Define cell sizes – Specified uniform cell sizes
- Cell size – The cell size in the specified direction
- Number of cells – Number of cells in the specified direction
- Use refine points – Refine points will be used to generate the grid
- Maximum cell size – The max size the should exists when growing
- Maximum bias – The max growth ratio to be used when growing
- Use inner growth – Specifies whether the cell sizes should grow between two refine points
- Grid size – The grid dimension in the specified direction
- Define cell sizes – Specified uniform cell sizes
When specifying Define cell sizes, there are a few options available. These options are:
- Specify cell size – Specify the cell size and the number of cells will be computed.
- Specify number of cells – Specify the number of cells and the cell size will be computed.
If the grid is to have square cells, the v direction cell size will always be linked to the u direction cell size.
Refine Points
Refine points for a Cartesian Grid allow changing the cell dimensions when generating the grid. They are not available for all models, since some Cartesian Grid models require uniform cell sizes. Specify whether to refine in the I and/or J direction and the base cell size for each direction.
When the refining is performed, the base size may be changed in order to fit the other restrictions applied to the refining process. If two refine points are too close to each other to allow the cell size to transition, one will be ignored when generating the grid. See Refine Point Dialog for more information.
Depth and Vector Options
In addition to the options specified on the grid frame, depth and vector interpolation options can be specified during the mapping process for some models. The depth mapping is required for all models, while the vector mapping is optional even for the models it can be performed on. Depth and vector datasets can be constant or interpolated from a scatter set.
Cells with a user specified tolerance above the datum can be marked as land (inactive) cells. This option is on by default for BOUSS-2D, but defaults to off for other models.
When specifying a constant vector, the X and Y components are oriented based on global space, not grid space.
The name of the vector dataset can be specified, but the name of the depth dataset is always set to "Depth".
Map to 2D Scatter Points
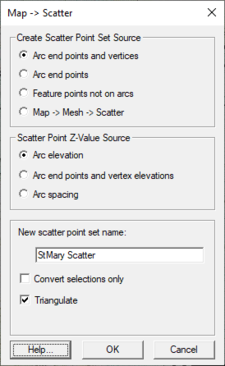
The Map → 2D Scatter Points command creates a scatter point set from the points and nodes and vertices of the current coverage. The process is creates a single elevation dataset for the 2D scatter points representing the Z location of all the points, nodes and vertices.
The dialog has three main sections which are detailed below.
Create Scatter Point Set Source – This section defines which feature objects will be converted to the new scatter set.
- Arc end points and vertices
- Arc end points
- Feature points not on arcs
- Map → Mesh → Scatter
- Cross section database
Scatter Point Z-Value Source – This section defines what data in the map coverage will be converted to the new scatter set.
- Arc elevation
- Arc end points and vertex elevations
- Arc spacing
New scatter point set name – This section specifies the new scatter point name and miscellaneous options.
- Name field – Enter the name of the new scatter set in this field. Apostrophes and special characters are not allowed.
- Convert selections only
- Triangulate
Older versions of SMS included an option to convert one of the measurements associated with an observation coverage to a dataset on a scatterset. This utilized the Observation Points → Scatter Points dialog. To accomplish this in versions of SMS newer than SMS 10.2, copy the observation spread sheet into Excel and save the data as a text file. Importing this file into SMS will allow creation of a scatter set of observed (measurement) data.
Measurement
A dataset is created for the 2D scatter points from the measurement selected in the dialog. The model associated with the selected measurement (if any) is shown, along with whether the measurement is steady state or transient.
Time Step Times
This section of the dialog is only available if the selected measurement is transient. It allows defining the number of time steps, and the time step times to be created for the scatter point dataset.
- Match all unique times
- This option gets the set of unique times from the XY series of all the observation points. This is the union of all the times. If some XY series use dates/times and others don’t, this option won’t be available. Otherwise, the times in the spreadsheet will be displayed as either dates/times or relative times depending on the XY series. The spreadsheet will not be editable. The Use dates/times toggle will be unavailable but set according to whether the observation point XY series use dates/times or not. The Reference time section will be unavailable, but if the XY series use dates/times, the minimum time will be used as the reference time for the scatter point dataset.
- Match time steps from model
- This option will only be available if the measurement is associated with a model, and the model is transient. If so, this will be the default choice and GMS will get the times to display in the spreadsheet from the stress period and time step info for the model. The spreadsheet will not be editable. The Use dates/times toggle will be unavailable but set according to whether the model uses dates/times or not. The Reference time section will be unavailable, but if the model uses dates/times, the model reference time will be used as the reference time.
- Specify times
- The spreadsheet of times will be editable with this option. It is possible to copy and paste times from another program such as a spreadsheet. Also, the Initialize Times button becomes available which brings up a dialog that can be used to create times at a specified interval. If selecting the Use dates/times toggle, the Reference time section will become available and the times in the spreadsheets will be displayed as dates/times.
Map to Quadtree
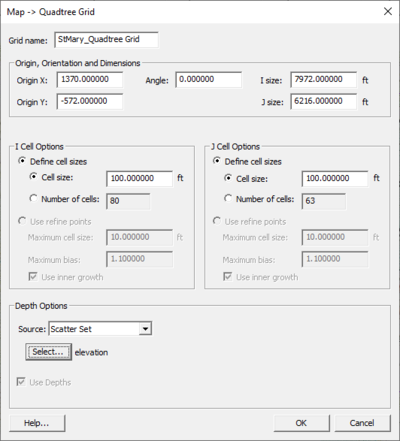
Parameters specified to create the quadtree grid include:
- Grid Name – Enter a name for the quadtree grid. Apostrophes and special characters cannot be used.
- Grid Geometry – This section allows specifying the origin, orientation and size of the grid. The fields of these quantities are populated with default values based on the three points. The orientation is measured as an angle from the positive X axis.
- Cell Options – This section allows specifying the number of cells in each direction in the grid. Several options are available. Specify sizes in the I (Delta U)and J (Delta V) directions or a number of columns and rows. If the Use Grid Frame Size toggle is checked, the grid will exactly match the dimensions specified in the Grid Geometry section. If that option is not checked, the last row and column may extend beyond the specified lengths. This allows specifying exact grid size, or exact cell size.
- Depth Options – The elevations or depths assigned to each cell or node can be specified as a single value, or select a dataset to interpolate from.
SMS will generate a quadtree on the input parameters.
Map to UGrid
The Map → UGrid command converts feature objects to a UGrid. The command is found by right-clicking on the map coverage. A dialog will appear allowing the new UGrid to be named. The name should not include apostrophes or special characters.
The process used in the conversion is similar to how SMS converts feature objects to a 2D mesh. Polygons must exist in the map coverage before converting to a UGrid.
Only coverages capable of being converted to a 2D mesh can be converted to a UGrid.
Map to 1D Grid
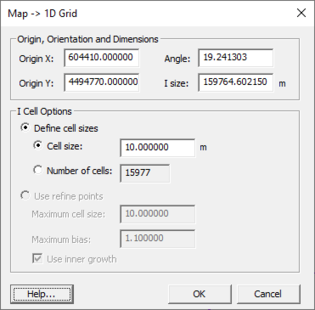
When converting a GenCade coverage to a 1D grid using the Map→1D Grid command, the Map→1D Grid dialog appears. The dialog allows setting the origin, angle, and cell size of the 1D grid.
Related Topics
| [hide] SMS – Surface-water Modeling System | ||
|---|---|---|
| Modules: | 1D Grid • Cartesian Grid • Curvilinear Grid • GIS • Map • Mesh • Particle • Quadtree • Raster • Scatter • UGrid |  |
| General Models: | 3D Structure • FVCOM • Generic • PTM | |
| Coastal Models: | ADCIRC • BOUSS-2D • CGWAVE • CMS-Flow • CMS-Wave • GenCade • STWAVE • WAM | |
| Riverine/Estuarine Models: | AdH • HEC-RAS • HYDRO AS-2D • RMA2 • RMA4 • SRH-2D • TUFLOW • TUFLOW FV | |
| Aquaveo • SMS Tutorials • SMS Workflows | ||
