GMS:MF6 CSUB Package: Difference between revisions

From XMS Wiki
Jump to navigationJump to search
No edit summary
No edit summary
 
(4 intermediate revisions by 2 users not shown)
Line 1: Line 1:
__NOINDEX__
{{Version GMS 10.6}}
{{MODFLOW 6 Beta}}
{{MODFLOW 6 Beta}}
{{MODFLOW 6 Links}}
{{MODFLOW 6 Links}}
Line 52: Line 50:
** ''PACKAGEDATA'' – This deals with the PACKAGEDATA block.
*** '''Add Rows...''' – This button brings up a ''Rows to Add'' dialog, where a number can be specified to the right of ''Number of rows to add at bottom''. This will help populate the spreadsheet.  
*** '''Filter on Selected Cells''' – ???
*** '''Filter on Selected Cells''' – If UGrid cells are selected when the dialog is opened, this button causes the table to only display those rows that correspond to the selected cells.
*** ''ICSUBNO'' – This column represents the ICSUBNO integer values, which define the CSUB interbed numbers for the PACKAGEDATA on each line. The CSUBNO values must be greater than zero and less than or equal to the separately defined NINTERBEDS value. The program will terminate with an error if a CSUB cell doesn't have information specified, or if information for a CSUB interbed number is specified more than once.
*** ''CELLID'' – This will display differently in the spreadsheet based on what type of grid is used for the simulation, specifically which type of DIS* input file is used in the model. The CELLID is the cell identifier, and the type of DIS* file used will change what will be determined to be the CELLID.
Line 79: Line 77:
*** '''Define Period''' – This button will allow a period to be defined. This will be active when no period has yet been defined, and it may gray out once one has been created.
*** '''Delete Period''' – This button will delete the selected period. A dialog warning will come up first asking the user to confirm their decision to delete the period.
*** '''Add Rows''' – This button will bring up an ''Add Stresses'' dialog. The following options can be used to help in adding the stresses:
*** '''Add Rows''' &ndash; This button will bring up an [[#Add_Stresses_Dialog|''Add Stresses'']] dialog. <!--The following options can be used to help in adding the stresses:
**** Columns and Values &ndash; Numeric updowns and textboxes can be used to enter the values for their relevant columns for all the new stresses. These may include columns that are not actually present in the spreadsheet.
**** ''Number of rows to add'' &ndash; A numeric updown can be used to enter the number of rows that will be added to the spreadsheet.
**** ''Add to'' &ndash; There are two different options, only one of which can be selected at a time.
***** ''All defined periods'' &ndash; These stresses will be added to all the periods that have been defined.
***** ''Only this period'' &ndash; These stresses will be added only to the currently selected period.
***** ''Only this period'' &ndash; These stresses will be added only to the currently selected period.-->
*** '''Delete Rows''' &ndash; This button will delete all of the stresses. A dialog warning will come up first asking the user to confirm their decision to delete the stresses. The dialog will also give them the option to either '''Delete From All Periods''' or '''Delete From Just This Period'''.
*** '''Plot All Periods''' &ndash; This will allow the user to plot all the periods that have been defined.
Line 113: Line 111:
{{Navbox GMS}}
{{Navbox GMS}}
[[Category:MODFLOW 6|CSUB]]
[[Category:MODFLOW 6|CSUB]]
[[Category: MODFLOW 6 Dialogs|csub]]

Latest revision as of 20:38, 15 March 2022

MODFLOW 6
Models & Tools
GWF Model
GWT Model
Cell Properties Dialog
Zone File
Packages
Flow: GNC, HFB, NPF
GWF: BUY, CHD, CSUB,
DRN, EVT, GHB,
LAK, MAW, MVR,
OBS, RCH,RIV,
SFR, STO, UZF,
WEL
GWT: ADV, CNC, DSP
FMI, IC, IST, LKT,
MDT, MST, MVT,
MWT, OBS, SFT,
SRC,SSM, UZT
Other DIS, DISU, DISV,
IMS, OC, TDIS,
PEST

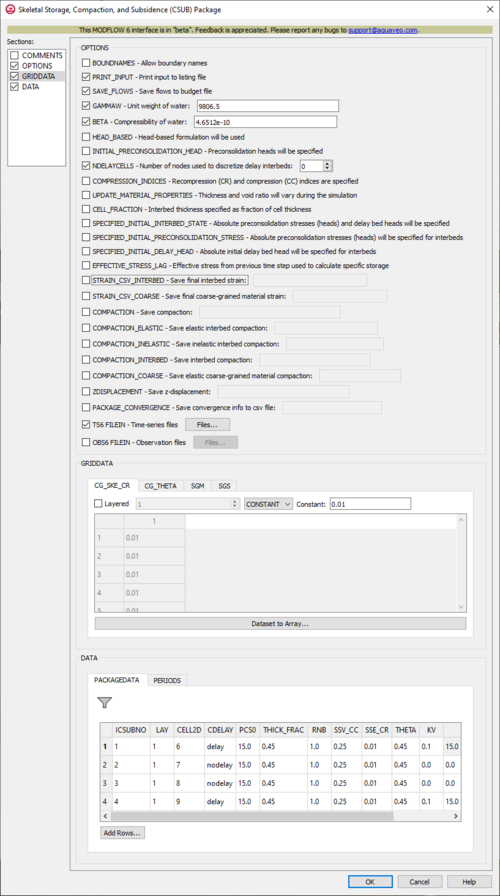
The Skeletal Storage, Compaction, and Subsidence (CSUB) Package dialog

The Skeletal Storage, Compaction, and Subsidence (CSUB) Package dialog is accessed by double-clicking on the CSUB package under a MODFLOW 6 simulation in the Project Explorer. It contains the following sections and options:

  • Sections list – A list of sections that can be turned on or off:
    • COMMENTS – Turn on to make the COMMENTS section visible.
    • OPTIONS – Turn on to make the OPTIONS section visible.
    • GRIDDATA – Turn on to make the GRIDDATA section visible.
    • DATA – Turn on to make the DATA section visible. This section is on by default.
  • COMMENTS section – Enter general alphanumeric comments. Comments entered here get written at the top of the file, preceded by a '#' symbol.
  • OPTIONS section – Options and settings:
    • BOUNDNAMES – This allows for boundary names to be provided with the list of CSUB cells.
    • PRINT_INPUT – This indicates that the list of CSUB input will be printed to the listing file immediately after it is read.
    • SAVE_FLOWS – This indicates that cell-by-cell flow terms will be saved to a budget file (specified in Output Control with "BUDGET SAVE FILE").
    • GAMMAW – This allows the unit weight of water to be set. For freshwater, GAMMAW is 9806.65 Newtons/cubic meters (SI) or 62.48 lb/cubic foot (English units). The default value for GAMMAW is 9806.65 Newtons/cubic meters.
    • BETA – This allows for the compressibility of water to be set. Typical values of BETA are 4.6512e-10 1/Pa (SI) or 2.2270e-8 lb/square foot (English units). The default value for BETA is 4.6512e-10 1/Pa.
    • HEAD_BASED – This indicates that head-based formulation will be used to simulate coarse-grained aquifer materials and no-delay and delay interbeds. If specified, then INITIAL_PRECONSOLIDATION_HEAD will be as well.
    • INITIAL_PRECONSOLIDATION_HEAD – This indicates that preconsolidation heads will be specified for no-delay and delay interbeds in the PACKAGEDATA block. When SPECIFIED_INTIAL_INTERBED_STATE is specified, these will be absolute values. When it isn't, these will be relative to steady-state or initial heads.
    • NDELAYCELLS – This allows a number to be set for the number of nodes used to discretize delay interbeds. When this isn't set, a default value of 19 is assigned.
    • COMPRESSION_INDICES – This indicates that recompression (CR) and compression (CC) indices will be specified, replacing the elastic specific storage (SSE) and inelastic specific storage (SSV) coefficients. When this isn't set, the SSE and SSV coefficients will have to be specified.
    • UPDATE_MATERIAL_PROPERTIES – This indicates that the thickness and void ratio of coarse-grained and interbed sediments (delay and no-delay) will vary during the simulation. When this isn't set, the ratio will not vary during the simulation.
    • CELL_FRACTION – This indicates that interbed thickness will be specified as a fraction of cell thickness. When this isn't set, the interbed thickness will have to be individually specified.
    • SPECIFIED_INITIAL_INTERBED_STATE – This indicates that absolute preconsolidation stresses (heads) and delay bed heads will be specified for the interbeds that are defined in the PACKAGEDATA block. This is equivalent to specifying both SPECIFIED_INITIAL_PRECONSOLDIATION_STRESS and SPECIFIED_INITIAL_DELAY_HEAD. If this option is not set, then these values will be relative to simulated values (if the first stress period is steady-state) or initial stresses and GWF heads (if the first stress period is transient).
    • SPECIFIED_INITIAL_PRECONSOLIDATION_STRESS – This indicates that absolute preconsolidation stresses (heads) will be specified for interbeds that are defined in the PACKAGEDATA block. If neither this option nor SPECIFIED_INITIAL_INTERBED_STATE are set, then these values will be relative to simulated values (if the first stress period is steady-state) or initial stresses (heads) (if the first stress period is transient).
    • SPECIFIED_INITIAL_DELAY_HEAD – This indicates that absolute initial delay bed head will be specified for interbeds that are defined in the PACKAGEDATA block. If neither this option nor SPECIFIED_INITIAL_INTERBED_STATE are set, then these values will be relative to simulated values (if the first stress period is steady-state) or initial GWF heads (if the first stress period is transient).
    • EFFECTIVE_STRESS_LAG – This indicates that effective stress from the previous time step will be used to calculate specific storage values. This is helpful with convergence in models with thin cells and water table elevations close to land surface, is identical to the SUBWT package approach for MODFLOW-2005, and will only be used when the effective-stress formulation is being used. When this isn't set, the default is to use current effective stress values to calculate specific storage values.
    • STRAIN_CSV_INTERBED – This allows the final interbed strain output to be saved to a specified file.
    • STRAIN_CSV_COARSE – This allows the final coarse-grained material strain output to be saved to a specified file.
    • COMPACTION – This allows the compaction to be saved to a specified file.
    • COMPACTION_ELASTIC – This allows the elastic interbed compaction to be saved to a specified binary file.
    • COMPACTION_INELASTIC – This allows the inelastic interbed compaction to be saved to a specified binary file.
    • COMPACTION_INTERBED – This allows the interbed compaction to be saved to a specified binary file.
    • COMPACTION_COARSE – This allows the elastic coarse-grained material compaction to be saved to a specified binary file.
    • ZDISPLACEMENT – This allows the z-displacement to be saved to a specified binary file.
    • PACKAGE_CONVERGENCE – This allows the package convergence info to be saved to a comma-separated values (CSV) file.
    • TS6 FILEIN – This allows time series files to be used as input to assign time-varying values. Specifying this option will allow a Files... button to its right to be clicked. Doing so will bring up a Files dialog.
    • OBS6 FILEIN – This allows observations files to be used as input. Specifying this option will allow a Files... button to its right to be clicked. Doing so will bring up a Files dialog.
  • GRIDDATA section – This deals with the GRIDDATA block.
    • Dataset to Array... – This button brings up a Select Dataset dialog, where a single dataset can be selected for use in the GRIDDATA section. This will populate its spreadsheet. This option is grayed out if Define is not turned on. The CG_SKE_CR and CG_THETA tabs do not have the Define option visible, so the button is always available for them.
    • Define – This allows data within the GRIDDATA section to be defined. When this is inactive, all of the options within a given tab are grayed out. This option is unavailable in the CG_SKE_CR and CG_THETA tabs, so they are automatically defined.
    • Layered – When this is active, a numeric updown for the layers will become available.
    • Drop-down and Constant/Factor – The drop-down in the GRIDDATA section has two options. The option selected will change the nature of the textbox to its right.
      • "CONSTANT" – This will change the textbox to the right to be representative of "Constant". If this is selected, the spreadsheet in the GRIDDATA section will be grayed out.
      • "ARRAY" – This will change the textbox to the right to be representative of "Factor". If this is selected, the spreadsheet in the GRIDDATA section will not be grayed out, and its cells will be editable.
    • CG_SKE_CR – The CG_SKE_CR tab represents either the initial elastic coarse-grained material specific storage of recompression index. If COMPRESSION_INDICES was set, then this will represent the recompression index. Otherwise this will represent the elastic specific storage. If HEAD_BASED was set, then specified/calculated elastic coarse-grained material specific storage values will not be adjusted from the initial values.
    • CG_THETA – The CG_THETA tab represents the initial porosity of coarse-grained materials.
    • SGM – The SGM tab represents the specific gravity of moist or unsaturated sediments. When this isn't specified, a default value of 1.7 will be used.
    • SGS – The SGS tab represents the specific gravity of saturated sediments. When this isn't specified, a default value of 2.0 will be used.
  • DATA section – Contains the following tabs:
    • PACKAGEDATA – This deals with the PACKAGEDATA block.
      • Add Rows... – This button brings up a Rows to Add dialog, where a number can be specified to the right of Number of rows to add at bottom. This will help populate the spreadsheet.
      • Filter on Selected Cells – If UGrid cells are selected when the dialog is opened, this button causes the table to only display those rows that correspond to the selected cells.
      • ICSUBNO – This column represents the ICSUBNO integer values, which define the CSUB interbed numbers for the PACKAGEDATA on each line. The CSUBNO values must be greater than zero and less than or equal to the separately defined NINTERBEDS value. The program will terminate with an error if a CSUB cell doesn't have information specified, or if information for a CSUB interbed number is specified more than once.
      • CELLID – This will display differently in the spreadsheet based on what type of grid is used for the simulation, specifically which type of DIS* input file is used in the model. The CELLID is the cell identifier, and the type of DIS* file used will change what will be determined to be the CELLID.
        • For a structured grid that uses a DIS input file, these columns will be:
          • LAY – This column represents the layers of the cells.
          • ROW – This column represents the rows of the cells.
          • COL – This column represents the columns of the cells.
        • For a grid that uses a DISV input file, these columns will be:
          • LAY – This column represents the layers of the cells.
          • CELL2D – This column represents the CELL2D numbers of the cells.
        • If the model uses a DISU (unstructured discretization) file, the column will be:
          • CELLID – This column represents the node numbers of the cells.
      • CDELAY – This column represents the CDELAY character strings, which define the subsidence package delay type for the interbeds. Possible CDELAY strings include:
        • "NODELAY" – Character keyword that indicates delay will not be simulated in the interbed.
        • "DELAY" – Character keyword that indicates delay will be simulated in the interbed.
      • PCS0 – This column represents the PCS0 values, which are the initial offsets from the calculated initial effective/preconsolidation stress in the interbeds, in the units of the height of a column of water. If SPECIFIED_INITIAL_INTERBED_STATE or SPECIFIED_INITIAL_PRECONSOLIDATION_STRESS have been specified, then these are the initial preconsolidation stresses. If HEAD_BASED is set, then these are the initial offsets from the calculated initial head/preconsolidation heads in the CSUB interbeds, and initial preconsolidation stresses are calculated from the calculated initial effective/geostatic stresses.
      • THICK_FRAC – This column represents the THICK_FRAC values, which are the interbed thickness/cell fractions of the interbeds. If CELL_FRACTION has been specified, interbed thickness is specified as a fraction of the cell thickness.
      • RNB – This column represents the RNB values, which are the interbed material factor equivalent numbers of interbeds in the interbed systems represented by the interbeds. If CDELAY has been set to "DELAY", these values must be greater than or equal to 1. If not, then these values can be any value.
      • SSV_CC – This column represents the SSV_CC values, which are the initial inelastic specific storages or compression indexes of the interbeds. If COMPRESSION_INDICES is set, then the compression index is specified. If HEAD_BASED is set, then specified/calculated interbed inelastic specific storage values are not adjusted from the initial values.
      • SSE_CR – This column represents the SSE_CR values, which are the initial elastic coarse-grained material specific storages or recompression indexes of the interbeds. If COMPRESSION_INDICES is set, then the recompression index is specified. If HEAD_BASED is set, then the specified/calculated interbed elastic specific storage values are not adjusted from the initial values.
      • THETA – This column represents the THETA values, which are the initial porosities of the interbeds.
      • KV – This column represents the KV values, which are the vertical hydraulic conductivities of the delay interbeds. If CDELAY has been set to "DELAY", these must be greater than 0. If not, then these values can be any value.
      • H0 – This column represents the H0 values, which are the initial offsets from the heads in cell CELLIDs or the initial heads in the delay interbeds. If SPECIFIED_INITIAL_INTERBED_STATE or SPECIFIED_INITIAL_DELAY_HEAD are set, then these are the initial heads in the delay beds. If CDELAY has been set to "NODELAY", then these can be any value.
    • PERIODS – This deals with the PERIODS block.
      • Period – A numeric updown can be used to enter which period is being examined in the spreadsheet.
      • Define Period – This button will allow a period to be defined. This will be active when no period has yet been defined, and it may gray out once one has been created.
      • Delete Period – This button will delete the selected period. A dialog warning will come up first asking the user to confirm their decision to delete the period.
      • Add Rows – This button will bring up an Add Stresses dialog.
      • Delete Rows – This button will delete all of the stresses. A dialog warning will come up first asking the user to confirm their decision to delete the stresses. The dialog will also give them the option to either Delete From All Periods or Delete From Just This Period.
      • Plot All Periods – This will allow the user to plot all the periods that have been defined.
      • Open Time Series – This will allow the user to open a time series file.
      • The columns listed in the spreadsheet will differ, based on which type of DIS* input file is used in the model.
        • If the model uses a DIS input file, these columns will be:
          • LAY – This column represents the layers of the cells.
          • ROW – This column represents the rows of the cells.
          • COL – This column represents the columns of the cells.
          • SIG0 – This column represents the stress offsets for the cells. SIG0 is added to the calculated geostatic stresses for the cells. SIG0 will only be specified if a separately defined MAXSIG0 value is set to be greater than 0. If time series files are used as input, entering a time series name instead of a numeric value can allow for values to be obtained from a time series.
        • If the model uses a DISV input file, these columns will be:
          • LAY – This column represents the layers of the cells.
          • ROW – This column represents the rows of the cells.
          • COL – This column represents the columns of the cells.
        • If the model uses a DISU input file, these columns will be:
          • LAY – This column represents the layers of the cells.
          • ROW – This column represents the rows of the cells.

Time Series Files Dialog

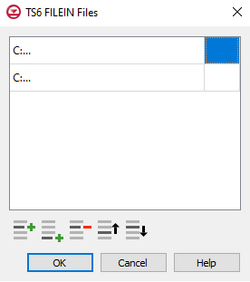
The Time Series Files dialog

The Time Series Files dialog is accessed by clicking Time Series Files... in the Options section of many of the package dialogs. It is used to define an array of one or more time series files. It contains the following sections and buttons:

  • At the top is an unlabeled section listing all of the time series files, one per line.
    • Double-click on the first field to see the full file path and name.
    • Click Edit... to open the time series file.
  • Insert Row Row-insert.svg – Click to insert a row above the currently-selected row.
  • Add Row Row-add.svg – Click to add a row below the currently-selected row.
  • Delete Row Row-delete.svg – Click to delete the selected row.
  • Move Up Row-up.svg – Move the selected row up.
  • Move Down Row-down.svg – Move the selected row down.


Observation Files Dialog

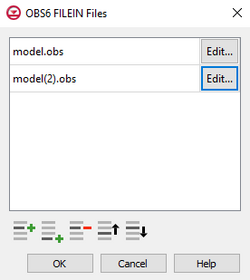
The Observation Files dialog

The Observation Files dialog is accessed by clicking Observations... in the Options section of many of the package dialogs. It is used to define an array of one or more observation files. It contains the following sections and buttons:

  • At the top is an unlabeled section listing all of the observation files, one per line.
  • Insert Row Row-insert.svg – Click to insert a row above the currently-selected row.
  • Add Row Row-add.svg – Click to add a row below the currently-selected row.
  • Delete Row Row-delete.svg – Click to delete the selected row.
  • Move Up Row-up.svg – Move the selected row up.
  • Move Down Row-down.svg – Move the selected row down.


Add Stresses Dialog

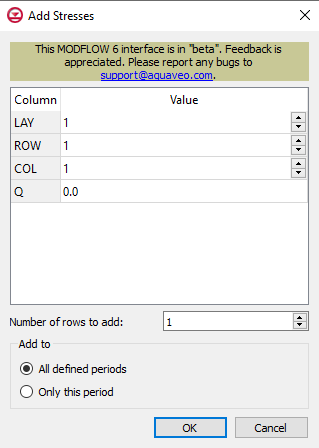
The Add Stresses dialog for the HFB package

The Add Stresses dialog is accessed by clicking Add Rows Row-add.svg in the Periods section of several MODFLOW 6 package dialogs. It contains the following sections and options:

  • Table – Table Options differ according to each package. See chart below.
  • Number of rows to add – Use the Increment Up and Down Increment up and down arrows.png buttons to select the desired number of rows to add.
  • Add to section – Radio buttons with the following options:
    • All defined periods – Select to add the rows to all defined periods.
    • Only this period – Select to add the rows to only this period.
Package Add Stresses Dialog Table Options
CHD
CHD Options
  • LAY – Used to specify certain layers.
  • ROW – Used to specify certain rows.
  • COL – Used to specify certain columns.
  • HEAD – Represents the head at the boundary.
DRN
DRN Options
  • LAY – Used to specify which layer is being applied.
  • ROW – Used to specify which row is being applied.
  • COL – Used to specify which column is being applied.
  • ELEV – Represents the elevation of the drain.
  • COND – Represents the hydraulic conductance between the aquifer and the drain.
GHB
GHB Options
  • LAY – Used to specify certain layers of the module.
  • ROW – Used to specify which row is being applied.
  • COL – Used to specify which column is being applied.
  • BHEAD – Represents the boundary head.
  • COND – Represents the hydraulic conductance between the aquifer cell and the boundary.
HFB
HFB Options
  • LAY1 – Represents the first of two chosen layers.
  • ROW1 – Represents the first of two chosen rows.
  • COL1 – Represents the first of two chosen columns.
  • LAY2 – Represents the second of two chosen layers.
  • ROW2 – Represents the second of two chosen rows.
  • COL2 – Represents the second of two chosen columns.
  • HYDCHR – The hydraulic characteristic of the horizontal-flow barrier. When this variable is negative it multiplied by the conductance of two cells.
LAK
LAK Options
  • LAKENO_OUTLETNO – A value that defines the reach number associated with the specified PERIOD data.
  • SETTING – Information that is linked to keywords and values.
  • VALUE1 – Value to be entered in relation to the specific project.
  • VALUE2 – Value to be entered in relation to the specific project.
MAW
MAW Options
  • WELLNO – A value that defines the reach number associated with the specified PERIOD data.
  • MAWSETTING – Information that is linked to keywords and values.
  • VALUE1 – Value to be entered in relation to the specific project.
  • VALUE2 – Value to be entered in relation to the specific project.
  • VALUE3 – Value to be entered in relation to the specific project.
RIV
RIV Options
  • LAY – Used to specify which row is being applied.
  • ROW – Used to specify which row is being applied.
  • COL – Used to specify which column is being applied.
  • STAGE – Variable that represents the head in the river.
  • COND – Variable that represents the riverbed hydraulic conductance.
  • RBOT – Variable that represents the elevation of the bottom of the riverbed.
SFR
SFR Options
  • RNO – A value that defines the reach number associated with the specified PERIOD data.
  • SFRSETTING – Information that is linked to keywords and values.
  • VALUE1 – Value to be entered in relation to the specific project.
  • VALUE2 – Value to be entered in relation to the specific project.
UZF
UZF Options
  • IUZNO – An integer value that defines the UZF cell number associated with the specified PERIOD data on the line.
  • FINF – A value that defines the applied infiltration rate of the UZF cell.
  • PET – A value that defines the ET rate of the UZF cell and specified GWF cell.
  • EXDP – A value that defines the ET extinction depth of the UZF cell.
  • EXTWC – A value that defines the amount of water removed from the UZF cell through evapotranspiration.
  • HA – A value that defines the amount of potential air that enters the UZF cell.
  • HROOT – A value that defines the root potential of the UZF cell.
  • ROOTACT – A value that defines how much root activity exists in the UZF cell.
WEL
WEL Options
  • LAY – Represents which layer within the grid to which the chosen well will be assigned.
  • ROW – Represents which row within the grid to which the chosen well will be assigned.
  • COL – Represents which column within the grid to which the chosen well will be assigned.
  • Q – Represents the volumetric well rate at which the recharge (positive value) and discharge (negative value) of the well will be.


Related Topics