GMS:MF6 DISV Package: Difference between revisions

From XMS Wiki
Jump to navigationJump to search
No edit summary
No edit summary
Line 2: Line 2:
{{MODFLOW 6 Links}}
{{MODFLOW 6 Links}}
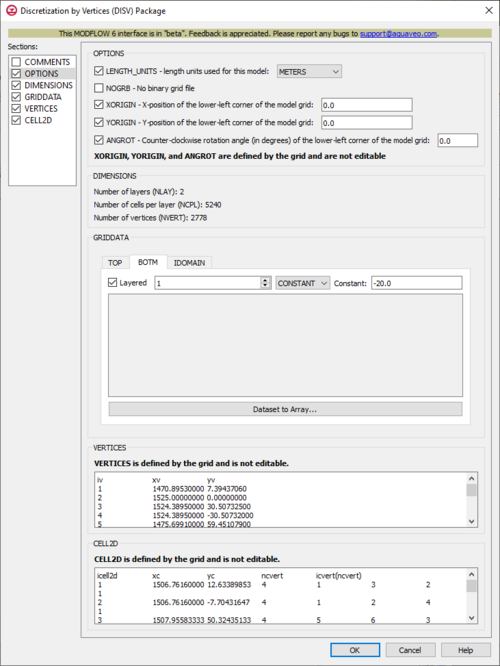
[[File:MF6-DISV package.png|thumb|500px|right|The ''Discretization by Vertices (DISV) Package'' dialog]]
[[File:MF6-DISV package.png|thumb|500px|right|The ''Discretization by Vertices (DISV) Package'' dialog]]
The ''Discretization by Vertices (DISV) Package'' dialog is accessed by double-clicking on the DISV package under a MODFLOW 6 simulation in the Project Explorer. It contains the following sections and options:
The ''Discretization by Vertices (DISV) Package'' dialog is accessed by double-clicking on the DISV package under a MODFLOW 6 simulation in the Project Explorer. The package works with any UGrid with an 3D constraint as long as the grid is stacked. It contains the following sections and options:
*''Sections'' list – A list of sections that can be turned on or off:
**''COMMENTS'' – Turn on to make the ''COMMENTS'' section visible.

Revision as of 22:20, 30 October 2024

MODFLOW 6
Models & Tools
GWF Model
GWT Model
Cell Properties Dialog
Zone File
Packages
Flow: GNC, HFB, NPF
GWF: BUY, CHD, CSUB,
DRN, EVT, GHB,
LAK, MAW, MVR,
OBS, RCH,RIV,
SFR, STO, UZF,
WEL
GWT: ADV, CNC, DSP
FMI, IC, IST, LKT,
MDT, MST, MVT,
MWT, OBS, SFT,
SRC,SSM, UZT
Other DIS, DISU, DISV,
IMS, OC, TDIS,
PEST

The Discretization by Vertices (DISV) Package dialog

The Discretization by Vertices (DISV) Package dialog is accessed by double-clicking on the DISV package under a MODFLOW 6 simulation in the Project Explorer. The package works with any UGrid with an 3D constraint as long as the grid is stacked. It contains the following sections and options:

  • Sections list – A list of sections that can be turned on or off:
    • COMMENTS – Turn on to make the COMMENTS section visible.
    • OPTIONS – Turn on to make the OPTIONS section visible.
    • DIMENSIONS – Turn on to make the DIMENSIONS section visible.
    • GRIDDATA – Turn on to make the GRIDDATA section visible.
    • VERTICES – Turn on to make the VERTICES section visible.
    • CELL2D – Turn on to make the CELL2D section visible.
  • COMMENTS section – Enter general alphanumeric comments. Comments entered here get written at the top of the file, preceded by a '#' symbol.
  • OPTIONS section – Options and settings:
    • LENGTH_UNITS – This allows for the length units for the model to be specified. Turning it on will activate a drop-down, with the following options:
      • "FEET"
      • "METERS"
      • "CENTIMETERS"
      • "UNKNOWN" – The default value if no other one is specified.
    • NOGRB – This indicates to deactivate writing of the binary grid file, so there will not be one.
    • XORIGIN – This indicates the X-position of the origin used for the model grid vertices (this value is defined by the grid and is not editable). Turning it on will activate a textbox where its value (for the X-position of the lower-left corner of the model grid) will be displayed. This value should be provided in a real-world coordinate system. This value does not affect the model simulation, but is written to the binary grid file so that postprocessors will be able to locate the grid in space. If this value hasn't been set, a default value of 0.0 will be used.
    • YORIGIN – This indicates the Y-position of the origin used for the model grid vertices (this value is defined by the grid and is not editable). Turning it on will activate a textbox where its value (for the Y-position of the lower-left corner of the model grid) will be displayed. This value should be provided in a real-world coordinate system. This value does not affect the model simulation, but is written to the binary grid file so that postprocessors will be able to locate the grid in space. If this value hasn't been set, a default value of 0.0 will be used.
    • ANGROT – This indicates the counter-clockwise rotation angle (in degrees) of the model grid coordinate system relative to a real-world coordinate system (this value is defined by the grid and is not editable). Turning it on will activate a textbox where its value (for the counter-clockwise rotation angle (in degrees) of the lower-left corner of the model grid) will be displayed. This value does not affect the model simulation, but is written to the binary grid file so that postprocessors will be able to locate the grid in space. If this value hasn't been set, a default value of 0.0 will be used.
  • DIMENSIONS section – This deals with the DIMENSIONS block.
    • Number of layers (NLAY) – This displays the number of layers in the model grid.
    • Number of cells per layer (NCPL) – This displays the number of cells per layer. This is a constant value for the grid and it applies to all layers.
    • Number of vertices (NVERT) – This displays the total number of (X, Y) vertex pairs used to characterize the horizontal configuration of the model grid.
  • GRIDDATA section – This deals with the GRIDDATA block.
    • Define – This allows data within the GRIDDATA section to be defined. When this is inactive, all of the options within a given tab are grayed out. This option is only specifically available in the IDOMAIN tab. In the BOTM tab, it is not visible but automatically activated so all the options are activated. In the TOP tab, it is not visible but automatically activated, but there are less options to work with.
    • Dataset to Array... – This button brings up a Select Dataset dialog, where a single dataset can be selected for use in the GRIDDATA section. This will populate its spreadsheet. This option is grayed out if Define is not turned on. This only appears in the IDOMAIN and BOTM tabs.
    • Layered – When this is active, a numeric updown for the layers will become available. This only appears in the IDOMAIN and BOTM tabs.
    • Drop-down and Constant/Factor – The drop-down in the GRIDDATA section has two options. The option selected will change the nature of the textbox to its right.
      • "CONSTANT" – This will change the textbox to the right to be representative of "Constant". If this is selected, the spreadsheet in the GRIDDATA section will be grayed out.
      • "ARRAY" – This will change the textbox to the right to be representative of "Factor". If this is selected, the spreadsheet in the GRIDDATA section will not be grayed out, and its cells will be editable.
    • TOP – The TOP tab represents the top elevations for each cell in the top model layer.
    • BOTM – The BOTM tab represents the bottom elevations for each cell.
    • IDOMAIN – The IDOMAIN tab represents the existence status of cells. This is optional to deal with. If it isn't specified, then all model cells exist within the solution. If the value for a cell is 0, the cell does not exist in the simulation. Input and output values will still be read and written for it, but internal to the program, it is excluded from the solution. If the value for a cell is 1, the cell exists in the simulation. If the value for a cell is -1, the cell does not exist in the simulation, however in this case the first existing cell above it will be connected to the first existing cell below it. This type of cell is referred to as a “vertical pass through” cell.
  • VERTICES section – This deals with the VERTICES block. This section is defined by the grid and is not editable.
    • iv – This column represents the iv values, which are the vertex numbers. The records in this block must be listed in consecutive order from 1 to the value defined by Number of vertices (NVERT) in the DIMENSIONS section.
    • xv – This column represents the xv values, which are the X-coordinates for the vertices.
    • yv – This column represents the yv values, which are the Y-coordinates for the vertices.
  • CELL2D section – This deals with the CELL2D block. This section is defined by the grid and is not editable.
    • icell2d – This column represents the icell2d values, which are the CELL2D numbers. The records in the CELL2D block must be listed in consecutive order from the first to the last.
    • xc – This column represents the xc values, which are the X-coordinates for the cell centers.
    • yc – This column represents the yc values, which are the Y-coordinates for the cell centers.
    • ncvert – This column represents the ncvert values, which are the numbers of vertices required to define the cells. Each cell may have a different number of vertices.
    • icvert(ncvert) – These columns represent the icvert values, which are arrays of integer values containing vertex numbers (from the VERTICES section) used to define the cells. Vertices will be listed in clockwise order. Cells that are connected will share vertices.


Related Topics